Brother International XL 5130 Users Manual - English - Page 16
Changing the Presser Foot, Cambio del prensatelas
 |
View all Brother International XL 5130 manuals
Add to My Manuals
Save this manual to your list of manuals |
Page 16 highlights
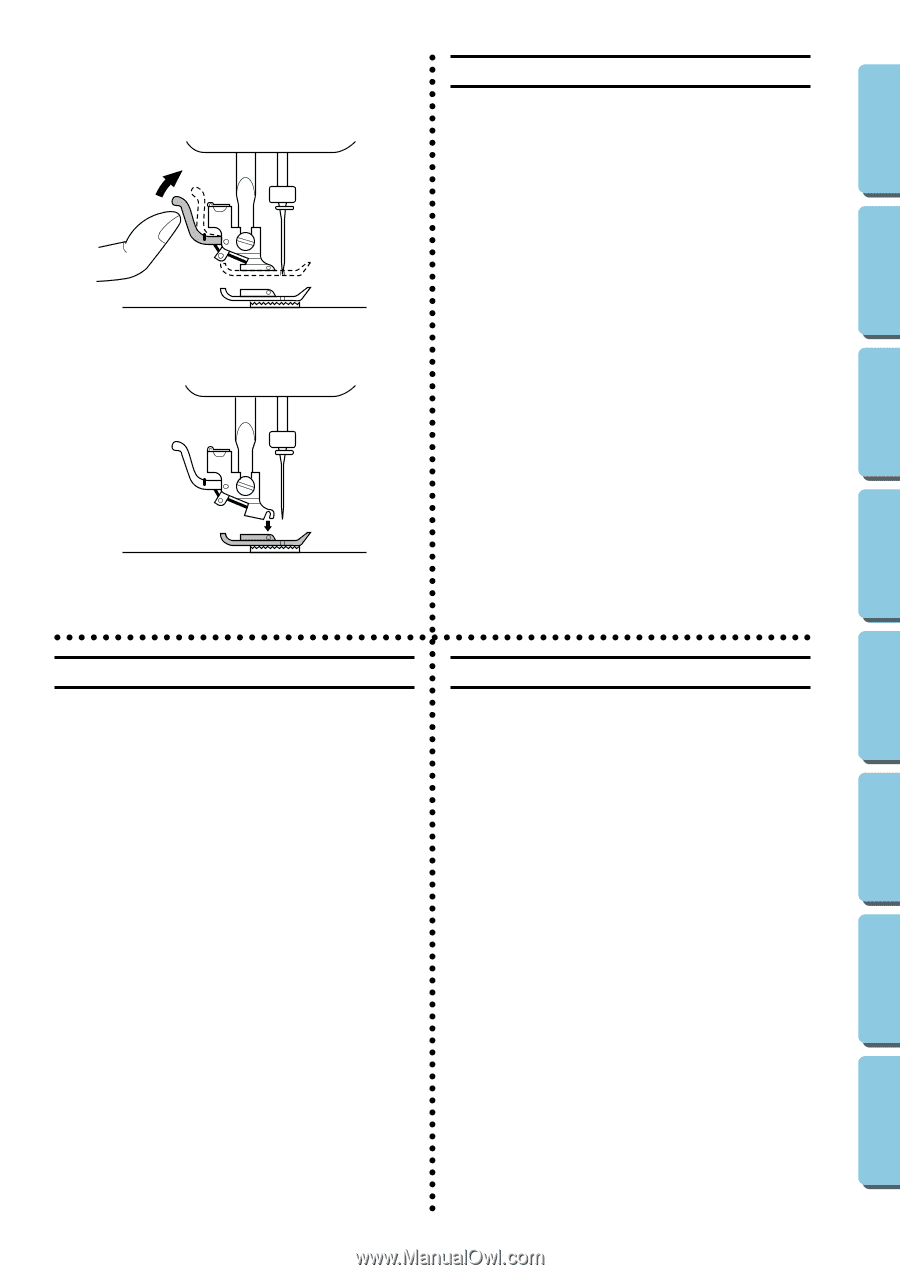
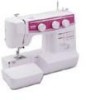
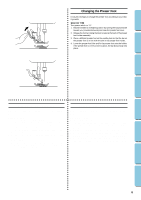
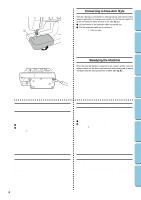
CONTENTS KNOWING YOUR SEWING MACHINE STRAIGHT AND ZIGZAG STITCHING BUILT-IN STITCHES Changing the Presser Foot It may be necessary to change the presser foot according to your sewing needs. SNAP-ON TYPE Turn power switch to "O". 1. Raise the needle to its highest position by turning the balance wheel toward you (counterclockwise) and raise the presser foot lever. 2. Release the foot by raising the lever located at the back of the presser foot holder assembly. 3. Place a different presser foot on the needle plate so that the bar on the presser foot is in line with the slot in the presser foot holder. 4. Lower the presser foot lifter and fix the presser foot onto the holder. If the presser foot is in the correct location, the bar should snap into place. BUTTONHOLE AND BUTTON SEWING USING ATTACHMENTS AND APPLICATIONS Cambio del prensatelas Changement de pied-de-biche Según sus necesidades de costura, puede ser necesario cambiar el prensatelas. Modelo a presión Desenchufar la máquina, interruptor principale a "O". 1. Levante la aguja a su posición más alta, girando la ruedecilla hacia usted (en el sentido contrario al de las manecillas de un reloj) y levante la palanca del prensatelas. 2. Suelte el prensatelas levantando la palanca que hay en la parte trasera del soporte. 3. Coloque otro prensatelas en la placa de agujas de tal forma que la barra del prensatelas quede alineada con la ranura del soporte del prensatelas. 4. Baje la palanca del prensatelas y fije el prensatelas en el soporte. Si el prensatelas está bien colocado, la barra debe engancharse en su lugar correspondiente. En fonction des besoins, il peut s'avérer nécessaire de changer le pied-debiche. MODELE A CLIQUET Mettre l'interrupteur principal sur "O". 1. Remonter complètement l'aiguille en tournant le volant vers soi (dans le sens opposé aux aiguilles d'une montre) et remonter le levier du piedde-biche. 2. Libérer le pied en levant le levier situé à l'arrière du support. 3. Placer un pied différent sur la plaque à aiguille de sorte que la tige du pied-de-biche s'aligne avec la fente située dans l'axe du pied-de-biche. 4. Abaisser le levier du pied-de-biche et fixer le pied sur l'axe. Si le piedde-biche est correctement installé, la tige devrait se mettre en place avec un déclic. 8 MAINTENANCE INDEX
-
 1
1 -
2
-
3
-
4
-
5
-
6
-
7
-
8
-
9
-
10
-
 11
11 -
 12
12 -
 13
13 -
 14
14 -
 15
15 -
 16
16 -
 17
17 -
 18
18 -
 19
19 -
 20
20 -
 21
21 -
22
-
23
-
24
-
25
-
26
-
27
-
28
-
29
-
30
-
31
-
32
-
33
-
34
-
35
-
36
-
37
-
38
-
39
-
40
-
41
-
42
-
43
-
44
-
45
-
46
-
47
-
48
-
49
-
50
-
51
-
52
-
53
-
54
-
55
-
56
-
57
-
58
-
59
-
60
-
61
-
62
-
63
-
64
-
65
-
66
-
67
-
68
-
69
-
70
-
71
-
72
-
73
-
74
-
75
-
76
-
77
 |
 |