Brother International XL 5130 Users Manual - English - Page 63
Monogramming and Embroidering, Monogrammes et broderies
 |
View all Brother International XL 5130 manuals
Add to My Manuals
Save this manual to your list of manuals |
Page 63 highlights
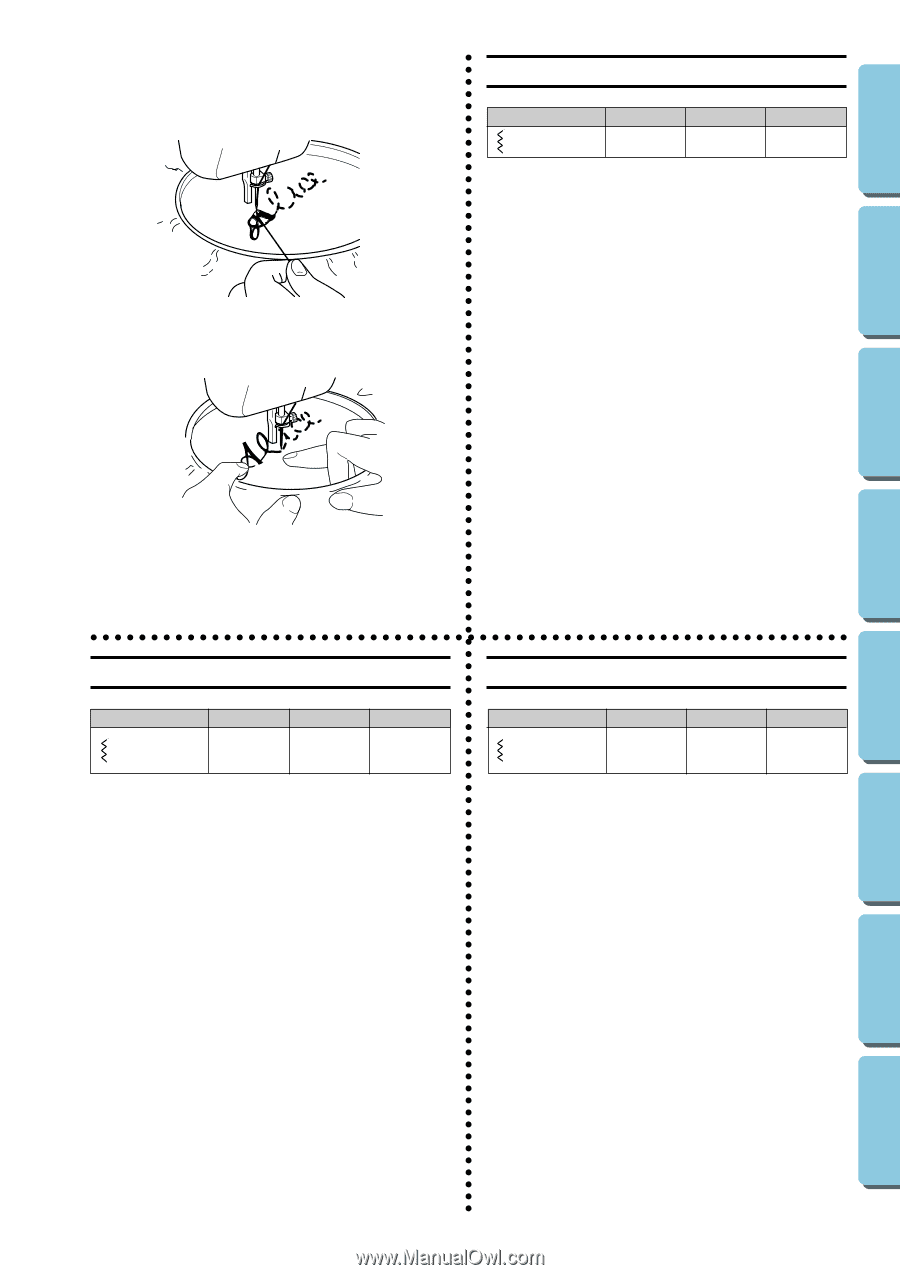
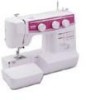
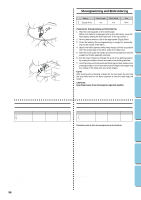
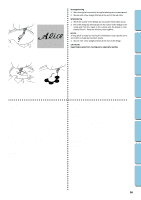
CONTENTS KNOWING YOUR SEWING MACHINE STRAIGHT AND ZIGZAG STITCHING BUILT-IN STITCHES Monogramming and Embroidering Pattern (Zigzag Stitch) Stitch Length Any Stitch Width Any Foot None Preparing for Monogramming and Embroidering 1. Place the darning plate on the needle plate. (When the machine is equipped with a drop feed lever, lower the feed dogs by setting the drop feed lever to the up position.) 2. Set the pattern selection dial to the appropriate Zigzag Stitch. 3. Draw the lettering (for monogramming) or design (for embroidering) on the surface of the fabric. 4. Stretch the fabric between embroidery hoops as firmly as possible with the reverse side of the fabric under the inside hoop. 5. Place the work under the needle and lower the presser bar with the presser foot holder assembly removed. 6. Pull the lower thread up through the work at the starting position by turning the balance wheel and make a few holding stitches. 7. Hold the hoop with the thumbs and forefingers of both hands while pressing the fabric with the middle and third fingers and supporting the outside of the hoop with your small fingers. NOTE: After sewing without feeding, prepare for the next seam by returning the drop feed lever to the down position so that the feed dogs are raised. CAUTION: Keep fingers away from moving parts, especially needles. BUTTONHOLE AND BUTTON SEWING USING ATTACHMENTS AND APPLICATIONS Monogramas y bordados Monogrammes et broderies Número de puntada Largo de puntada Ancho de puntada Prensatelas (Puntada zigzag) Cualaquiera Cualaquiera Quitarlo, sin prensatelas Preparación para monogramas y bordados 1. Coloque la placa de zurcido en la placa de la aguja. (Cuando la máquina está equipada con una palanca de alimentación de bajada, baje los ganchos de alimentación colocando la palanca de alimentación de bajada en la posición hacia arriba). 2. Ponga el selector de puntadas en la puntada zigzag apropiada. 3. Dibuje las letras (para monogramas) o el diseño (para bordados) en el derecho del tejido. 4. Estire el tejido en bastidor tanto como pueda y si es posible con el revés abajo del circulo interior. 5. Coloque la tela debajo de la aguja y baje la barra del prensatelas con su soporte. 6. Girando la ruedecilla, pase el hilo inferior por el trabajo y cosa unas cuantas puntadas para asegurarlo. 7. Sujete el bastidor con el pulgar e índice de cada mano, presione el tejido con los dedos medios y anulares y sostenga los exteriores del bastidor con los meñiques. NOTA: Después de haber cosido sin la alimentación, prepárese para la siguiente costura bajando la palanca para que se levanten los alimentadores. ATENCIÓN: Mantenga los dedos alejados de las piezas móviles, especialmente de las agujas. 55 Modèle (Point zigzag) Longueur de point Largeur de point Pied-de-biche N'importe N'importe quelle longueur quelle longueur Aucun Préparation avant de faire des monogrammes ou des broderies 1. Placer la plaque à repriser sur la plaque à aiguille. (Lorsque la machine est équipée d'un levier d'abaissement des griffes d'entraînement, abaisser les griffes en relevant le levier). 2. Mettre le sélecteur de modèle sur le point zigzag adéquat. 3. Dessiner les lettres (monogrammes) ou le motif (broderies) sur l'endroit du tissu. 4. Tendre au maximum l'ouvrage sur le tambour, en maintenant l'envers du tissu dans le fond du cercle intérieur. 5. Placer l'ouvrage sous l'aiguille et abaisser la barre sans pied du piedde-biche. 6. Tirer le fil inférieur à travers l'ouvrage, au point de départ. Pour ce faire, tourner le volant vers soi et piquer quelques points de maintien. 7. Saisir le tambour des deux mains, avec le pouce et l'index, tout en appuyant sur le tissu avec le majeur et l'annulaire de chaque main. Les auriculaires serviront à tenir l'extérieur du tambour. REMARQUE: Après la couture sans entraînement, préparer la machine pour la couture suivante en rabaissant le levier des griffes d'entraînement afin de relever les griffes. PRÉCAUTION: Veiller à tenir ses doigts à l'écart des éléments mobiles et notamment des aiguilles. MAINTENANCE INDEX
-
 1
1 -
2
-
3
-
4
-
5
-
6
-
7
-
8
-
9
-
10
-
11
-
12
-
13
-
14
-
15
-
16
-
17
-
18
-
19
-
20
-
21
-
22
-
23
-
24
-
25
-
26
-
27
-
28
-
29
-
30
-
31
-
32
-
33
-
34
-
35
-
36
-
37
-
38
-
39
-
40
-
41
-
42
-
43
-
44
-
45
-
46
-
47
-
48
-
49
-
50
-
51
-
52
-
53
-
54
-
55
-
56
-
57
-
 58
58 -
 59
59 -
 60
60 -
 61
61 -
 62
62 -
 63
63 -
 64
64 -
 65
65 -
 66
66 -
 67
67 -
 68
68 -
69
-
70
-
71
-
72
-
73
-
74
-
75
-
76
-
77
 |
 |