Brother International XL 5130 Users Manual - English - Page 32
Brother International XL 5130 - Free Arm Sewing Machine Manual
 |
View all Brother International XL 5130 manuals
Add to My Manuals
Save this manual to your list of manuals |
Page 32 highlights
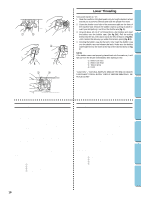
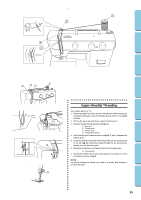
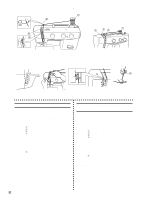
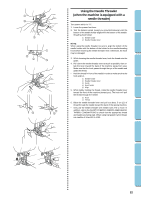
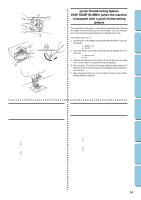
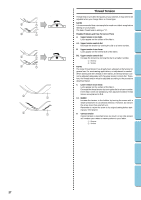
CONTENTS KNOWING YOUR SEWING MACHINE STRAIGHT AND ZIGZAG STITCHING BUILT-IN STITCHES Quick Thread-setting System 1 FAST START BOBBIN (when the machine is equipped with a quick thread-setting system) This new system allows you to start sewing immediately after inserting the bobbin without drawing up the lower thread. You can, however, pull up the lower thread as explained on page 25 if you wish. 2 Turn power switch to "O". 1. Hold the end of the bobbin thread and insert the bobbin case into the shuttle. 1 Bobbin case 2 Shuttle 2. Close the shuttle cover while pulling the thread through the slit in the cover. 3 Shuttle cover 4 4 Slit 3. Slide the thread down to the bottom of the slit, then pull it up and cut it on the cutter to complete the lower threading. 3 4. Pull out about 15 cm (6") of the upper thread as usual, then pull it between the toes of the presser foot and straight toward the back of the machine. 5. Start sewing as usual. (It is not necessary to draw up the bobbin thread.) (Refer to page 25) BUTTONHOLE AND BUTTON SEWING USING ATTACHMENTS AND APPLICATIONS Sistema rápido de colocación del hilo BOBINA DE INICIO RÁPIDO (cuando la máquina está equipada con un sistema rápido de colocación del hilo) Este nuevo sistema permite comenzar a coser de forma inmediata después de insertar una bobina sin necesidad de sacar el hilo de la canilla. No obstante, también puede sacar el hilo de la canilla tal como se explica en la página 25. Desenchufar la máquina, interruptor principale a "O". 1. Sujete el extremo del hilo de la bobina e inserte el portabobina en la lanzadera. 1 Portabobina 2 Lanzadera 2. Cierre la tapa de la lanzadera a la vez que tira del hilo que pasa a través de la ranura de la tapa. 3 Tapa de la lanzadera 4 Ranura 3. Deslice el hilo hacia abajo hasta el fondo de la ranura y luego tire del hilo hacia arriba y córtelo para completar la canilla. 4. Tire aproximadamente 15 cm (6") del hilo superior de la forma habitual, luego tire de él entre los talones del prensatelas en dirección a la parte trasera de la máquina. 5. Comience a coser de la forma habitual. (No es necesario sacar el hilo de la bobina) (consulte la página 25). SYSTÈME RAPIDE (lorsque la machine est équipée d'un sys- tème d'enfilage rapide) Ce nouveau système permet de commencer à coudre immédiatement après la mise en place de la canette, sans devoir remonter le fil inférieur. Si vous le souhaitez, vous pouvez néanmoins le remonter comme expliqué à la page 25, selon la méthode traditionnelle. Mettre l'interrupteur principal sur "O". 1. Tenir l'extrémité du fil de la navette et introduire le boîtier dans la na- vette. 1 Boîtier 2 Navette 2. Verrouiller le boîtier en place tout en tirant le fil par la rainure prévue dans le couvercle. 3 Couvercle de la navette 4 Rainure 3. Faire glisser le fil vers le bas de la rainure puis le tirer vers le haut et le couper avec le coupe-fil pour terminer sa remontée. 4. Tirer environ 15 cm du fil supérieur comme d'habitude puis le faire passer entre les branches du pied-de-biche et tout droit vers l'arrière de la machine. 5. Commencer à coudre normalement. (Il n'est pas nécessaire de tirer le fil de la bobine vers le haut.) (Voir page 25) 24 MAINTENANCE INDEX
-
 1
1 -
2
-
3
-
4
-
5
-
6
-
7
-
8
-
9
-
10
-
11
-
12
-
13
-
14
-
15
-
16
-
17
-
18
-
19
-
20
-
21
-
22
-
23
-
24
-
25
-
26
-
 27
27 -
 28
28 -
 29
29 -
 30
30 -
 31
31 -
 32
32 -
 33
33 -
 34
34 -
 35
35 -
 36
36 -
 37
37 -
38
-
39
-
40
-
41
-
42
-
43
-
44
-
45
-
46
-
47
-
48
-
49
-
50
-
51
-
52
-
53
-
54
-
55
-
56
-
57
-
58
-
59
-
60
-
61
-
62
-
63
-
64
-
65
-
66
-
67
-
68
-
69
-
70
-
71
-
72
-
73
-
74
-
75
-
76
-
77
 |
 |
