Brother International XL 5130 Users Manual - English - Page 26
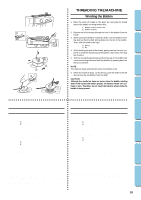
THREADING THE MACHINE, Winding the Bobbin
 |
View all Brother International XL 5130 manuals
Add to My Manuals
Save this manual to your list of manuals |
Page 26 highlights
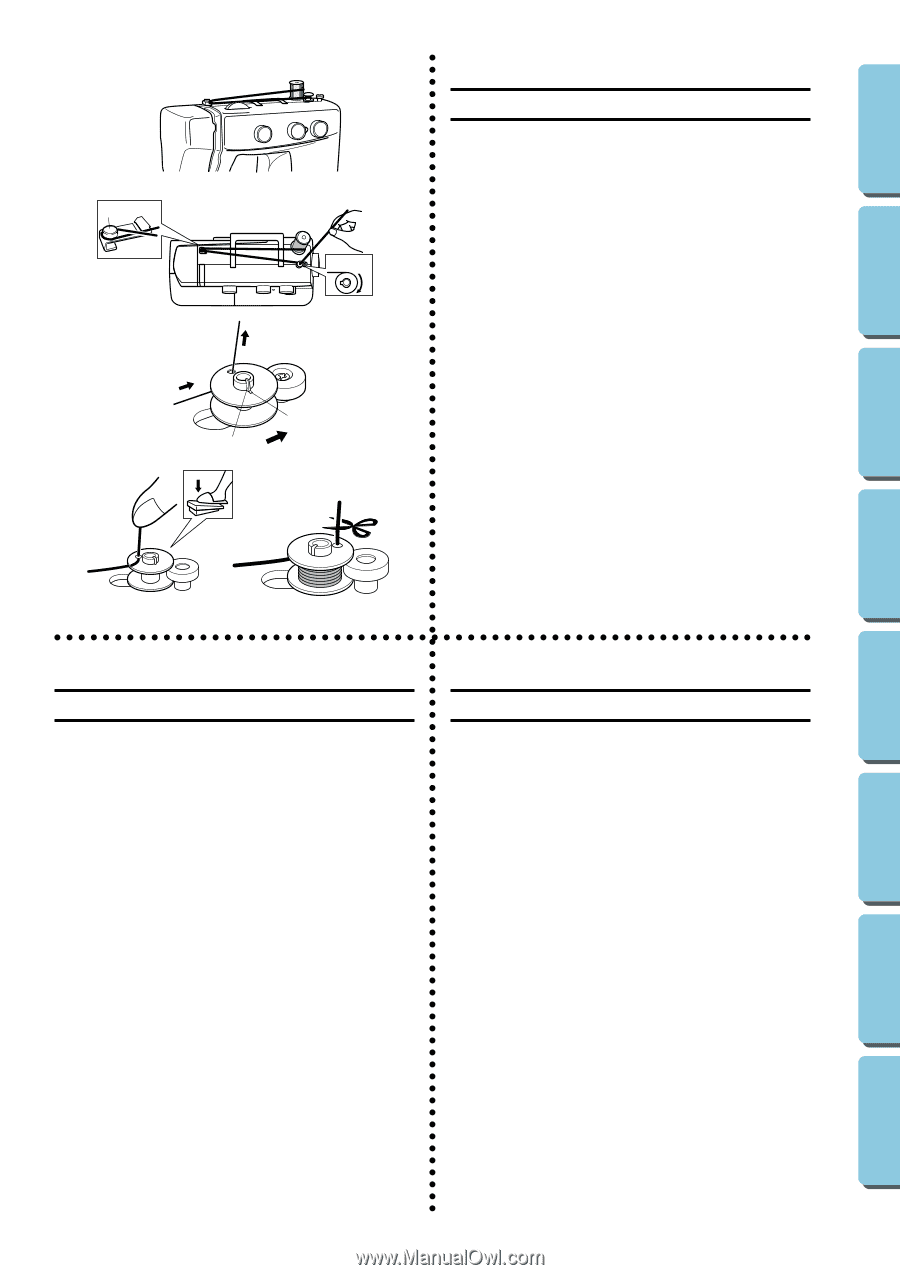
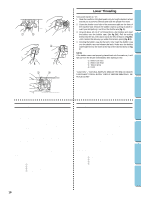
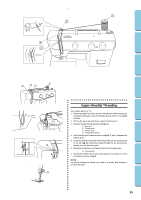
CONTENTS KNOWING YOUR SEWING MACHINE STRAIGHT AND ZIGZAG STITCHING BUILT-IN STITCHES THREADING THE MACHINE Winding the Bobbin 1. Place the spool of thread on the spool pin and pass the thread around the bobbin winding tension disc. 1 Bobbin winding tension disc 2 Bobbin winding 1 2. Pass the end of the thread through the hole in the bobbin from the inside. 3. While turning the bobbin clockwise, slide it over the bobbin wind- 2 ing shaft so that the shaft spring slides into the slit in the bobbin. Then, slide the shaft to the right. 3 Spring 4 Slit 4 3 4. While holding the end of the thread, gently press on the foot controller to wind the thread around the bobbin a few times, then stop the machine. 5. Trim the excess thread sticking out from the top of the bobbin and continue winding the thread onto the bobbin by pressing down on the foot controller. NOTE: The machine stops automatically when the bobbin is full. 6. When the machine stops, cut the thread, push the shaft to the left and remove the full bobbin from the shaft. CAUTION: Although the needle bar does not move when the bobbin winding shaft is slid toward the bobbin presser, the balance wheel will continue to turn. Therefore, do not touch the balance wheel while the bobbin is being wound. BUTTONHOLE AND BUTTON SEWING USING ATTACHMENTS AND APPLICATIONS ENHEBRADO DE LA MÁQUINA ENFILAGE DE LA MACHINE Bobinado de la canilla Remplissage de la canette 1. Coloque un carrete de hilo en el portacarretes y pase el hilo por el disco de tensión de bobinado de la canilla. 1 Disco de tensión de bobinado de la canilla 2 Bobinado de la canilla 2. Pase el extremo del hilo por el orificio de la canilla a partir del interior. 3. Mientras gira la canilla en sentido de las manecillas de un reloj, deslice el eje hacia el eje de bobinado de tal forma que el muelle impulsor del eje se deslice dentro de la ranura de la canilla. Deslice el eje hacia la derecha. 3 Muelle 4 Ranura 4. Sujetando el extremo del hilo, presione suavemente el pedal para que el hilo efectúe un par de vueltas alrededor de la canilla y pare la máquina. 5. Deshaga el exceso de hilo arriba de la canilla. Siga bobinando el hilo en la canilla presionando el pedal. NOTA: La máquina se para automáticamente cuando la canilla está llena. 6. Cuando la máquina se pare, corte el hilo, empuje el eje hacia la izquierda y retire la canilla llena del eje. ATENCIÓN: Aunque la barra de la aguja no se desplace cuando el eje de bobinado de la canilla se desliza hacia el apretador de la canilla, la ruedecilla va a seguir girando y no puede ser tocada mientras la canilla está bobinando. 1. Placer la bobine de fil sur le porte-bobine et faire passer le fil par le disque de tension du dévidoir. 1 Disque de tension du dévidoir 2 Remplissage de la canette 2. Passer l'extrémité du fil dans l'orifice de la canette, par l'intérieur. 3. Placer la canette sur le dévidoir et glisser celui-ci vers la droite. Tourner la canette dans le sens des aiguilles d'une montre, à la main, jusqu'à ce que le ressort de la broche se place dans la rainure de la canette. 3 Ressort 4 Rainure 4. Tout en tenant l'extrémité du fil, appuyer doucement sur la pédale pour enrouler le fil autour de la canette. Arrêter la machine au bout de quelques tours. 5. Couper le bout de fil dépassant au-dessus de la canette puis continuer à enrouler le fil sur la canette en appuyant sur la pédale du rhéostat. REMARQUE: La machine s'arrête automatiquement lorsque la canette est pleine. 6. Lorsque la machine s'arrête, couper le fil, repousser le dévidoir vers la gauche, et en retirer la canette pleine. PRÉCAUTION: Bien que la barre à aiguille ne fonctionne pas lorsque la broche du dévidoir est glissée pour maintenir la canette, le volant à main va continuer à tourner. Dès lors, éviter de toucher le volant lors du remplissage de la canette. 18 MAINTENANCE INDEX
-
 1
1 -
2
-
3
-
4
-
5
-
6
-
7
-
8
-
9
-
10
-
11
-
12
-
13
-
14
-
15
-
16
-
17
-
18
-
19
-
20
-
 21
21 -
 22
22 -
 23
23 -
 24
24 -
 25
25 -
 26
26 -
 27
27 -
 28
28 -
 29
29 -
 30
30 -
 31
31 -
32
-
33
-
34
-
35
-
36
-
37
-
38
-
39
-
40
-
41
-
42
-
43
-
44
-
45
-
46
-
47
-
48
-
49
-
50
-
51
-
52
-
53
-
54
-
55
-
56
-
57
-
58
-
59
-
60
-
61
-
62
-
63
-
64
-
65
-
66
-
67
-
68
-
69
-
70
-
71
-
72
-
73
-
74
-
75
-
76
-
77
 |
 |