Brother International XL 5130 Users Manual - English - Page 61
Darning, Reprisage
 |
View all Brother International XL 5130 manuals
Add to My Manuals
Save this manual to your list of manuals |
Page 61 highlights
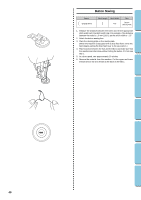
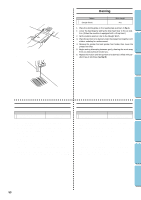
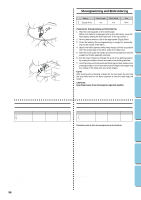
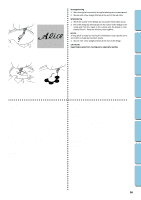
CONTENTS KNOWING YOUR SEWING MACHINE STRAIGHT AND ZIGZAG STITCHING BUILT-IN STITCHES Darning Pattern Stitch Length A (Straight Stitch) Any 1. Place the darning plate on the needle plate as shown in fig. A. 1'. Lower the feed dogs by setting the drop feed lever to the up position. (When the machine is equipped with a Drop Feed.) 2. Set the pattern selection dial to the Straight Stitch. 3. Place the portion to be darned under the presser foot together with a fabric underlay for reinforcement. 4. Remove the presser foot and presser foot holder, then lower the presser foot lifter. 5. Begin sewing alternating between gently drawing the work away from you and pulling it toward you. B 6. Repeat this motion until the portion to be darned is filled with par- allel lines of stitching. (See fig. B.) BUTTONHOLE AND BUTTON SEWING USING ATTACHMENTS AND APPLICATIONS Zurcido Reprisage Número de puntada (Puntada recta) Largo de puntada Cualquiera 1. Coloque la placa de zurcido en la placa de la aguja tal y como se muestra en la fig. A. 1'. Baje los alimentadores colocando la palanca en la posición hacia arriba. (cuando la máquina está equipada con alimentación de bajada). 2. Ponga el selector de puntada en puntada recta. 3. Ponga el tejido a zurcir debajo del prensatelas con una pieza de tela de refuerzo debajo. 4. Retire el prensatelas y su soporte y luego bájelo. 5. Empiece a coser empujando y tirando alternativamente del tejido. 6. Repita la operación hasta que el zurcido se haya completado creando unas cuantas líneas de puntadas paralelas. (Ver fig. B.) Modèle (Point droit) Longueur de point N'importe quelle longueur 1. Placer la plaque à repriser sur la plaque à aiguille, comme indiqué sur la fig. A. 1'. Abaisser les griffes d'entraînement en mettant le levier respectif sur la position relevée. (Lorsque la machine est équipée d'un levier d'abaissement des griffes d'entraînement). 2. Mettre le sélecteur de modèle sur le point droit. 3. Placer la partie à repriser et la pièce de renfort sous le pied-de-biche. 4. Retirer le pied-de-biche et son support puis abaisser le releveur de piedde-biche. 5. Commencer à coudre en donnant au tissu un mouvement de va-et-vient (le pousser et le tirer doucement). 6. Répéter le mouvement jusqu'à ce que la partie à repriser soit remplie de lignes de points parallèles. (Voir fig. B.) 53 MAINTENANCE INDEX
-
 1
1 -
2
-
3
-
4
-
5
-
6
-
7
-
8
-
9
-
10
-
11
-
12
-
13
-
14
-
15
-
16
-
17
-
18
-
19
-
20
-
21
-
22
-
23
-
24
-
25
-
26
-
27
-
28
-
29
-
30
-
31
-
32
-
33
-
34
-
35
-
36
-
37
-
38
-
39
-
40
-
41
-
42
-
43
-
44
-
45
-
46
-
47
-
48
-
49
-
50
-
51
-
52
-
53
-
54
-
55
-
 56
56 -
 57
57 -
 58
58 -
 59
59 -
 60
60 -
 61
61 -
 62
62 -
 63
63 -
 64
64 -
 65
65 -
 66
66 -
67
-
68
-
69
-
70
-
71
-
72
-
73
-
74
-
75
-
76
-
77
 |
 |
