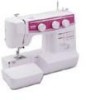
Brother International XL 5130 Users Manual - English - Page 23
Stretch Stitching, Puntada elástica
 |
View all Brother International XL 5130 manuals
Add to My Manuals
Save this manual to your list of manuals |
Page 23 highlights
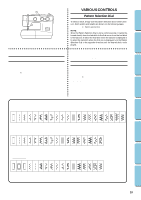
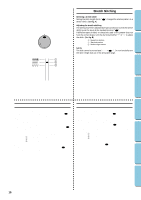
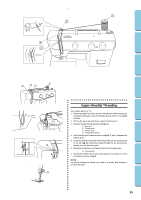
CONTENTS KNOWING YOUR SEWING MACHINE STRAIGHT AND ZIGZAG STITCHING BUILT-IN STITCHES 4 A - SS + 0 321 B - 1 SS 2 + 3 • • • • 4 3 Stretch Stitching Selecting a stretch stitch Setting the stitch length dial to " SS " changes the selected pattern to a stretch stitch. (See fig. A.) Adjusting the stretch stitching The sewing machine is adjusted during its production so that the stretch stitching can be sewn at the standard position " SS ". If different types of fabric or thread are used or the pattern does not have the correct shape, turn the dial toward either "+" or "-" to adjust the stitch. (See fig. B.) 1 Makes fine stitches 2 Standard position 3 Makes rough stitches NOTE: The dial cannot be turned past SS -". Do not forcefully turn the stitch length dial out of the allowable range. Puntada elástica Couture en points élastiques Selección de la puntada elástica Al establecer el selector del largo de puntada en la posición " SS ", la puntada actualmente seleccionada cambia a la puntada elástica. (Ver fig. A.) Ajuste de la puntada elástica La máquina de coser se ajusta durante su producción de tal forma que puede coser la puntada elástica en la posición estándar " SS ". Si utiliza un tipo de hilo diferente al de fábrica o la puntada realizada no tiene la forma correcta, gire el disco hacia la posición "+" o hacia la posición "-" para ajustar la puntada. (Ver fig. B.) 1 Realiza puntadas correctas 2 Posición estándar 3 Realiza puntadas defectuosas NOTA: No puede girar el disco después de la posición SS -". No intente forzar el selector del largo de puntada fuera del rango permitido. Sélection d'un point élastique Régler le sélecteur de longueur de point sur " SS " pour que le modèle sélectionné devienne un point élastique. (Voir fig. A.) Réglage de la couture en points élastiques A la sortie d'usine, la machine à coudre est réglée de sorte que la piqûre en points élastiques se fasse à la position normale " SS ". Si vous utilisez des tissus ou des fils différents ou si le modèle de point n'a pas la forme voulue, tourner le sélecteur vers "+" ou "-" pour régler le point (Voir fig. B.) 1 Points fins 2 Position normale 3 Points grossiers REMARQUE: Le sélecteur ne peut dépasser ". . . . + SS -". Ne pas forcer le sélecteur en tentant de le tourner au deçà de la plage de réglages autorisée. BUTTONHOLE AND BUTTON SEWING USING ATTACHMENTS AND APPLICATIONS MAINTENANCE INDEX 15
-
 1
1 -
2
-
3
-
4
-
5
-
6
-
7
-
8
-
9
-
10
-
11
-
12
-
13
-
14
-
15
-
16
-
17
-
 18
18 -
 19
19 -
 20
20 -
 21
21 -
 22
22 -
 23
23 -
 24
24 -
 25
25 -
 26
26 -
 27
27 -
 28
28 -
29
-
30
-
31
-
32
-
33
-
34
-
35
-
36
-
37
-
38
-
39
-
40
-
41
-
42
-
43
-
44
-
45
-
46
-
47
-
48
-
49
-
50
-
51
-
52
-
53
-
54
-
55
-
56
-
57
-
58
-
59
-
60
-
61
-
62
-
63
-
64
-
65
-
66
-
67
-
68
-
69
-
70
-
71
-
72
-
73
-
74
-
75
-
76
-
77
 |
 |
