Brother International XL 5130 Users Manual - English - Page 45
Elastic Stitching, Point élastique
 |
View all Brother International XL 5130 manuals
Add to My Manuals
Save this manual to your list of manuals |
Page 45 highlights
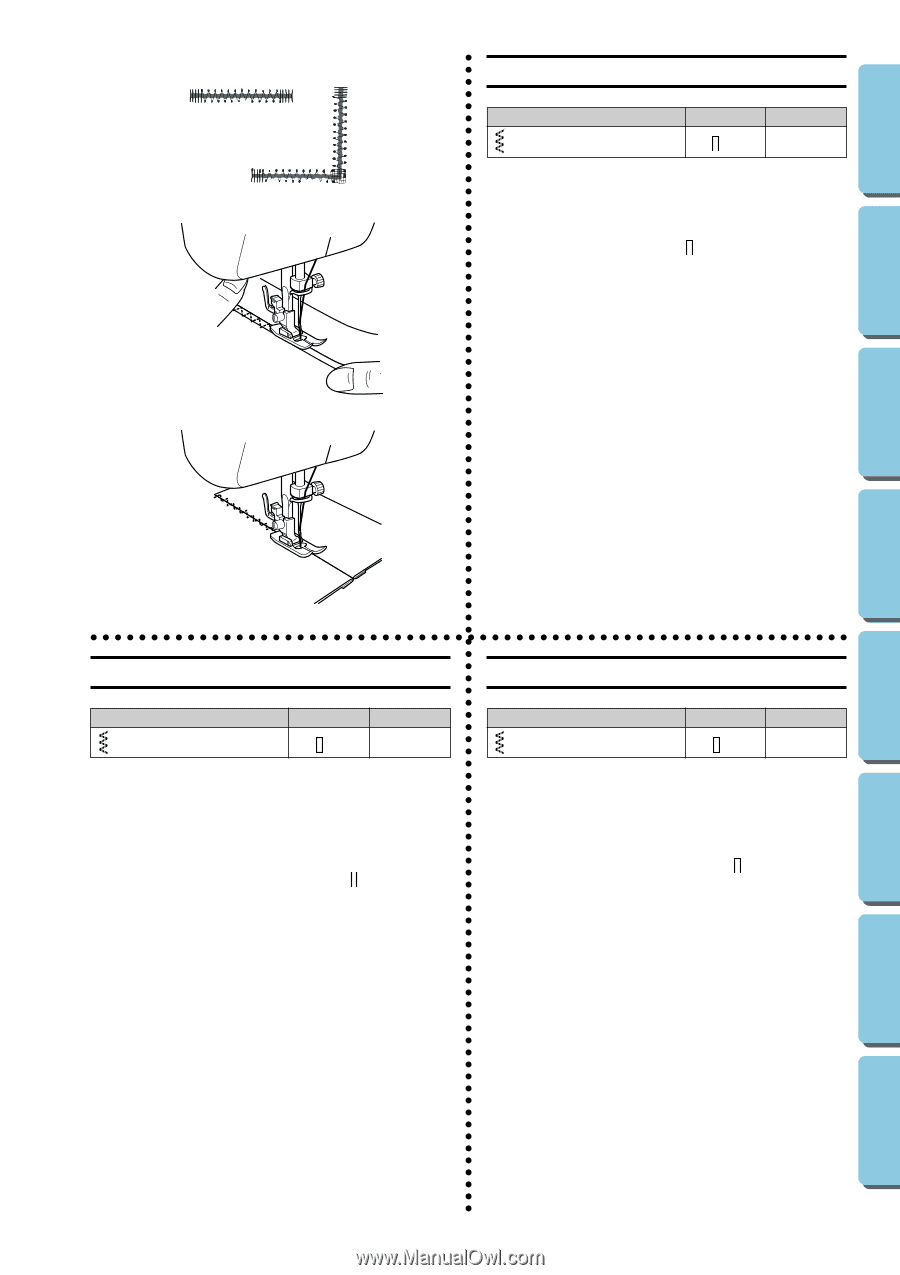
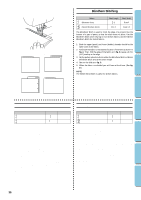
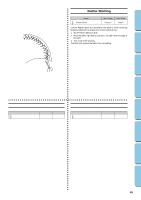
CONTENTS KNOWING YOUR SEWING MACHINE STRAIGHT AND ZIGZAG STITCHING BUILT-IN STITCHES A Elastic Stitching Pattern (Elastic Stitch) Stitch Length -2.5 Stitch Width 3-5 The Elastic Stitch can be used in three different ways: to mend, to sew elastic, or to join fabric. Each method is explained below. B Set the pattern selection dial to the Elastic Stitch. Mending 1. Set the stitch length dial between " " and "2.5". 2. Place the reinforcement fabric under the tear to be mended. 3. Following the line of the tear, sew using the Elastic Stitch as illus- trated in fig. A. Sewing Elastic 1. Place the elastic on the fabric. 2. As you sew, stretch the elastic both in the front and behind the presser foot as shown in fig. B. C Joining Fabric The Elastic Stitch can be used to join two pieces of fabric together and is very effective when sewing knitted fabrics. If nylon thread is used, the stitch will not be visible. 1. Place the edges of the two pieces of fabric together and center them under the presser foot. 2. Sew them together using the Elastic Stitch taking care to keep the two fabric edges close together as shown in fig. C. BUTTONHOLE AND BUTTON SEWING USING ATTACHMENTS AND APPLICATIONS Puntada elástica Point élastique Número de puntada (Puntada para coser elásticos) Largo de puntada Ancho de puntada -2,5 3-5 Se puede usar la puntada elástica para tres operaciones: los remiendos, la inserción de gomas elásticas y como puntada de unión para juntar dos tejidos. Ponga el selector en puntada elástica Cada una de estas operaciones se detalla a continuación. Remiendos 1. Ponga el selector de largo de puntada entre " " y "2,5". 2. Coloque una tela de refuerzo debajo de la parte a remendar. 3. Siguiendo la línea de la rasgadura, cosa con la puntada elástica tal y como se muestra en la fig. A. Inserción de gomas elásticas 1. Ponga la goma sobre el tejido. 2. A medida que esté cosiendo, estire el elástico tanto delante como detrás del prensatelas tal y como se muestra en la fig. B. Puntada de unión La puntada elástica puede servir para unir dos trozos de tejido y resulta muy eficaz para la costura de prendas de punto. Si se usa un hilo de nylon, la puntada resultará invisible. 1. Junte las orillas de ambos trozos de tejido y céntrelas debajo del prensatelas. 2. Cósalas juntas con la puntada elástica, teniendo sumo cuidado en mantener las dos orillas de los tejidos muy juntas, tal como se muestra en la fig. C. Modèle (Point élastique) Longueur de point Largeur de point -2,5 3-5 Le point élastique possède trois fonctions principales : le raccommodage, la couture d'élastiques ou l'assemblage de tissus. Chacune de ces trois fonctions se trouve détaillée ci-dessous. Mettre le sélecteur de modèle de point sur le point élastique. Raccommodage 1. Mettre le sélecteur de longueur de point entre " " et "2,5". 2. Placer une pièce de renfort sous la déchirure à réparer. 3. Coudre en suivant la ligne de la déchirure. Coudre au point élastique comme le montre la fig. A. Couture d'elastiques 1. Placer l'élastique sur le tissu. 2. A mesure que l'on coud, tendre l'élastique de part et d'autre du pied-de- biche (voir fig. B). Assemblage de tissus Le point élastique peut servir à assembler deux morceaux de tissu. Il s'avère particulièrement efficace pour la couture de tricots. Avec du fil nylon, la couture sera invisible. 1. Placer bord à bord les deux pièces de tissu et les centrer sous le pied-de- biche. 2. Les assembler avec le point élastique, en prenant bien soin de garder les deux pièces bord à bord comme le montre la fig. C. 37 MAINTENANCE INDEX
-
 1
1 -
2
-
3
-
4
-
5
-
6
-
7
-
8
-
9
-
10
-
11
-
12
-
13
-
14
-
15
-
16
-
17
-
18
-
19
-
20
-
21
-
22
-
23
-
24
-
25
-
26
-
27
-
28
-
29
-
30
-
31
-
32
-
33
-
34
-
35
-
36
-
37
-
38
-
39
-
 40
40 -
 41
41 -
 42
42 -
 43
43 -
 44
44 -
 45
45 -
 46
46 -
 47
47 -
 48
48 -
 49
49 -
 50
50 -
51
-
52
-
53
-
54
-
55
-
56
-
57
-
58
-
59
-
60
-
61
-
62
-
63
-
64
-
65
-
66
-
67
-
68
-
69
-
70
-
71
-
72
-
73
-
74
-
75
-
76
-
77
 |
 |