Brother International XL-2600i Operation Manual - Page 66
Using the 1/4-inch Quilting Foot
 |
View all Brother International XL-2600i manuals
Add to My Manuals
Save this manual to your list of manuals |
Page 66 highlights
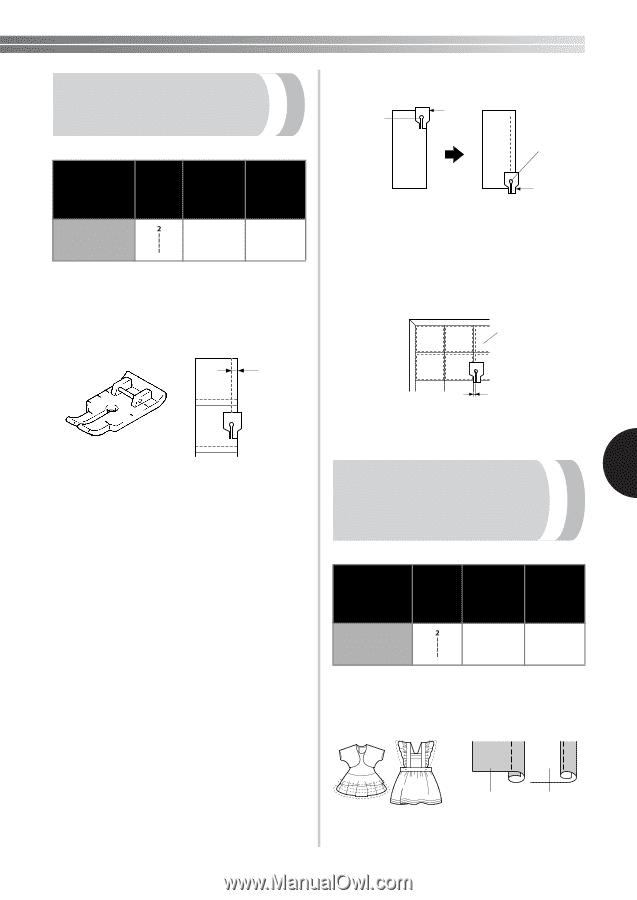
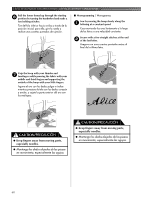
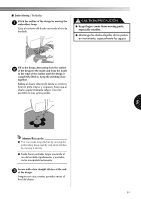
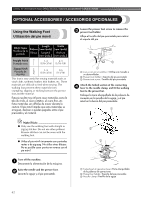
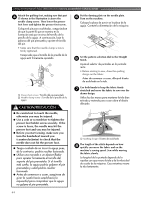
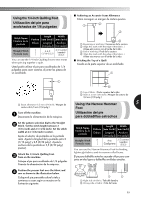
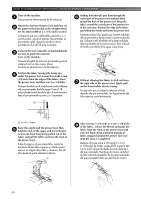
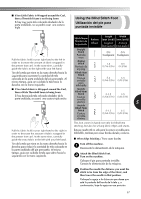
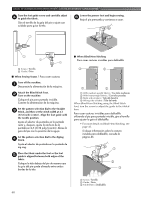
Using the 1/4-inch Quilting Foot Utilización del pie para acolchados de 1/4 pulgadas Stitch Name Nombre de la puntada Straight Stitch Puntada recta Pattern Dibujo Length Width [mm (inch)] [mm (inch)] Longitud Anchura [mm (pulg.)] [mm (pulg.)] 2-2.5 (1/16-3/32) 2.5 (center / centro) (3/32) You can use the 1/4-inch Quilting Foot to sew seams when piecing together a quilt. Usted podrá utilizar el pie para acolchados de 1/4 pulgadas para coser costuras al juntar las piezas de un acolchado. ■ Achieving an Accurate Seam Allowance Cómo conseguir un margen de costura preciso 1 2 3 4 1 Beginning of stitching / Comienzo de la costura 2 Align this mark with the edge of the fabric. / Alinee esta marca con el borde de la tela. 3 End of stitching / Final de la costura 4 Align this mark with the edge of the fabric. / Alinee esta marca con el borde de la tela. ■ Stitching the Top of a Quilt Cosido en la parte superior de un acolchado 1 1 2 1 Seam allowance 6.5 mm (1/4 inch) / Margen de costura de 6,5 mm (1/4 pulg.) Turn off the machine. 1 Desconecte la alimentación de la máquina. 1 Top of fabric / Parta superior de la tela 2 Seam 3.2 mm (1/8 inch) / Margen de costura de 3,2 mm (1/8 pulg.) Using the Narrow Hemmer 5 Foot Utilización del pie para dobladillos estrechos Set the pattern selection dial to the Straight 2 Stitch. Set the stitch length between 2 (1/16 inch) and 2.5 (3/32 inch). Set the stitch width at 2.5 (3/32 inch) (center). Ajuste el selector de puntadas en la puntada recta. Ajuste la longitud de la puntada entre 2 (1/16 pulg.) y 2,5 (3/32 pulg.). Ajuste la anchura de la puntada en 2,5 (3/32 pulg.) (centro). Attach the 1/4-inch Quilting Foot. 3 Turn on the machine. Coloque el pie para acolchados de 1/4 pulgadas. Conecte la alimentación de la máquina. Stitch Name Nombre de la puntada Straight Stitch Puntada recta Pattern Dibujo Length Width [mm (inch)] [mm (inch)] Longitud Anchura [mm (pulg.)] [mm (pulg.)] Any Cualquiera 2.5 (center / centro) (3/32) You can use the Narrow Hemmer Foot for binding lightweight fabrics and for narrow rolled hems. El pie para dobladillos estrechos se puede utilizar para coser juntas en telas ligeras y dobladillos enrollados estrechos. Position the presser foot over the fabric and 4 sew as shown in the illustration below. Coloque el pie prensatela sobre la tela y comience a coser según se muestra en la ilustración siguiente. 1 2 1 Right side of fabric / Tela del derecho 2 Wrong side of fabric / Tela del revés 65
-
 1
1 -
2
-
3
-
4
-
5
-
6
-
7
-
8
-
9
-
10
-
11
-
12
-
13
-
14
-
15
-
16
-
17
-
18
-
19
-
20
-
21
-
22
-
23
-
24
-
25
-
26
-
27
-
28
-
29
-
30
-
31
-
32
-
33
-
34
-
35
-
36
-
37
-
38
-
39
-
40
-
41
-
42
-
43
-
44
-
45
-
46
-
47
-
48
-
49
-
50
-
51
-
52
-
53
-
54
-
55
-
56
-
57
-
58
-
59
-
60
-
 61
61 -
 62
62 -
 63
63 -
 64
64 -
 65
65 -
 66
66 -
 67
67 -
 68
68 -
 69
69 -
 70
70 -
 71
71 -
72
-
73
-
74
-
75
-
76
-
77
-
78
-
79
-
80
-
81
-
82
 |
 |