Canon PowerShot G3 Software Starter Guide DC SD Ver.11 - Page 34
Downloading and Printing Images with ZoomBrowser EX - power supplies
 |
View all Canon PowerShot G3 manuals
Add to My Manuals
Save this manual to your list of manuals |
Page 34 highlights
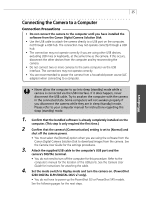
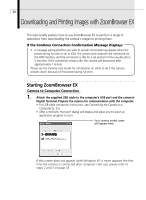
30 Downloading and Printing Images with ZoomBrowser EX This topic briefly explains how to use ZoomBrowser EX to perform a range of operations from downloading the camera's images to printing them. If the Continue Connection Confirmation Message Displays • A message asking whether you wish to remain connected may appear when the power-saving function is set to [On], the camera and computer are connected via the USB interface, and the connection is idle for a set period of time (usually about 5 minutes). If the connection remains idle, the camera will disconnect after approximately 1 minute. Please see the Camera User Guide for information on what to do if the camera powers down because of the power-saving function. Starting ZoomBrowser EX Camera to Computer Connection 1. Attach the supplied USB cable to the computer's USB port and the camera's Digital Terminal. Prepare the camera for communication with the computer. • For USB cable connection instructions, see Connecting the Camera to a Computer (p. 25). • After a moment, the Event dialog will display and allow you to select an application program to start. Your camera model name will appear here. If this screen does not appear (with Windows XP, it never appears the first time the camera is connected after computer start-up), please refer to steps 2 and 3 of page 32.
-
 1
1 -
2
-
3
-
4
-
5
-
6
-
7
-
8
-
9
-
10
-
11
-
12
-
13
-
14
-
15
-
16
-
17
-
18
-
19
-
20
-
21
-
22
-
23
-
24
-
25
-
26
-
27
-
28
-
 29
29 -
 30
30 -
 31
31 -
 32
32 -
 33
33 -
 34
34 -
 35
35 -
 36
36 -
 37
37 -
 38
38 -
 39
39 -
40
-
41
-
42
-
43
-
44
-
45
-
46
-
47
-
48
-
49
-
50
-
51
-
52
-
53
-
54
-
55
-
56
-
57
-
58
-
59
-
60
-
61
-
62
-
63
-
64
-
65
-
66
-
67
-
68
-
69
-
70
-
71
-
72
-
73
-
74
-
75
-
76
-
77
-
78
-
79
-
80
-
81
-
82
-
83
-
84
-
85
-
86
-
87
-
88
-
89
-
90
-
91
-
92
-
93
-
94
-
95
-
96
-
97
-
98
-
99
-
100
-
101
-
102
-
103
-
104
-
105
-
106
-
107
-
108
-
109
-
110
-
111
-
112
-
113
-
114
-
115
-
116
-
117
-
118
-
119
-
120
-
121
-
122
-
123
 |
 |
