Canon PowerShot G3 Software Starter Guide DC SD Ver.11 - Page 61
Downloading with Windows Explorer - file viewer utility xp
 |
View all Canon PowerShot G3 manuals
Add to My Manuals
Save this manual to your list of manuals |
Page 61 highlights
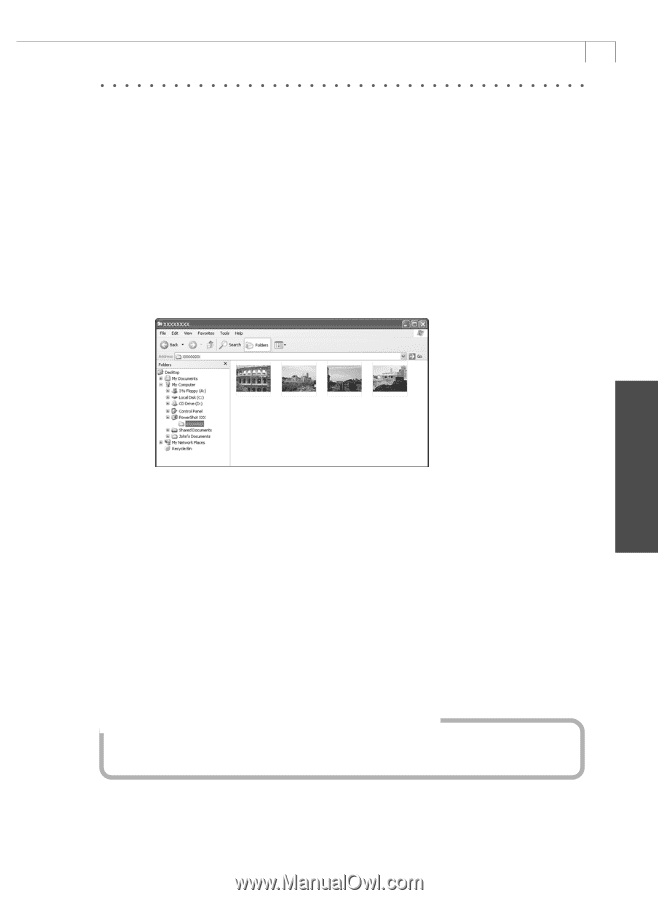
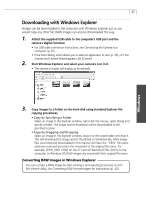
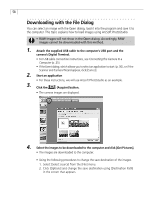
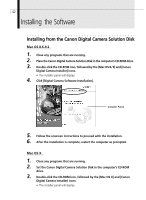
57 Downloading with Windows Explorer Images can be downloaded to the computer with Windows Explorer just as you would copy any other file. RAW images can also be downloaded this way. 1. Attach the supplied USB cable to the computer's USB port and the camera's Digital Terminal. • For USB cable connection instructions, see Connecting the Camera to a Computer (p. 25). • If the Event dialog, which allows you to select an application to start (p. 30), or if the Scanner and Camera Wizard appear, click [Cancel]. 2. Start Windows Explorer and select your camera's icon in it. • The camera's images will display as thumbnails. 3. Copy images to a folder on the hard disk using standard Explorer file copying procedures. • Copy by Specifying a Folder Select an image in the Explorer window, right-click the mouse, select [Save] and specify a folder. The image and its thumbnail will be downloaded to the specified location. • Copy by Dragging and Dropping Select an image in the Explorer window, drag it to the target folder and drop it. This will download the image and its thumbnail. In Windows Me, RAW image files converted and downloaded in this manner will have the "CRW" file name extension removed but retain the remainder of the original file name. For example, [CRW_0001.CRW] on the CF card will become [CRW_0001] on the computer. In Windows XP, RAW images are saved with their original file name. Converting RAW Images in Windows Explorer You can convert a RAW image by right-clicking it and selecting [Convert], to start File Viewer Utility. See Converting RAW Format Images for instructions (p. 42). Windows
-
 1
1 -
2
-
3
-
4
-
5
-
6
-
7
-
8
-
9
-
10
-
11
-
12
-
13
-
14
-
15
-
16
-
17
-
18
-
19
-
20
-
21
-
22
-
23
-
24
-
25
-
26
-
27
-
28
-
29
-
30
-
31
-
32
-
33
-
34
-
35
-
36
-
37
-
38
-
39
-
40
-
41
-
42
-
43
-
44
-
45
-
46
-
47
-
48
-
49
-
50
-
51
-
52
-
53
-
54
-
55
-
 56
56 -
 57
57 -
 58
58 -
 59
59 -
 60
60 -
 61
61 -
 62
62 -
 63
63 -
 64
64 -
 65
65 -
 66
66 -
67
-
68
-
69
-
70
-
71
-
72
-
73
-
74
-
75
-
76
-
77
-
78
-
79
-
80
-
81
-
82
-
83
-
84
-
85
-
86
-
87
-
88
-
89
-
90
-
91
-
92
-
93
-
94
-
95
-
96
-
97
-
98
-
99
-
100
-
101
-
102
-
103
-
104
-
105
-
106
-
107
-
108
-
109
-
110
-
111
-
112
-
113
-
114
-
115
-
116
-
117
-
118
-
119
-
120
-
121
-
122
-
123
 |
 |