Canon PowerShot G3 Software Starter Guide DC SD Ver.11 - Page 71
Downloading and Printing Images with ImageBrowser
 |
View all Canon PowerShot G3 manuals
Add to My Manuals
Save this manual to your list of manuals |
Page 71 highlights
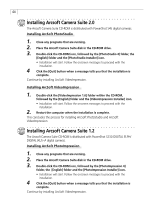
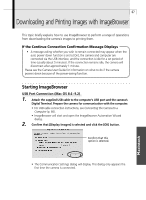
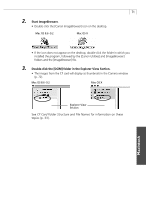
67 Downloading and Printing Images with ImageBrowser This topic briefly explains how to use ImageBrowser to perform a range of operations from downloading the camera's images to printing them. If the Continue Connection Confirmation Message Displays • A message asking whether you wish to remain connected may appear when the auto power down function is set to [On], the camera and computer are connected via the USB interface, and the connection is idle for a set period of time (usually about 5 minutes). If the connection remains idle, the camera will disconnect after approximately 1 minute. Please see the Camera User Guide for information on what to do if the camera powers down because of the power-saving function. Starting ImageBrowser USB Port Connection (Mac OS 8.6 - 9.2) 1. Attach the supplied USB cable to the computer's USB port and the camera's Digital Terminal. Prepare the camera for communication with the computer. • For USB cable connection instructions, see Connecting the Camera to a Computer (p. 66). • ImageBrowser will start and open the ImageBrowser Automation Wizard dialog. 2. Confirm that [Display Images] is selected and click the [OK] button. Confirm that this option is selected. • The Communication Settings dialog will display. This dialog only appears the first time the camera is connected. Macintosh
-
 1
1 -
2
-
3
-
4
-
5
-
6
-
7
-
8
-
9
-
10
-
11
-
12
-
13
-
14
-
15
-
16
-
17
-
18
-
19
-
20
-
21
-
22
-
23
-
24
-
25
-
26
-
27
-
28
-
29
-
30
-
31
-
32
-
33
-
34
-
35
-
36
-
37
-
38
-
39
-
40
-
41
-
42
-
43
-
44
-
45
-
46
-
47
-
48
-
49
-
50
-
51
-
52
-
53
-
54
-
55
-
56
-
57
-
58
-
59
-
60
-
61
-
62
-
63
-
64
-
65
-
 66
66 -
 67
67 -
 68
68 -
 69
69 -
 70
70 -
 71
71 -
 72
72 -
 73
73 -
 74
74 -
 75
75 -
 76
76 -
77
-
78
-
79
-
80
-
81
-
82
-
83
-
84
-
85
-
86
-
87
-
88
-
89
-
90
-
91
-
92
-
93
-
94
-
95
-
96
-
97
-
98
-
99
-
100
-
101
-
102
-
103
-
104
-
105
-
106
-
107
-
108
-
109
-
110
-
111
-
112
-
113
-
114
-
115
-
116
-
117
-
118
-
119
-
120
-
121
-
122
-
123
 |
 |