Canon PowerShot G3 Software Starter Guide DC SD Ver.11 - Page 53
Shooting - flash
 |
View all Canon PowerShot G3 manuals
Add to My Manuals
Save this manual to your list of manuals |
Page 53 highlights
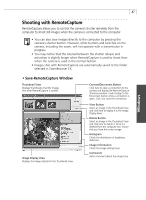
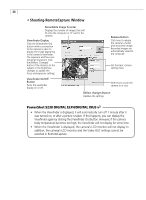
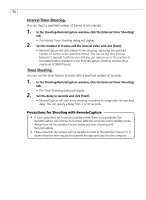
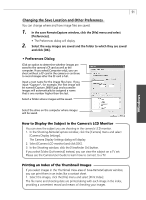
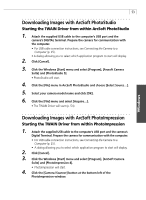
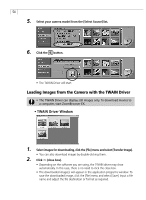
49 Shooting 1. Attach the supplied USB cable to the computer's USB port and the camera's DIGITAL terminal. Prepare the camera for communication with the computer. • For USB cable connection instructions, see Connecting the Camera to a Computer (p. 25). - PowerShot S45: open the lens cover after connecting. - PowerShot G3: remove the lens cap after connecting. - PowerShot S230 DIGITAL ELPH/DIGITAL IXUS v3: set the mode switch to Replay mode and then turn on the power. The Event dialog will display, allowing you to select which application to start. Select [Canon ZoomBrowser EX] and click [OK]. When the ZoomBrowser EX Camera window displays, close this window. This will display ZoomBrowser EX's main window. 2. Click [Camera & Memory Card] and select [Remote Shooting] from the displayed menu. • RemoteCapture will start and the "Connect to Camera?" prompt will display. 3. Click [Connect]. • The Shooting-RemoteCapture window will display. 4. Set the Size/Quality, Flash and Rotation settings. • If you are shooting with the camera on end to either the right or left at 90°, you can set the [Rotation] setting to either [90 degree Left] or [90 degree Right] to have the image rotated when it is shot and saved. However, when the camera's [Auto Rotate] function is set to [On], the Rotation setting is not available. To change the destination of the saved image, see Changing the Save Location and Other Preferences (p. 51). 5. Click [Detail setting]. • The full-view Shooting-RemoteCapture window will display. 6. Click [Viewfinder On] and view the image in the upper portion of the Shooting-RemoteCapture window. • Change the settings if required. To update any changes made in the Detail settings window, click the [Reflect changes] button. 7. Click the [Release] button. • The image will record and be automatically saved to the computer. You can also release the shutter by pressing the camera's shutter button directly or pressing the space bar on the computer keyboard. Windows
-
 1
1 -
2
-
3
-
4
-
5
-
6
-
7
-
8
-
9
-
10
-
11
-
12
-
13
-
14
-
15
-
16
-
17
-
18
-
19
-
20
-
21
-
22
-
23
-
24
-
25
-
26
-
27
-
28
-
29
-
30
-
31
-
32
-
33
-
34
-
35
-
36
-
37
-
38
-
39
-
40
-
41
-
42
-
43
-
44
-
45
-
46
-
47
-
 48
48 -
 49
49 -
 50
50 -
 51
51 -
 52
52 -
 53
53 -
 54
54 -
 55
55 -
 56
56 -
 57
57 -
 58
58 -
59
-
60
-
61
-
62
-
63
-
64
-
65
-
66
-
67
-
68
-
69
-
70
-
71
-
72
-
73
-
74
-
75
-
76
-
77
-
78
-
79
-
80
-
81
-
82
-
83
-
84
-
85
-
86
-
87
-
88
-
89
-
90
-
91
-
92
-
93
-
94
-
95
-
96
-
97
-
98
-
99
-
100
-
101
-
102
-
103
-
104
-
105
-
106
-
107
-
108
-
109
-
110
-
111
-
112
-
113
-
114
-
115
-
116
-
117
-
118
-
119
-
120
-
121
-
122
-
123
 |
 |