Canon PowerShot G3 Software Starter Guide DC SD Ver.11 - Page 40
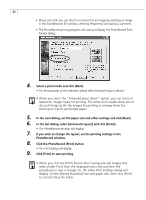
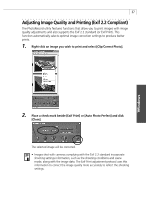
Click the PhotoRecord [Print] button.
 |
View all Canon PowerShot G3 manuals
Add to My Manuals
Save this manual to your list of manuals |
Page 40 highlights
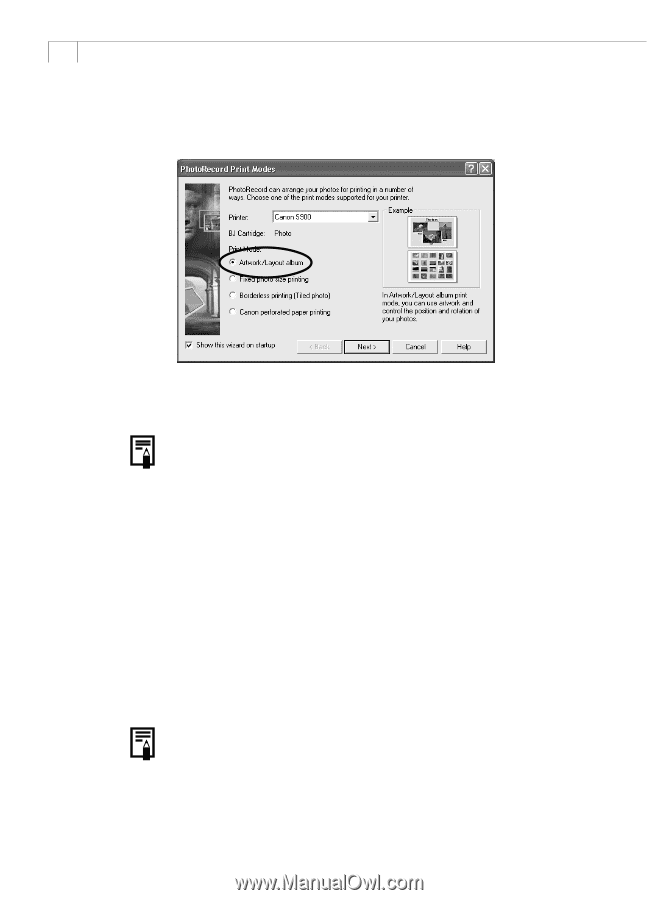
36 • Please note that you can attach a comment to an image by selecting an image in the ZoomBrowser EX window, selecting [Properties] and typing a comment. • The PhotoRecord printing program will start and display the PhotoRecord Print Modes dialog. 4. Select a print mode and click [Next]. • For the purposes of this example, please select [Artwork/Layout album]. • When you select the "Artwork/Layout album" option, you can resize or reposition images freely for printing. The other print modes allow you to do such things as tile the images for printing or arrange them for printing on Canon perforated paper. 5. In the next dialog, set the paper size and other settings and click [Next]. 6. In the last dialog, select [Automatic layout] and click [Finish]. • The PhotoRecord window will display. 7. If you wish to change the layout, set the printing settings in the PhotoRecord window. 8. Click the PhotoRecord [Print] button. • The Print dialog will display. 9. Click [Print] to start printing. • When you click the [Print] button after having selected images and select [Index Print] from the displayed menu then perform the procedures in step 3 of page 35, the Index Print Settings dialog will display. Set the desired thumbnail size and paper size, then click [Print] to start printing the index.
-
 1
1 -
2
-
3
-
4
-
5
-
6
-
7
-
8
-
9
-
10
-
11
-
12
-
13
-
14
-
15
-
16
-
17
-
18
-
19
-
20
-
21
-
22
-
23
-
24
-
25
-
26
-
27
-
28
-
29
-
30
-
31
-
32
-
33
-
34
-
 35
35 -
 36
36 -
 37
37 -
 38
38 -
 39
39 -
 40
40 -
 41
41 -
 42
42 -
 43
43 -
 44
44 -
 45
45 -
46
-
47
-
48
-
49
-
50
-
51
-
52
-
53
-
54
-
55
-
56
-
57
-
58
-
59
-
60
-
61
-
62
-
63
-
64
-
65
-
66
-
67
-
68
-
69
-
70
-
71
-
72
-
73
-
74
-
75
-
76
-
77
-
78
-
79
-
80
-
81
-
82
-
83
-
84
-
85
-
86
-
87
-
88
-
89
-
90
-
91
-
92
-
93
-
94
-
95
-
96
-
97
-
98
-
99
-
100
-
101
-
102
-
103
-
104
-
105
-
106
-
107
-
108
-
109
-
110
-
111
-
112
-
113
-
114
-
115
-
116
-
117
-
118
-
119
-
120
-
121
-
122
-
123
 |
 |