Compaq CQ2000 Getting Started Guide - Page 157
Making the movie, Previewing the movie, make muvee, Start Playback, Previous Frame, Next Frame
 |
View all Compaq CQ2000 manuals
Add to My Manuals
Save this manual to your list of manuals |
Page 157 highlights
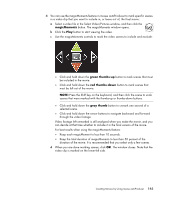
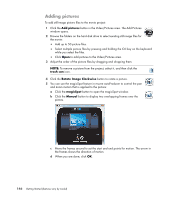
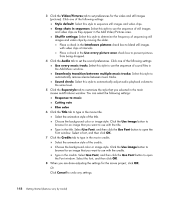
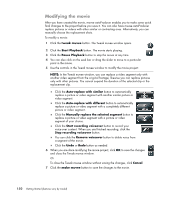
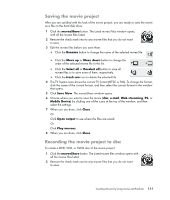
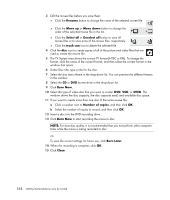
Making the movie After you have added at least one video or picture file to the movie project, you can have muvee autoProducer make the movie. The muvee autoProducer program makes a movie by combining the video, picture, and music files that you have selected, along with the style of movie, to produce a professional-looking movie in just a few steps. 1 Click the make muvee button. 2 Click OK, as required. 3 After making a movie, you can preview it in the muvee autoProducer Preview window. Use the controls in the Preview window to play, pause, and stop the movie preview. You can revise and preview the movie as often as you want, to experiment with different styles and with the content of the movie. IMPORTANT: Each time that you make a change to a movie project, you must click the make muvee button again to add that change to the movie. Previewing the movie After you have made the movie, you can preview how it looks and sounds, and take snapshots of frames in the movie. 1 Click the Start Playback button. The movie starts playing. 2 Use the Stop and Previous Frame/Next Frame buttons to navigate through the movie. 3 Click the Take a Snapshot button to save the current frame as a picture file (.jpeg, .bmp, or .gif format). 4 Click the Go to the source of the segment button to open the magicSpot window. For more information about using magicMoments, see "Adding videos." 5 Click the Full-screen preview button to view the movie in the full-screen mode. 6 Click the Audio mix button to adjust sound levels for the movie. Creating Movies by Using muvee autoProducer 149
-
 1
1 -
2
-
3
-
4
-
5
-
6
-
7
-
8
-
9
-
10
-
11
-
12
-
13
-
14
-
15
-
16
-
17
-
18
-
19
-
20
-
21
-
22
-
23
-
24
-
25
-
26
-
27
-
28
-
29
-
30
-
31
-
32
-
33
-
34
-
35
-
36
-
37
-
38
-
39
-
40
-
41
-
42
-
43
-
44
-
45
-
46
-
47
-
48
-
49
-
50
-
51
-
52
-
53
-
54
-
55
-
56
-
57
-
58
-
59
-
60
-
61
-
62
-
63
-
64
-
65
-
66
-
67
-
68
-
69
-
70
-
71
-
72
-
73
-
74
-
75
-
76
-
77
-
78
-
79
-
80
-
81
-
82
-
83
-
84
-
85
-
86
-
87
-
88
-
89
-
90
-
91
-
92
-
93
-
94
-
95
-
96
-
97
-
98
-
99
-
100
-
101
-
102
-
103
-
104
-
105
-
106
-
107
-
108
-
109
-
110
-
111
-
112
-
113
-
114
-
115
-
116
-
117
-
118
-
119
-
120
-
121
-
122
-
123
-
124
-
125
-
126
-
127
-
128
-
129
-
130
-
131
-
132
-
133
-
134
-
135
-
136
-
137
-
138
-
139
-
140
-
141
-
142
-
143
-
144
-
145
-
146
-
147
-
148
-
149
-
150
-
151
-
 152
152 -
 153
153 -
 154
154 -
 155
155 -
 156
156 -
 157
157 -
 158
158 -
 159
159 -
 160
160 -
 161
161 -
 162
162 -
163
-
164
-
165
-
166
 |
 |
