Compaq CQ2000 Getting Started Guide - Page 31
Connecting your home stereo system (optional), Color, Description - power adapter
 |
View all Compaq CQ2000 manuals
Add to My Manuals
Save this manual to your list of manuals |
Page 31 highlights
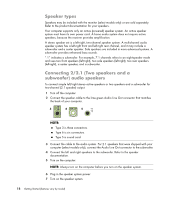
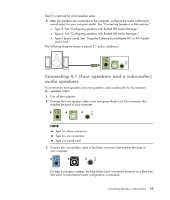
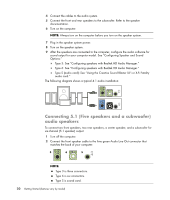
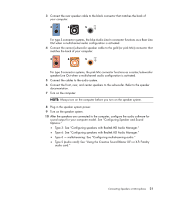
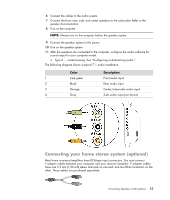
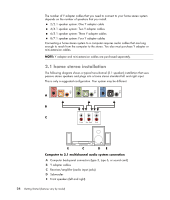
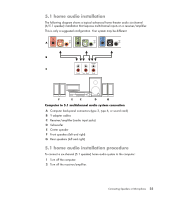
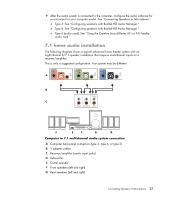
6 Connect the cables to the audio system. 7 Connect the front, rear, side, and center speakers to the subwoofer. Refer to the speaker documentation. 8 Turn on the computer. NOTE: Always turn on the computer before the speaker system. 9 Connect the speaker system to the power. 10 Turn on the speaker system. 11 After the speakers are connected to the computer, configure the audio software for sound output for your computer model. Type 6 - multistreaming: See "Configuring multistreaming audio." The following diagram shows a typical 7.1 audio installation. Color Description 1 Lime green Front audio input 2 Black Rear audio input 3 Orange Center/subwoofer audio input 4 Gray Side audio input (not shown) Connecting your home stereo system (optional) Most home receivers/amplifiers have RCA-type input connectors. You must connect Y adapter cables between your computer and your receiver/amplifier. Y adapter cables have one 3.5 mm (1/8-inch) stereo mini-jack on one end, and two RCA connectors on the other. These cables are purchased separately. Connecting Speakers or Microphone 23
-
 1
1 -
2
-
3
-
4
-
5
-
6
-
7
-
8
-
9
-
10
-
11
-
12
-
13
-
14
-
15
-
16
-
17
-
18
-
19
-
20
-
21
-
22
-
23
-
24
-
25
-
 26
26 -
 27
27 -
 28
28 -
 29
29 -
 30
30 -
 31
31 -
 32
32 -
 33
33 -
 34
34 -
 35
35 -
 36
36 -
37
-
38
-
39
-
40
-
41
-
42
-
43
-
44
-
45
-
46
-
47
-
48
-
49
-
50
-
51
-
52
-
53
-
54
-
55
-
56
-
57
-
58
-
59
-
60
-
61
-
62
-
63
-
64
-
65
-
66
-
67
-
68
-
69
-
70
-
71
-
72
-
73
-
74
-
75
-
76
-
77
-
78
-
79
-
80
-
81
-
82
-
83
-
84
-
85
-
86
-
87
-
88
-
89
-
90
-
91
-
92
-
93
-
94
-
95
-
96
-
97
-
98
-
99
-
100
-
101
-
102
-
103
-
104
-
105
-
106
-
107
-
108
-
109
-
110
-
111
-
112
-
113
-
114
-
115
-
116
-
117
-
118
-
119
-
120
-
121
-
122
-
123
-
124
-
125
-
126
-
127
-
128
-
129
-
130
-
131
-
132
-
133
-
134
-
135
-
136
-
137
-
138
-
139
-
140
-
141
-
142
-
143
-
144
-
145
-
146
-
147
-
148
-
149
-
150
-
151
-
152
-
153
-
154
-
155
-
156
-
157
-
158
-
159
-
160
-
161
-
162
-
163
-
164
-
165
-
166
 |
 |