Dell 5200n Mono Laser Printer Dell™ Workgroup Laser Printer M5200 Us - Page 141
Clearing jams, Tips for avoiding jams
 |
View all Dell 5200n Mono Laser Printer manuals
Add to My Manuals
Save this manual to your list of manuals |
Page 141 highlights
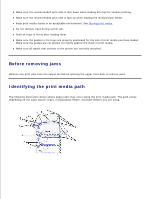
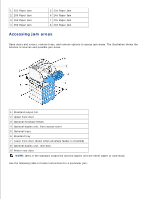
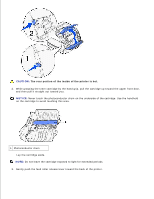
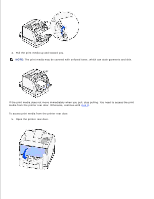
Clearing jams Before removing jams Identifying the print media path 200 and 201 Paper Jam Remove Cartridge 202 Paper Jam Open Rear Door 23x Paper Jam 24x Paper Jam Check Tray x 250 Paper Jam Check MP Feeder 260 Paper Jam Check Env Feeder By carefully selecting print media and loading it properly, you are able to avoid most jams. Use appropriate print media (paper, transparencies, labels, and card stock) to help ensure trouble-free printing. See Print media guidelines for more information. NOTE: We recommend that you try a limited sample of any print media you are considering using with the printer before purchasing large quantities. By selecting appropriate print media and loading it properly, you are able to avoid most jams. See the following for instructions on loading print media: Loading print media in standard and optional trays Using and loading the multipurpose feeder Using and loading the optional envelope feeder Tips for avoiding jams Use only recommended print media. See Print media guidelines for more information. See Loading print media in standard and optional trays, Using and loading the multipurpose feeder, and Using and loading the optional envelope feeder to load print media properly. Do not overload the print media sources. Make sure the stack height does not exceed the maximum height indicated by the load line labels in the sources. Do not load wrinkled, creased, damp, or curled print media. Flex, fan, and straighten print media before you load it. If jams do occur with print media, try feeding one sheet at a time through the multipurpose feeder. Do not use print media that you have cut or trimmed yourself. Do not mix print media sizes, weights, or types in the same print media source. Use only recommended print media. See Recommended paper.
-
 1
1 -
2
-
3
-
4
-
5
-
6
-
7
-
8
-
9
-
10
-
11
-
12
-
13
-
14
-
15
-
16
-
17
-
18
-
19
-
20
-
21
-
22
-
23
-
24
-
25
-
26
-
27
-
28
-
29
-
30
-
31
-
32
-
33
-
34
-
35
-
36
-
37
-
38
-
39
-
40
-
41
-
42
-
43
-
44
-
45
-
46
-
47
-
48
-
49
-
50
-
51
-
52
-
53
-
54
-
55
-
56
-
57
-
58
-
59
-
60
-
61
-
62
-
63
-
64
-
65
-
66
-
67
-
68
-
69
-
70
-
71
-
72
-
73
-
74
-
75
-
76
-
77
-
78
-
79
-
80
-
81
-
82
-
83
-
84
-
85
-
86
-
87
-
88
-
89
-
90
-
91
-
92
-
93
-
94
-
95
-
96
-
97
-
98
-
99
-
100
-
101
-
102
-
103
-
104
-
105
-
106
-
107
-
108
-
109
-
110
-
111
-
112
-
113
-
114
-
115
-
116
-
117
-
118
-
119
-
120
-
121
-
122
-
123
-
124
-
125
-
126
-
127
-
128
-
129
-
130
-
131
-
132
-
133
-
134
-
135
-
 136
136 -
 137
137 -
 138
138 -
 139
139 -
 140
140 -
 141
141 -
 142
142 -
 143
143 -
 144
144 -
 145
145 -
 146
146 -
147
-
148
-
149
-
150
-
151
-
152
-
153
-
154
-
155
-
156
-
157
-
158
-
159
-
160
-
161
-
162
-
163
-
164
-
165
-
166
-
167
-
168
-
169
-
170
-
171
-
172
-
173
-
174
-
175
-
176
-
177
-
178
-
179
-
180
-
181
-
182
-
183
-
184
-
185
-
186
-
187
-
188
-
189
-
190
-
191
-
192
-
193
-
194
-
195
-
196
-
197
-
198
-
199
-
200
-
201
-
202
-
203
-
204
-
205
-
206
-
207
-
208
-
209
-
210
-
211
-
212
-
213
-
214
-
215
-
216
-
217
-
218
-
219
-
220
-
221
-
222
-
223
-
224
-
225
-
226
-
227
-
228
 |
 |
