Dell 5200n Mono Laser Printer Dell™ Workgroup Laser Printer M5200 Us - Page 156
Paper Jam Check Duplex, 235 Paper Jam, Check Duplex, step 5, Paper Jam Remove Cartridge
 |
View all Dell 5200n Mono Laser Printer manuals
Add to My Manuals
Save this manual to your list of manuals |
Page 156 highlights
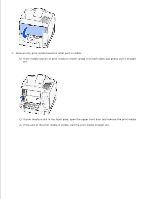
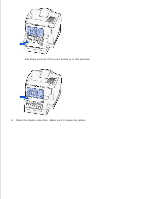
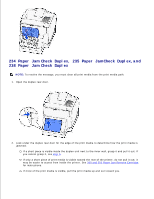
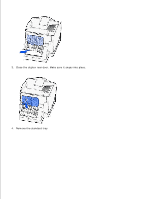
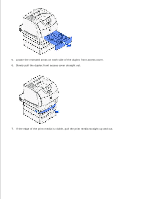
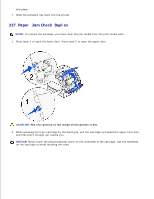
234 Paper Jam Check Duplex, 235 Paper Jam Check Duplex,and 238 Paper Jam Check Duplex NOTE: To resolve the message, you must clear all print media from the print media path. 1. Open the duplex rear door. 2. Look under the duplex rear door for the edge of the print media to determine how the print media is jammed: If a short piece is visible inside the duplex unit next to the inner wall, grasp it and pull it out. If you cannot grasp it, see step 5. If only a short piece of print media is visible toward the rear of the printer, do not pull it out; it may be easier to access from inside the printer. See 200 and 201 Paper Jam Remove Cartridge for instructions. If most of the print media is visible, pull the print media up and out toward you.
-
 1
1 -
2
-
3
-
4
-
5
-
6
-
7
-
8
-
9
-
10
-
11
-
12
-
13
-
14
-
15
-
16
-
17
-
18
-
19
-
20
-
21
-
22
-
23
-
24
-
25
-
26
-
27
-
28
-
29
-
30
-
31
-
32
-
33
-
34
-
35
-
36
-
37
-
38
-
39
-
40
-
41
-
42
-
43
-
44
-
45
-
46
-
47
-
48
-
49
-
50
-
51
-
52
-
53
-
54
-
55
-
56
-
57
-
58
-
59
-
60
-
61
-
62
-
63
-
64
-
65
-
66
-
67
-
68
-
69
-
70
-
71
-
72
-
73
-
74
-
75
-
76
-
77
-
78
-
79
-
80
-
81
-
82
-
83
-
84
-
85
-
86
-
87
-
88
-
89
-
90
-
91
-
92
-
93
-
94
-
95
-
96
-
97
-
98
-
99
-
100
-
101
-
102
-
103
-
104
-
105
-
106
-
107
-
108
-
109
-
110
-
111
-
112
-
113
-
114
-
115
-
116
-
117
-
118
-
119
-
120
-
121
-
122
-
123
-
124
-
125
-
126
-
127
-
128
-
129
-
130
-
131
-
132
-
133
-
134
-
135
-
136
-
137
-
138
-
139
-
140
-
141
-
142
-
143
-
144
-
145
-
146
-
147
-
148
-
149
-
150
-
 151
151 -
 152
152 -
 153
153 -
 154
154 -
 155
155 -
 156
156 -
 157
157 -
 158
158 -
 159
159 -
 160
160 -
 161
161 -
162
-
163
-
164
-
165
-
166
-
167
-
168
-
169
-
170
-
171
-
172
-
173
-
174
-
175
-
176
-
177
-
178
-
179
-
180
-
181
-
182
-
183
-
184
-
185
-
186
-
187
-
188
-
189
-
190
-
191
-
192
-
193
-
194
-
195
-
196
-
197
-
198
-
199
-
200
-
201
-
202
-
203
-
204
-
205
-
206
-
207
-
208
-
209
-
210
-
211
-
212
-
213
-
214
-
215
-
216
-
217
-
218
-
219
-
220
-
221
-
222
-
223
-
224
-
225
-
226
-
227
-
228
 |
 |

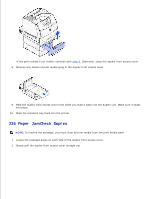
234 Paper Jam Check Duplex, 235 Paper Jam
Check Duplex,
and
238 Paper Jam Check Duplex
NOTE:
To resolve the message, you must clear all print media from the print media path.
Open the duplex rear door.
1.
Look under the duplex rear door for the edge of the print media to determine how the print media is
jammed:
If a short piece is visible inside the duplex unit next to the inner wall, grasp it and pull it out. If
you cannot grasp it, see
step 5
.
If only a short piece of print media is visible toward the rear of the printer, do not pull it out; it
may be easier to access from inside the printer. See
200
and
201 Paper Jam Remove Cartridge
for instructions.
If most of the print media is visible, pull the print media up and out toward you.
2.