Dell 5200n Mono Laser Printer Dell™ Workgroup Laser Printer M5200 Us - Page 147
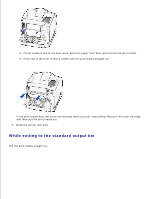
Paper Jam Open Rear Door, and then pull the print media out.
 |
View all Dell 5200n Mono Laser Printer manuals
Add to My Manuals
Save this manual to your list of manuals |
Page 147 highlights
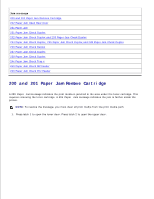
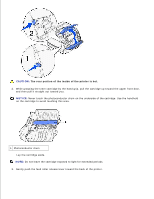
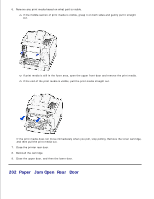
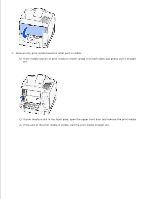
6. Remove any print media based on what part is visible. If the middle section of print media is visible, grasp it on both sides and gently pull it straight out. If print media is still in the fuser area, open the upper front door and remove the print media. If the end of the print media is visible, pull the print media straight out. If the print media does not move immediately when you pull, stop pulling. Remove the toner cartridge, and then pull the print media out. 7. Close the printer rear door. 8. Reinstall the cartridge. 9. Close the upper door, and then the lower door. 202 Paper Jam Open Rear Door
-
 1
1 -
2
-
3
-
4
-
5
-
6
-
7
-
8
-
9
-
10
-
11
-
12
-
13
-
14
-
15
-
16
-
17
-
18
-
19
-
20
-
21
-
22
-
23
-
24
-
25
-
26
-
27
-
28
-
29
-
30
-
31
-
32
-
33
-
34
-
35
-
36
-
37
-
38
-
39
-
40
-
41
-
42
-
43
-
44
-
45
-
46
-
47
-
48
-
49
-
50
-
51
-
52
-
53
-
54
-
55
-
56
-
57
-
58
-
59
-
60
-
61
-
62
-
63
-
64
-
65
-
66
-
67
-
68
-
69
-
70
-
71
-
72
-
73
-
74
-
75
-
76
-
77
-
78
-
79
-
80
-
81
-
82
-
83
-
84
-
85
-
86
-
87
-
88
-
89
-
90
-
91
-
92
-
93
-
94
-
95
-
96
-
97
-
98
-
99
-
100
-
101
-
102
-
103
-
104
-
105
-
106
-
107
-
108
-
109
-
110
-
111
-
112
-
113
-
114
-
115
-
116
-
117
-
118
-
119
-
120
-
121
-
122
-
123
-
124
-
125
-
126
-
127
-
128
-
129
-
130
-
131
-
132
-
133
-
134
-
135
-
136
-
137
-
138
-
139
-
140
-
141
-
 142
142 -
 143
143 -
 144
144 -
 145
145 -
 146
146 -
 147
147 -
 148
148 -
 149
149 -
 150
150 -
 151
151 -
 152
152 -
153
-
154
-
155
-
156
-
157
-
158
-
159
-
160
-
161
-
162
-
163
-
164
-
165
-
166
-
167
-
168
-
169
-
170
-
171
-
172
-
173
-
174
-
175
-
176
-
177
-
178
-
179
-
180
-
181
-
182
-
183
-
184
-
185
-
186
-
187
-
188
-
189
-
190
-
191
-
192
-
193
-
194
-
195
-
196
-
197
-
198
-
199
-
200
-
201
-
202
-
203
-
204
-
205
-
206
-
207
-
208
-
209
-
210
-
211
-
212
-
213
-
214
-
215
-
216
-
217
-
218
-
219
-
220
-
221
-
222
-
223
-
224
-
225
-
226
-
227
-
228
 |
 |

Remove any print media based on what part is visible.
If the middle section of print media is visible, grasp it on both sides and gently pull it straight
out.
6.
If print media is still in the fuser area, open the upper front door and remove the print media.
If the end of the print media is visible, pull the print media straight out.
If the print media does not move immediately when you pull, stop pulling. Remove the toner cartridge,
and then pull the print media out.
Close the printer rear door.
7.
Reinstall the cartridge.
8.
Close the upper door, and then the lower door.
9.
202 Paper Jam Open Rear Door