Dell 5200n Mono Laser Printer Dell™ Workgroup Laser Printer M5200 Us - Page 30
Installing an optional duplex unit
 |
View all Dell 5200n Mono Laser Printer manuals
Add to My Manuals
Save this manual to your list of manuals |
Page 30 highlights
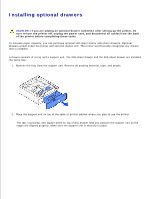
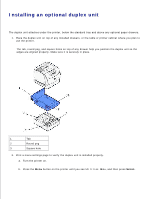
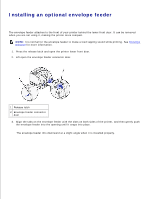
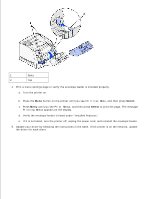
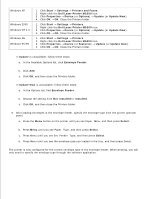
Installing an optional duplex unit The duplex unit attaches under the printer, below the standard tray and above any optional paper drawers. 1. Place the duplex unit on top of any installed drawers, or the table or printer cabinet where you plan to use the printer. The tab, round peg, and square holes on top of any drawer help you position the duplex unit so the edges are aligned properly. Make sure it is securely in place. 1 Tab 2 Round peg 3 Square hole 2. Print a menu settings page to verify the duplex unit is installed properly. a. Turn the printer on. b. Press the Menu button on the printer until you see Utilities Menu, and then press Select. c. d.
-
 1
1 -
2
-
3
-
4
-
5
-
6
-
7
-
8
-
9
-
10
-
11
-
12
-
13
-
14
-
15
-
16
-
17
-
18
-
19
-
20
-
21
-
22
-
23
-
24
-
 25
25 -
 26
26 -
 27
27 -
 28
28 -
 29
29 -
 30
30 -
 31
31 -
 32
32 -
 33
33 -
 34
34 -
 35
35 -
36
-
37
-
38
-
39
-
40
-
41
-
42
-
43
-
44
-
45
-
46
-
47
-
48
-
49
-
50
-
51
-
52
-
53
-
54
-
55
-
56
-
57
-
58
-
59
-
60
-
61
-
62
-
63
-
64
-
65
-
66
-
67
-
68
-
69
-
70
-
71
-
72
-
73
-
74
-
75
-
76
-
77
-
78
-
79
-
80
-
81
-
82
-
83
-
84
-
85
-
86
-
87
-
88
-
89
-
90
-
91
-
92
-
93
-
94
-
95
-
96
-
97
-
98
-
99
-
100
-
101
-
102
-
103
-
104
-
105
-
106
-
107
-
108
-
109
-
110
-
111
-
112
-
113
-
114
-
115
-
116
-
117
-
118
-
119
-
120
-
121
-
122
-
123
-
124
-
125
-
126
-
127
-
128
-
129
-
130
-
131
-
132
-
133
-
134
-
135
-
136
-
137
-
138
-
139
-
140
-
141
-
142
-
143
-
144
-
145
-
146
-
147
-
148
-
149
-
150
-
151
-
152
-
153
-
154
-
155
-
156
-
157
-
158
-
159
-
160
-
161
-
162
-
163
-
164
-
165
-
166
-
167
-
168
-
169
-
170
-
171
-
172
-
173
-
174
-
175
-
176
-
177
-
178
-
179
-
180
-
181
-
182
-
183
-
184
-
185
-
186
-
187
-
188
-
189
-
190
-
191
-
192
-
193
-
194
-
195
-
196
-
197
-
198
-
199
-
200
-
201
-
202
-
203
-
204
-
205
-
206
-
207
-
208
-
209
-
210
-
211
-
212
-
213
-
214
-
215
-
216
-
217
-
218
-
219
-
220
-
221
-
222
-
223
-
224
-
225
-
226
-
227
-
228
 |
 |

Installing an optional duplex unit
The duplex unit attaches under the printer, below the standard tray and above any optional paper drawers.
Place the duplex unit on top of any installed drawers, or the table or printer cabinet where you plan to
use the printer.
1.
The tab, round peg, and square holes on top of any drawer help you position the duplex unit so the
edges are aligned properly. Make sure it is securely in place.
1
Tab
2
Round peg
3
Square hole
Print a menu settings page to verify the duplex unit is installed properly.
Turn the printer on.
a.
Press the
Menu
button on the printer until you see
Utilities Menu
, and then press
Select.
b.
c.
2.