Dell Inspiron 7000 Dell Inspiron 7000 Service Manual - Page 39
Remove any PC Cards. - remove hard drive
 |
View all Dell Inspiron 7000 manuals
Add to My Manuals
Save this manual to your list of manuals |
Page 39 highlights
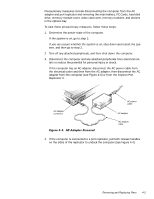
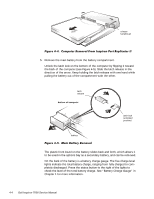
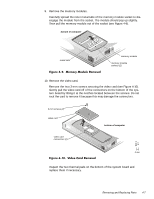
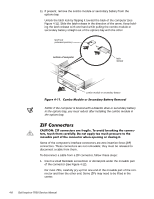
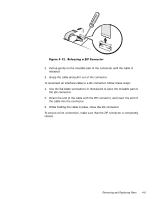
6. Remove any PC Cards. To remove a type I or type II PC Card from the top connector (see Figure 4-6), press the top eject button twice. To remove a type 1 or type II PC Card from the bottom connector, press the bottom eject button twice. To remove a type III card, press the bottom eject button twice. NOTE: The first time you press an eject button, the eject button itself pops out. The second time you press the eject button, the PC Card is released and extends slightly from the slot. Grasp the end of the card, and pull it completely from the slot. . top eject button PC Card 7. Remove the hard-disk drive assembly. Loosen the two captive screws that secure the hard-disk drive into the bottom of the computer. The front edge of the cover pops up slightly. Slide the hard-disk drive toward the front of the computer and then lift the drive out of the computer (see Figure 4-7). Removing and Replacing Parts 4-5
-
 1
1 -
2
-
3
-
4
-
5
-
6
-
7
-
8
-
9
-
10
-
11
-
12
-
13
-
14
-
15
-
16
-
17
-
18
-
19
-
20
-
21
-
22
-
23
-
24
-
25
-
26
-
27
-
28
-
29
-
30
-
31
-
32
-
33
-
 34
34 -
 35
35 -
 36
36 -
 37
37 -
 38
38 -
 39
39 -
 40
40 -
 41
41 -
 42
42 -
 43
43 -
 44
44 -
45
-
46
-
47
-
48
-
49
-
50
-
51
-
52
-
53
-
54
-
55
-
56
-
57
-
58
-
59
-
60
-
61
-
62
-
63
-
64
-
65
-
66
-
67
-
68
-
69
-
70
-
71
-
72
-
73
-
74
-
75
-
76
-
77
-
78
-
79
-
80
-
81
-
82
-
83
-
84
-
85
-
86
-
87
-
88
-
89
-
90
-
91
-
92
-
93
-
94
-
95
-
96
-
97
-
98
-
99
-
100
-
101
-
102
-
103
-
104
 |
 |