Dell Inspiron 7000 Dell Inspiron 7000 Service Manual - Page 89
The heat exchanger/fan can be removed without removing the palmrest
 |
View all Dell Inspiron 7000 manuals
Add to My Manuals
Save this manual to your list of manuals |
Page 89 highlights
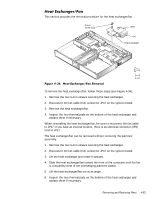
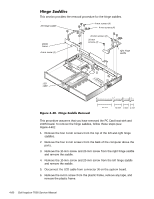
This section provides the removal procedure for the heat exchanger/fan. 5-mm screws (2) cable fan heat exchanger To remove the heat exchanger/fan, follow these steps (see Figure 4-36): 1. Remove the two 5-mm screws securing the heat exchanger. 2. Disconnect the fan cable from connector JP17 on the system board. 3. Remove the heat exchanger/fan. 4. Inspect the two thermal pads on the bottom of the heat exchanger and replace them if necessary. When reinstalling the heat exchanger/fan, be sure to reconnect the fan cable to JP17; if you have an internal modem, there is an identical connector (JP2) next to JP17. The heat exchanger/fan can be removed without removing the palmrest assembly. 1. Remove the two 5-mm screws securing the heat exchanger. 2. Disconnect the fan cable from connector JP17 on the system board. 3. Lift the heat exchanger and rotate it upward. 4. Slide the heat exchanger/fan toward the front of the computer until the fan is completely clear of the overhanging palmrest plastic. 5. Lift the heat exchanger/fan out at an angle. 6. Inspect the two thermal pads on the bottom of the heat exchanger and replace them if necessary. Removing and Replacing Parts 4-55
-
 1
1 -
2
-
3
-
4
-
5
-
6
-
7
-
8
-
9
-
10
-
11
-
12
-
13
-
14
-
15
-
16
-
17
-
18
-
19
-
20
-
21
-
22
-
23
-
24
-
25
-
26
-
27
-
28
-
29
-
30
-
31
-
32
-
33
-
34
-
35
-
36
-
37
-
38
-
39
-
40
-
41
-
42
-
43
-
44
-
45
-
46
-
47
-
48
-
49
-
50
-
51
-
52
-
53
-
54
-
55
-
56
-
57
-
58
-
59
-
60
-
61
-
62
-
63
-
64
-
65
-
66
-
67
-
68
-
69
-
70
-
71
-
72
-
73
-
74
-
75
-
76
-
77
-
78
-
79
-
80
-
81
-
82
-
83
-
 84
84 -
 85
85 -
 86
86 -
 87
87 -
 88
88 -
 89
89 -
 90
90 -
 91
91 -
 92
92 -
 93
93 -
 94
94 -
95
-
96
-
97
-
98
-
99
-
100
-
101
-
102
-
103
-
104
 |
 |
