Denon AVR 4806 Owners Manual - Page 105
Option Setup, Setting the Channel Setup
 |
UPC - 081757506465
View all Denon AVR 4806 manuals
Add to My Manuals
Save this manual to your list of manuals |
Page 105 highlights
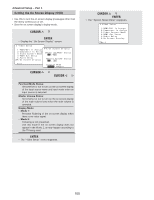
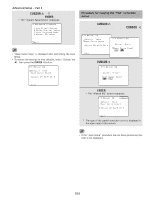
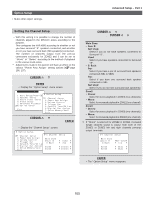
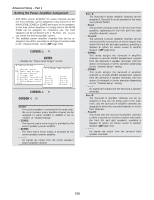
Option Setup • Make other expert settings. Advanced Setup - Part 1 Setting the Channel Setup • With this setting it is possible to change the number of channels played in the different zones according to the purpose. This configures the AVR-4806 according to whether or not you have surround "B" speakers connected, and whether or not you have surround back (SB) speaker(s) connected. The number of channels output from the pre-out connectors exclusively for ZONE2 and 3 can be set to "Mono" or "Stereo" according to the method of playback in the various multi-zones. Adjustments made in this section will have an effect on the various "Power Amp Assign" setting options ( page 106, 107). 1 Press the CURSOR D or H button to select the "Option Setup" at the "System Setup Menu", then press the ENTER button. • Display the "Option Setup" menu screen. 2 Press the CURSOR D or H button to select the "Channel Setup", then press the ENTER button. • Display the "Channel Setup" screen. 3 Press the CURSOR D or H button to select the zone, then press the CURSOR F or G button to select the channel setting. Main Zone: • Surr. B: Not Used: Select if you do not have speakers connected to Surround "B". Used: Select if you have speakers connected to Surround "B". • S. Back: 2sp: Select if you have a pair of surround back speakers connected (SBL & SBR). 1sp: Select if you have one surround back speaker connected to SBL. Not Used: Select if you do not have surround back speaker(s). Zone2: • Stereo: Select for stereo playback in ZONE2 (two channels). • Mono: Select for monaural playback in ZONE2 (one channel). Zone3: • Stereo: Select for stereo playback in ZONE3 (two channels). • Mono: Select for monaural playback in ZONE3 (one channel). If "Mono" is selected for ZONE2 or ZONE3, monaural (single channel) sound is output from both of the ZONE2 or ZONE3 left and right channels pre-amp output terminals. 4 Press the ENTER button to enter the setting. • The "Option Setup" menu reappears. 105
-
 1
1 -
2
-
3
-
4
-
5
-
6
-
7
-
8
-
9
-
10
-
11
-
12
-
13
-
14
-
15
-
16
-
17
-
18
-
19
-
20
-
21
-
22
-
23
-
24
-
25
-
26
-
27
-
28
-
29
-
30
-
31
-
32
-
33
-
34
-
35
-
36
-
37
-
38
-
39
-
40
-
41
-
42
-
43
-
44
-
45
-
46
-
47
-
48
-
49
-
50
-
51
-
52
-
53
-
54
-
55
-
56
-
57
-
58
-
59
-
60
-
61
-
62
-
63
-
64
-
65
-
66
-
67
-
68
-
69
-
70
-
71
-
72
-
73
-
74
-
75
-
76
-
77
-
78
-
79
-
80
-
81
-
82
-
83
-
84
-
85
-
86
-
87
-
88
-
89
-
90
-
91
-
92
-
93
-
94
-
95
-
96
-
97
-
98
-
99
-
 100
100 -
 101
101 -
 102
102 -
 103
103 -
 104
104 -
 105
105 -
 106
106 -
 107
107 -
 108
108 -
 109
109 -
 110
110 -
111
-
112
-
113
-
114
-
115
-
116
-
117
-
118
-
119
-
120
-
121
-
122
-
123
-
124
-
125
-
126
-
127
-
128
-
129
-
130
-
131
-
132
-
133
-
134
-
135
-
136
-
137
-
138
-
139
-
140
-
141
-
142
-
143
-
144
-
145
-
146
-
147
-
148
-
149
-
150
-
151
-
152
-
153
-
154
 |
 |
