Denon AVR 4806 Owners Manual - Page 89
Audio Input Setup
 |
UPC - 081757506465
View all Denon AVR 4806 manuals
Add to My Manuals
Save this manual to your list of manuals |
Page 89 highlights
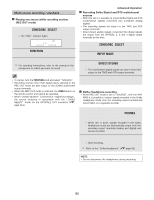
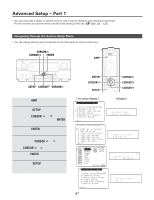
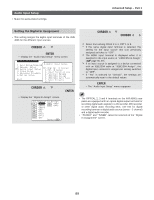
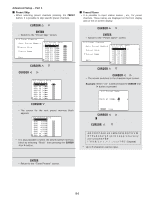
Audio Input Setup • Make the audio-related settings. Advanced Setup - Part 1 Setting the Digital In Assignment • This setting assigns the digital input terminals of the AVR4806 for the different input sources. 1 Press the CURSOR D or H button to select "Audio Input Setup" at the "System Setup Menu", then press the ENTER button. • Display the "Audio Input Setup" menu screen. 2 Press the CURSOR D or H button to select "Digital In Assign", then press the ENTER button. • Display the "Digital In Assign" screen. 3 Press the CURSOR D or H button to select the input source, then press the CURSOR F or G button to select the digital input terminal. Select from among COAX 1 to 3, OPT 1 to 5. If the same digital input terminal is selected, the setting for the input source that was previously assigned switches to "OFF". The HDMI input terminal is displayed when it is assigned to the input source at "HDMI/DVI In Assign" ( page 96, 97). If an input source is assigned to a device connected with an IEEE1394 cable at "IEEE1394 Assign", the digital input connector's assignment setting switches to "OFF". If "Yes" is selected for "Default", the settings are automatically reset to the default values. 4 Press the ENTER button to enter the setting. • The "Audio Input Setup" menu reappears. • The OPTICAL 2, 3 and 4 terminals on the AVR-4806's rear panel are equipped with an optical digital output terminal for recording digital audio signals to a CD recorder, MD recorder, or other digital audio recording deck. Use this for digital recording between a digital audio source (stereo - 2 channel) and a digital audio recorder. • "PHONO" and "TUNER" cannot be selected on the "Digital In Assignment" screen. 89
-
 1
1 -
2
-
3
-
4
-
5
-
6
-
7
-
8
-
9
-
10
-
11
-
12
-
13
-
14
-
15
-
16
-
17
-
18
-
19
-
20
-
21
-
22
-
23
-
24
-
25
-
26
-
27
-
28
-
29
-
30
-
31
-
32
-
33
-
34
-
35
-
36
-
37
-
38
-
39
-
40
-
41
-
42
-
43
-
44
-
45
-
46
-
47
-
48
-
49
-
50
-
51
-
52
-
53
-
54
-
55
-
56
-
57
-
58
-
59
-
60
-
61
-
62
-
63
-
64
-
65
-
66
-
67
-
68
-
69
-
70
-
71
-
72
-
73
-
74
-
75
-
76
-
77
-
78
-
79
-
80
-
81
-
82
-
83
-
 84
84 -
 85
85 -
 86
86 -
 87
87 -
 88
88 -
 89
89 -
 90
90 -
 91
91 -
 92
92 -
 93
93 -
 94
94 -
95
-
96
-
97
-
98
-
99
-
100
-
101
-
102
-
103
-
104
-
105
-
106
-
107
-
108
-
109
-
110
-
111
-
112
-
113
-
114
-
115
-
116
-
117
-
118
-
119
-
120
-
121
-
122
-
123
-
124
-
125
-
126
-
127
-
128
-
129
-
130
-
131
-
132
-
133
-
134
-
135
-
136
-
137
-
138
-
139
-
140
-
141
-
142
-
143
-
144
-
145
-
146
-
147
-
148
-
149
-
150
-
151
-
152
-
153
-
154
 |
 |
