Denon AVR 4806 Owners Manual - Page 123
Setting the Direct Mode Setup, Setting the MIC Input Select
 |
UPC - 081757506465
View all Denon AVR 4806 manuals
Add to My Manuals
Save this manual to your list of manuals |
Page 123 highlights
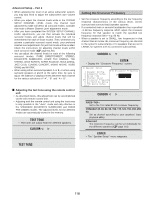
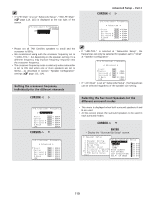
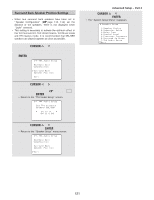
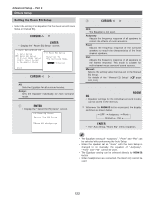
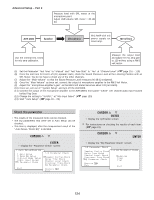
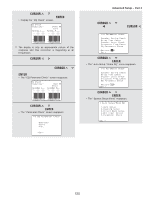
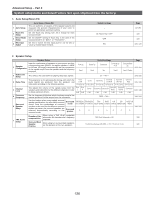
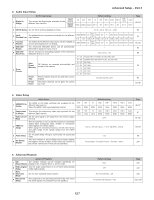
Setting the Direct Mode Setup Advanced Setup - Part 2 Setting the MIC Input Select • Perform the ON/OFF setting of Room EQ when the surround mode is "DIRECT" or "PURE DIRECT". 1 Press the CURSOR D or H button to select the "Direct Mode Setup" at the "Auto Setup / Room EQ" menu, then press the ENTER button. • Display the "Direct Mode Setup" screen. • Sets whether the setup microphone is connected to the PIN JACK (V.AUX L channel) connector or the MINI JACK (SETUP MIC) connector. 1 Press the CURSOR D or H button to select the "Mic Input Select" at the "Auto Setup / Room EQ" menu, then press the ENTER button. • Display the "Mic Input Select" screen. 2 Press the CURSOR F or G button to select the "ON" or "OFF". 3 Press the ENTER button to enter the setting. • The "Auto Setup / Room EQ" menu reappears. 2 Press the CURSOR F or G button to select the "Mic" or "V.AUX L". 3 Press the ENTER button to enter the setting. • The "Auto Setup / Room EQ" menu reappears. Specifications and Setup Procedure for Non-DENON Microphone Required Microphone for DENON Auto-Setup Room EQ : Product name Countryman B3 Required Microphone Amplifier Specification for DENON Auto-Setup Room EQ • Gain : 29 dB • Frequency Response : 10 ~ 30 kHz Full Flat (Ex : Rane MS1b) Microphone Placement • Set the microphone using microphone stand, or other method, at the prime listening position. • Point the top of the microphone toward the ceiling. • Adjust the height so that the top of microphone to matches the height of your ear when sitting. Microphone Amplifier Gain Setting using Sound Level Meter and RMS Volt Meter First you will need to adjust the " microphone amplifier gain". (1) Connect the all speakers and the video monitor (for the on screen display) with the AVR-4806. (2) Connect the microphone with the microphone amplifier. (3) Turn on the AVR-4806 and the "microphone amplifier". (4) Turn on the "Phantom Supply" on the microphone amplifier. 123
-
 1
1 -
2
-
3
-
4
-
5
-
6
-
7
-
8
-
9
-
10
-
11
-
12
-
13
-
14
-
15
-
16
-
17
-
18
-
19
-
20
-
21
-
22
-
23
-
24
-
25
-
26
-
27
-
28
-
29
-
30
-
31
-
32
-
33
-
34
-
35
-
36
-
37
-
38
-
39
-
40
-
41
-
42
-
43
-
44
-
45
-
46
-
47
-
48
-
49
-
50
-
51
-
52
-
53
-
54
-
55
-
56
-
57
-
58
-
59
-
60
-
61
-
62
-
63
-
64
-
65
-
66
-
67
-
68
-
69
-
70
-
71
-
72
-
73
-
74
-
75
-
76
-
77
-
78
-
79
-
80
-
81
-
82
-
83
-
84
-
85
-
86
-
87
-
88
-
89
-
90
-
91
-
92
-
93
-
94
-
95
-
96
-
97
-
98
-
99
-
100
-
101
-
102
-
103
-
104
-
105
-
106
-
107
-
108
-
109
-
110
-
111
-
112
-
113
-
114
-
115
-
116
-
117
-
 118
118 -
 119
119 -
 120
120 -
 121
121 -
 122
122 -
 123
123 -
 124
124 -
 125
125 -
 126
126 -
 127
127 -
 128
128 -
129
-
130
-
131
-
132
-
133
-
134
-
135
-
136
-
137
-
138
-
139
-
140
-
141
-
142
-
143
-
144
-
145
-
146
-
147
-
148
-
149
-
150
-
151
-
152
-
153
-
154
 |
 |
