Denon AVR 4806 Owners Manual - Page 109
Setting the Trigger Out, Trigger Out at the Option Setup menu
 |
UPC - 081757506465
View all Denon AVR 4806 manuals
Add to My Manuals
Save this manual to your list of manuals |
Page 109 highlights
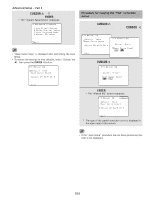
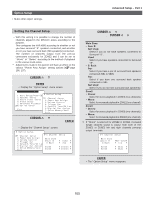
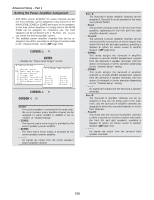
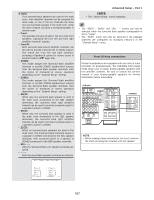
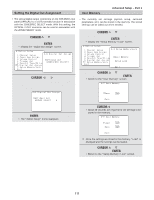
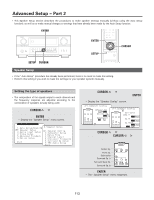
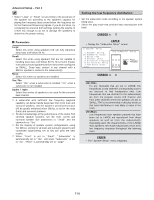
Setting the Trigger Out • Three 12 V DC Trigger Outputs on the rear panel can be used to control other devices with compatible trigger inputs, such as motorized screens, motorized screen masking, motorized drapes, and other trigger-controlled devices. • Set the DC output supplied from the trigger out terminals for the various input sources to "ON" or "OFF". 1 Press the CURSOR D or H button to select the "Trigger Out" at the "Option Setup" menu, then press the ENTER button. • Display the "Trigger Out" screen. Advanced Setup - Part 1 5 If "MAIN" was selected at step 3: Press the CURSOR D or H button to select the surround mode, then press the CURSOR F or G button to select the "ON" or "OFF". ON: If that surround mode is selected when an input source set to "ON" is selected, the power supplied from the trigger out terminal turns on. OFF: If that surround mode is selected when an input source set to "ON" is selected, the power supplied from the trigger out terminal turns off. 2 Press the CURSOR D or H button to select the trigger out terminal you want to set, then press the ENTER button. • Switch to the setting screen. Example: When "Trigger Out 1" is selected 6 Press the ENTER button. • Return to the "Trigger Out" screen. Use the same procedure to make the settings for Trigger Out 2, 3. 7 Press the CURSOR D or H button to select the "Exit", then press the ENTER button. • The "Option Setup" menu reappears. 3 Press the CURSOR F or G button to select the zone (MAIN ZONE, ZONE2 and ZONE3). The power supplied from the trigger out terminal turns on and off when the power for the set zone is turned on and off. 4 Press the CURSOR D or H button to select the input source, then press the CURSOR F or G button to select the "ON" or "OFF". ON: When that input source is selected, the power supplied from the trigger out terminal turns on. OFF: When that input source is selected, the power supplied from the trigger out terminal turns off. If "Yes" is selected for "Default", the setting are automatically reset to the default values. 109
-
 1
1 -
2
-
3
-
4
-
5
-
6
-
7
-
8
-
9
-
10
-
11
-
12
-
13
-
14
-
15
-
16
-
17
-
18
-
19
-
20
-
21
-
22
-
23
-
24
-
25
-
26
-
27
-
28
-
29
-
30
-
31
-
32
-
33
-
34
-
35
-
36
-
37
-
38
-
39
-
40
-
41
-
42
-
43
-
44
-
45
-
46
-
47
-
48
-
49
-
50
-
51
-
52
-
53
-
54
-
55
-
56
-
57
-
58
-
59
-
60
-
61
-
62
-
63
-
64
-
65
-
66
-
67
-
68
-
69
-
70
-
71
-
72
-
73
-
74
-
75
-
76
-
77
-
78
-
79
-
80
-
81
-
82
-
83
-
84
-
85
-
86
-
87
-
88
-
89
-
90
-
91
-
92
-
93
-
94
-
95
-
96
-
97
-
98
-
99
-
100
-
101
-
102
-
103
-
 104
104 -
 105
105 -
 106
106 -
 107
107 -
 108
108 -
 109
109 -
 110
110 -
 111
111 -
 112
112 -
 113
113 -
 114
114 -
115
-
116
-
117
-
118
-
119
-
120
-
121
-
122
-
123
-
124
-
125
-
126
-
127
-
128
-
129
-
130
-
131
-
132
-
133
-
134
-
135
-
136
-
137
-
138
-
139
-
140
-
141
-
142
-
143
-
144
-
145
-
146
-
147
-
148
-
149
-
150
-
151
-
152
-
153
-
154
 |
 |
