Epson PowerLite Pro G6150 User Manual - Page 39
Attaching and Removing the Lens Unit, Attaching the Lens Unit
 |
View all Epson PowerLite Pro G6150 manuals
Add to My Manuals
Save this manual to your list of manuals |
Page 39 highlights
4. Connect the stereo mini-jack end of the cable to your projector's Audio Out port. Parent topic: Projector Connections Attaching and Removing the Lens Unit Follow the instructions in these sections to attach or remove the lens unit. Attaching the Lens Unit Removing the Lens Unit Parent topic: Setting Up the Projector Attaching the Lens Unit You can attach a compatible lens to the projector. Note: Make sure the front of the projector is not facing up while the lens unit is removed to help prevent dirt or dust from entering the projector. Be sure to attach a compatible lens only. Caution: Avoid touching the lens with your bare hands to prevent fingerprints on or damage to the lens surface. 1. Turn the focus ring as shown until it stops. 39
-
 1
1 -
2
-
3
-
4
-
5
-
6
-
7
-
8
-
9
-
10
-
11
-
12
-
13
-
14
-
15
-
16
-
17
-
18
-
19
-
20
-
21
-
22
-
23
-
24
-
25
-
26
-
27
-
28
-
29
-
30
-
31
-
32
-
33
-
 34
34 -
 35
35 -
 36
36 -
 37
37 -
 38
38 -
 39
39 -
 40
40 -
 41
41 -
 42
42 -
 43
43 -
 44
44 -
45
-
46
-
47
-
48
-
49
-
50
-
51
-
52
-
53
-
54
-
55
-
56
-
57
-
58
-
59
-
60
-
61
-
62
-
63
-
64
-
65
-
66
-
67
-
68
-
69
-
70
-
71
-
72
-
73
-
74
-
75
-
76
-
77
-
78
-
79
-
80
-
81
-
82
-
83
-
84
-
85
-
86
-
87
-
88
-
89
-
90
-
91
-
92
-
93
-
94
-
95
-
96
-
97
-
98
-
99
-
100
-
101
-
102
-
103
-
104
-
105
-
106
-
107
-
108
-
109
-
110
-
111
-
112
-
113
-
114
-
115
-
116
-
117
-
118
-
119
-
120
-
121
-
122
-
123
-
124
-
125
-
126
-
127
-
128
-
129
-
130
-
131
-
132
-
133
-
134
-
135
-
136
-
137
-
138
-
139
-
140
-
141
-
142
-
143
-
144
-
145
-
146
-
147
-
148
-
149
-
150
-
151
-
152
-
153
-
154
-
155
-
156
-
157
-
158
-
159
-
160
-
161
-
162
-
163
-
164
-
165
-
166
-
167
-
168
-
169
-
170
-
171
-
172
-
173
-
174
-
175
-
176
-
177
-
178
-
179
-
180
-
181
-
182
-
183
-
184
-
185
-
186
-
187
-
188
-
189
-
190
-
191
-
192
-
193
-
194
-
195
-
196
-
197
-
198
-
199
-
200
-
201
-
202
-
203
-
204
-
205
-
206
-
207
-
208
-
209
-
210
-
211
-
212
-
213
-
214
-
215
-
216
-
217
-
218
-
219
-
220
-
221
-
222
-
223
-
224
-
225
-
226
-
227
-
228
-
229
-
230
-
231
-
232
-
233
-
234
-
235
-
236
-
237
-
238
-
239
-
240
 |
 |
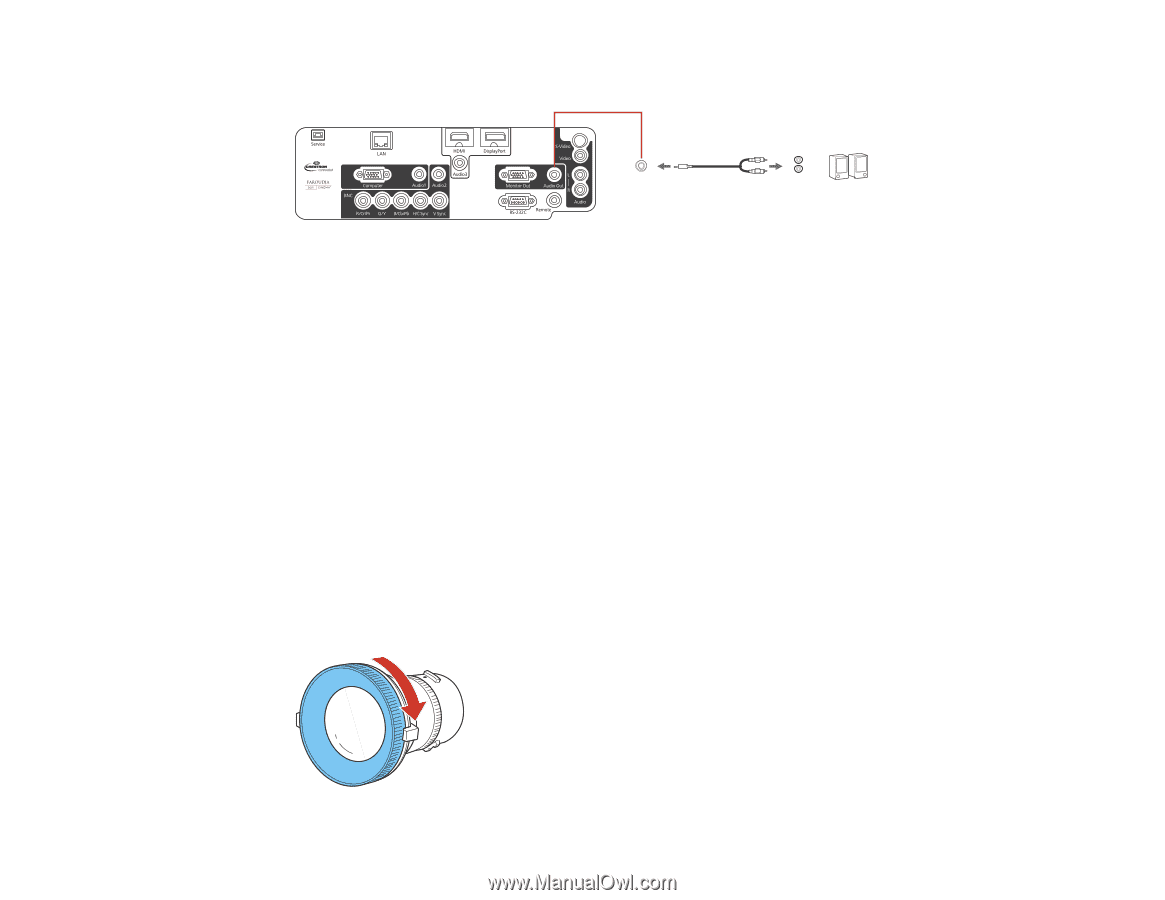
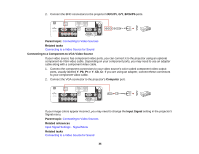
4.
Connect the stereo mini-jack end of the cable to your projector's
Audio Out
port.
Parent topic:
Projector Connections
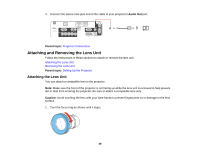
Attaching and Removing the Lens Unit
Follow the instructions in these sections to attach or remove the lens unit.
Attaching the Lens Unit
Removing the Lens Unit
Parent topic:
Setting Up the Projector
Attaching the Lens Unit
You can attach a compatible lens to the projector.
Note:
Make sure the front of the projector is not facing up while the lens unit is removed to help prevent
dirt or dust from entering the projector. Be sure to attach a compatible lens only.
Caution:
Avoid touching the lens with your bare hands to prevent fingerprints on or damage to the lens
surface.
1.
Turn the focus ring as shown until it stops.
39