Epson PowerLite Pro G6150 User Manual - Page 82
Adjusting the Image Position Using Lens Shift, Abs. Color Temp.
 |
View all Epson PowerLite Pro G6150 manuals
Add to My Manuals
Save this manual to your list of manuals |
Page 82 highlights
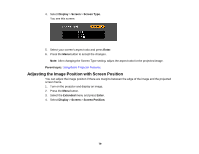
Top menu Image Signal Settings Extended Submenu/Option Color Mode Abs. Color Temp. Advanced • Gamma • RGB • RGBCMY Auto Iris Reset Auto Setup Geometric Correction Multi-Projection • Brightness Level • Edge Blending • Multi-screen Parent topic: Displaying a Test Pattern Adjusting the Image Position Using Lens Shift If the projector cannot be installed directly in front of the screen, you can adjust the position of the projected image using the lens shift feature. Note: Wait 30 minutes after turning on the projector before setting the focus, zoom, and lens shift for maximum accuracy. 1. Turn on the projector and display an image. 82
-
 1
1 -
2
-
3
-
4
-
5
-
6
-
7
-
8
-
9
-
10
-
11
-
12
-
13
-
14
-
15
-
16
-
17
-
18
-
19
-
20
-
21
-
22
-
23
-
24
-
25
-
26
-
27
-
28
-
29
-
30
-
31
-
32
-
33
-
34
-
35
-
36
-
37
-
38
-
39
-
40
-
41
-
42
-
43
-
44
-
45
-
46
-
47
-
48
-
49
-
50
-
51
-
52
-
53
-
54
-
55
-
56
-
57
-
58
-
59
-
60
-
61
-
62
-
63
-
64
-
65
-
66
-
67
-
68
-
69
-
70
-
71
-
72
-
73
-
74
-
75
-
76
-
 77
77 -
 78
78 -
 79
79 -
 80
80 -
 81
81 -
 82
82 -
 83
83 -
 84
84 -
 85
85 -
 86
86 -
 87
87 -
88
-
89
-
90
-
91
-
92
-
93
-
94
-
95
-
96
-
97
-
98
-
99
-
100
-
101
-
102
-
103
-
104
-
105
-
106
-
107
-
108
-
109
-
110
-
111
-
112
-
113
-
114
-
115
-
116
-
117
-
118
-
119
-
120
-
121
-
122
-
123
-
124
-
125
-
126
-
127
-
128
-
129
-
130
-
131
-
132
-
133
-
134
-
135
-
136
-
137
-
138
-
139
-
140
-
141
-
142
-
143
-
144
-
145
-
146
-
147
-
148
-
149
-
150
-
151
-
152
-
153
-
154
-
155
-
156
-
157
-
158
-
159
-
160
-
161
-
162
-
163
-
164
-
165
-
166
-
167
-
168
-
169
-
170
-
171
-
172
-
173
-
174
-
175
-
176
-
177
-
178
-
179
-
180
-
181
-
182
-
183
-
184
-
185
-
186
-
187
-
188
-
189
-
190
-
191
-
192
-
193
-
194
-
195
-
196
-
197
-
198
-
199
-
200
-
201
-
202
-
203
-
204
-
205
-
206
-
207
-
208
-
209
-
210
-
211
-
212
-
213
-
214
-
215
-
216
-
217
-
218
-
219
-
220
-
221
-
222
-
223
-
224
-
225
-
226
-
227
-
228
-
229
-
230
-
231
-
232
-
233
-
234
-
235
-
236
-
237
-
238
-
239
-
240
 |
 |

Top menu
Submenu/Option
Image
Color Mode
Abs. Color Temp.
Advanced
•
Gamma
•
RGB
•
RGBCMY
Auto Iris
Reset
Signal
Auto Setup
Settings
Geometric Correction
Extended
Multi-Projection
•
Brightness Level
•
Edge Blending
•
Multi-screen
Parent topic:
Displaying a Test Pattern
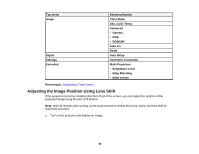
Adjusting the Image Position Using Lens Shift
If the projector cannot be installed directly in front of the screen, you can adjust the position of the
projected image using the lens shift feature.
Note:
Wait 30 minutes after turning on the projector before setting the focus, zoom, and lens shift for
maximum accuracy.
1.
Turn on the projector and display an image.
82