Epson PowerLite Pro G6150 User Manual - Page 56
Run LaunchU3.exe, Allow, In Windows Vista, if you see the AutoPlay window, select
 |
View all Epson PowerLite Pro G6150 manuals
Add to My Manuals
Save this manual to your list of manuals |
Page 56 highlights
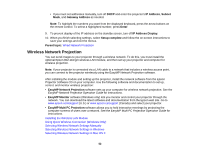
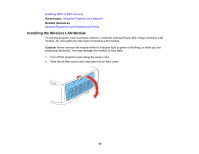
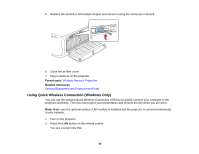
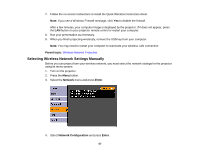
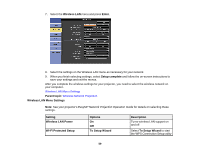
3. Verify the correct SSID and IP address is displayed, then remove the wireless LAN module from the projector. 4. Insert the Quick Wireless Connection USB key into the same port used for the wireless LAN module. You see a projected message that the network information update is complete. 5. Remove the USB key. 6. Now connect the USB key to a USB port on your computer or notebook. Note: In Windows Vista, if you see the AutoPlay window, select Run LaunchU3.exe, then select Allow on the next screen. 56
-
 1
1 -
2
-
3
-
4
-
5
-
6
-
7
-
8
-
9
-
10
-
11
-
12
-
13
-
14
-
15
-
16
-
17
-
18
-
19
-
20
-
21
-
22
-
23
-
24
-
25
-
26
-
27
-
28
-
29
-
30
-
31
-
32
-
33
-
34
-
35
-
36
-
37
-
38
-
39
-
40
-
41
-
42
-
43
-
44
-
45
-
46
-
47
-
48
-
49
-
50
-
 51
51 -
 52
52 -
 53
53 -
 54
54 -
 55
55 -
 56
56 -
 57
57 -
 58
58 -
 59
59 -
 60
60 -
 61
61 -
62
-
63
-
64
-
65
-
66
-
67
-
68
-
69
-
70
-
71
-
72
-
73
-
74
-
75
-
76
-
77
-
78
-
79
-
80
-
81
-
82
-
83
-
84
-
85
-
86
-
87
-
88
-
89
-
90
-
91
-
92
-
93
-
94
-
95
-
96
-
97
-
98
-
99
-
100
-
101
-
102
-
103
-
104
-
105
-
106
-
107
-
108
-
109
-
110
-
111
-
112
-
113
-
114
-
115
-
116
-
117
-
118
-
119
-
120
-
121
-
122
-
123
-
124
-
125
-
126
-
127
-
128
-
129
-
130
-
131
-
132
-
133
-
134
-
135
-
136
-
137
-
138
-
139
-
140
-
141
-
142
-
143
-
144
-
145
-
146
-
147
-
148
-
149
-
150
-
151
-
152
-
153
-
154
-
155
-
156
-
157
-
158
-
159
-
160
-
161
-
162
-
163
-
164
-
165
-
166
-
167
-
168
-
169
-
170
-
171
-
172
-
173
-
174
-
175
-
176
-
177
-
178
-
179
-
180
-
181
-
182
-
183
-
184
-
185
-
186
-
187
-
188
-
189
-
190
-
191
-
192
-
193
-
194
-
195
-
196
-
197
-
198
-
199
-
200
-
201
-
202
-
203
-
204
-
205
-
206
-
207
-
208
-
209
-
210
-
211
-
212
-
213
-
214
-
215
-
216
-
217
-
218
-
219
-
220
-
221
-
222
-
223
-
224
-
225
-
226
-
227
-
228
-
229
-
230
-
231
-
232
-
233
-
234
-
235
-
236
-
237
-
238
-
239
-
240
 |
 |

3.
Verify the correct SSID and IP address is displayed, then remove the wireless LAN module from the
projector.
4.
Insert the Quick Wireless Connection USB key into the same port used for the wireless LAN module.
You see a projected message that the network information update is complete.
5.
Remove the USB key.
6.
Now connect the USB key to a USB port on your computer or notebook.
Note:
In Windows Vista, if you see the AutoPlay window, select
Run LaunchU3.exe
, then select
Allow
on the next screen.
56