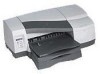
HP 2600 HP Business Inkjet 2600/2600dn - (English) User's Guide - Page 16
Step 5: Set up the LCD control panel for your language (optional)
 |
View all HP 2600 manuals
Add to My Manuals
Save this manual to your list of manuals |
Page 16 highlights
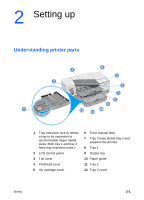
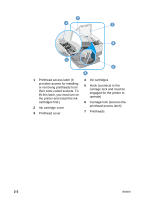
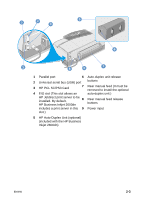
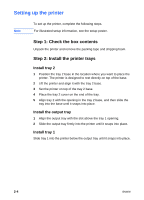
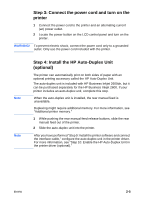
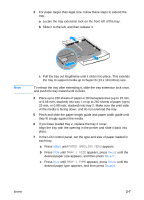
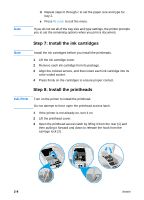
Note Step 5: Set up the LCD control panel for your language (optional) If necessary, attach the LCD control panel overlay for your preferred language, and configure the printer to display messages and print configuration pages in your preferred language. When the printer is turned on for the first time, you have the option to set the language to display messages in different languages. To configure the LCD control panel language 1 Ensure that the printer is turned off. 2 Press and hold VALUE on the LCD control panel and turn on the printer. 3 Press VALUE to scroll through the language list. 4 Press SELECT to confirm the language selection. Step 6: Load paper and configure media types and sizes By default, tray 1 is designed to support letter and A4 media, and tray 2 is designed to support larger media sizes. However, you can load any supported size or type of media in either tray. To use your printer most effectively, decide which types and sizes of media you want to use in the paper trays, and then configure this information in the LCD control panel. For more information about configuring paper trays, as well as a summary of media you can use with the printer, see "Selecting and using print media." To load paper in the paper trays 1 Grasp the handle under the front of the tray, and then pull the tray out of the printer. If you are loading tray 2, remove the tray 2 cover. 2 Pinch and slide the paper length guide and paper width guide to their outermost positions. 2-6 ENWW
-
 1
1 -
2
-
3
-
4
-
5
-
6
-
7
-
8
-
9
-
10
-
 11
11 -
 12
12 -
 13
13 -
 14
14 -
 15
15 -
 16
16 -
 17
17 -
 18
18 -
 19
19 -
 20
20 -
 21
21 -
22
-
23
-
24
-
25
-
26
-
27
-
28
-
29
-
30
-
31
-
32
-
33
-
34
-
35
-
36
-
37
-
38
-
39
-
40
-
41
-
42
-
43
-
44
-
45
-
46
-
47
-
48
-
49
-
50
-
51
-
52
-
53
-
54
-
55
-
56
-
57
-
58
-
59
-
60
-
61
-
62
-
63
-
64
-
65
-
66
-
67
-
68
-
69
-
70
-
71
-
72
-
73
-
74
-
75
-
76
-
77
-
78
-
79
-
80
-
81
-
82
-
83
-
84
-
85
-
86
-
87
-
88
-
89
-
90
-
91
-
92
-
93
-
94
-
95
-
96
-
97
-
98
-
99
-
100
-
101
-
102
-
103
-
104
-
105
-
106
-
107
-
108
-
109
-
110
-
111
-
112
-
113
-
114
-
115
-
116
-
117
-
118
-
119
-
120
-
121
-
122
-
123
-
124
-
125
-
126
-
127
-
128
-
129
-
130
-
131
-
132
-
133
-
134
-
135
-
136
-
137
-
138
-
139
-
140
-
141
-
142
 |
 |
