HP 2600 HP Business Inkjet 2600/2600dn - (English) User's Guide - Page 28
Mac OS 8.6 to Mac OS 9.1, Mac OS X - printer setup
 |
View all HP 2600 manuals
Add to My Manuals
Save this manual to your list of manuals |
Page 28 highlights
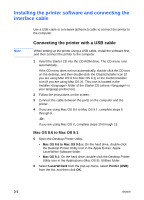
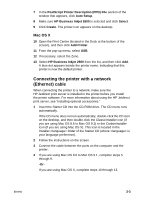
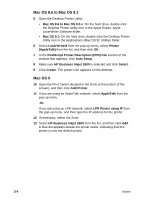
Mac OS 8.6 to Mac OS 9.1 5 Open the Desktop Printer Utility: • Mac OS 8.6 to Mac OS 9.0.x: On the hard drive, double-click the Desktop Printer Utility icon in the Apple Extras: Apple LaserWriter Software folder. • Mac OS 9.1: On the hard drive, double-click the Desktop Printer Utility icon in the Applications (Mac OS 9): Utilities folder. 6 Select LaserWriter8 from the pop-up menu, select Printer (AppleTalk) from the list, and then click OK. 7 In the PostScript Printer Description (PPD) File section of the window that appears, click Auto Setup. 8 Make sure HP Business Inkjet 2600 is selected and click Select. 9 Click Create. The printer icon appears on the desktop. Mac OS X 10 Open the Print Center (located in the Dock at the bottom of the screen), and then click Add Printer. 11 If you are using an AppleTalk network, select AppleTalk from the pop-up menu. -Or- If you are using an LPR network, select LPR Printer using IP from the pop-up menu, and then type the IP address for the printer. 12 If necessary, select the Zone. 13 Select HP Business Inkjet 2600 from the list, and then click Add. A blue dot appears beside the printer name, indicating that this printer is now the default printer. 3-4 ENWW
-
 1
1 -
2
-
3
-
4
-
5
-
6
-
7
-
8
-
9
-
10
-
11
-
12
-
13
-
14
-
15
-
16
-
17
-
18
-
19
-
20
-
21
-
22
-
 23
23 -
 24
24 -
 25
25 -
 26
26 -
 27
27 -
 28
28 -
 29
29 -
 30
30 -
 31
31 -
 32
32 -
 33
33 -
34
-
35
-
36
-
37
-
38
-
39
-
40
-
41
-
42
-
43
-
44
-
45
-
46
-
47
-
48
-
49
-
50
-
51
-
52
-
53
-
54
-
55
-
56
-
57
-
58
-
59
-
60
-
61
-
62
-
63
-
64
-
65
-
66
-
67
-
68
-
69
-
70
-
71
-
72
-
73
-
74
-
75
-
76
-
77
-
78
-
79
-
80
-
81
-
82
-
83
-
84
-
85
-
86
-
87
-
88
-
89
-
90
-
91
-
92
-
93
-
94
-
95
-
96
-
97
-
98
-
99
-
100
-
101
-
102
-
103
-
104
-
105
-
106
-
107
-
108
-
109
-
110
-
111
-
112
-
113
-
114
-
115
-
116
-
117
-
118
-
119
-
120
-
121
-
122
-
123
-
124
-
125
-
126
-
127
-
128
-
129
-
130
-
131
-
132
-
133
-
134
-
135
-
136
-
137
-
138
-
139
-
140
-
141
-
142
 |
 |