HP Color LaserJet CM4730 HP Color LaserJet CM4730 MFP - User Guide - Page 140
Con the printer driver to recognize the optional stapler stacker, Setting the color options - mfp pcl 6 driver
 |
View all HP Color LaserJet CM4730 manuals
Add to My Manuals
Save this manual to your list of manuals |
Page 140 highlights
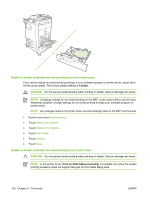
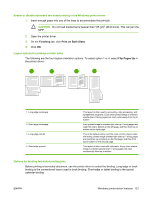
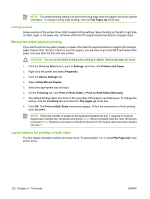
3. Click the Device Settings tab. 4. On the Output tab, click the drop-down list under Staple, and click One-edge. Configure the printer driver to recognize the optional stapler stacker 1. Open the Printers folder. 2. Select HP Color LaserJet CM4730 MFP. 3. On the File menu, click Properties. 4. Select the Device Settings tab. 5. Use either of the following methods to select the stapler/stacker: Scroll to Automatic Configuration, select Update Now, and then click Apply. -or- Scroll to Accessory Output Bin, select HP 500-sheet stapler/stacker or HP 3-bin mailbox mailbox-mode or HP 3-bin mailbox stacker-mode or HP 3-bin mailbox function-separator, and click Apply. Setting the color options Options on the Color tab control how colors are interpreted and printed from software programs. You can choose either Automatic or Manual color options. For more information, see Manage printer color options on Windows computers. ● Select Automatic to optimize the color and halftone settings for text, graphics, and photographs. The Automatic setting provides additional color options for programs and operating systems that support color-management systems. This setting is recommended for printing all color documents. ● Select Manual to adjust the color and halftone settings for text, graphics, and photographs. If you are using a PCL driver, you can adjust the RGB data. If you are using the PS driver, you can adjust RGB or CMYK data. To set the color options 1. On the File menu in the software program, click Print. 2. Select the driver, and then click Properties or Preferences. 3. Click the Color tab. 4. In the Color Options area, select the option that you want to use. 5. If you selected Manual, click Settings to open the Color Settings dialog box. Adjust the individual settings for text, graphics, and photographs. You can also adjust the general printing settings. Click OK. 6. In the Color Themes area, select the RGB Color option that you want to use. 7. Click OK. 124 Chapter 9 Print tasks ENWW
-
 1
1 -
2
-
3
-
4
-
5
-
6
-
7
-
8
-
9
-
10
-
11
-
12
-
13
-
14
-
15
-
16
-
17
-
18
-
19
-
20
-
21
-
22
-
23
-
24
-
25
-
26
-
27
-
28
-
29
-
30
-
31
-
32
-
33
-
34
-
35
-
36
-
37
-
38
-
39
-
40
-
41
-
42
-
43
-
44
-
45
-
46
-
47
-
48
-
49
-
50
-
51
-
52
-
53
-
54
-
55
-
56
-
57
-
58
-
59
-
60
-
61
-
62
-
63
-
64
-
65
-
66
-
67
-
68
-
69
-
70
-
71
-
72
-
73
-
74
-
75
-
76
-
77
-
78
-
79
-
80
-
81
-
82
-
83
-
84
-
85
-
86
-
87
-
88
-
89
-
90
-
91
-
92
-
93
-
94
-
95
-
96
-
97
-
98
-
99
-
100
-
101
-
102
-
103
-
104
-
105
-
106
-
107
-
108
-
109
-
110
-
111
-
112
-
113
-
114
-
115
-
116
-
117
-
118
-
119
-
120
-
121
-
122
-
123
-
124
-
125
-
126
-
127
-
128
-
129
-
130
-
131
-
132
-
133
-
134
-
 135
135 -
 136
136 -
 137
137 -
 138
138 -
 139
139 -
 140
140 -
 141
141 -
 142
142 -
 143
143 -
 144
144 -
 145
145 -
146
-
147
-
148
-
149
-
150
-
151
-
152
-
153
-
154
-
155
-
156
-
157
-
158
-
159
-
160
-
161
-
162
-
163
-
164
-
165
-
166
-
167
-
168
-
169
-
170
-
171
-
172
-
173
-
174
-
175
-
176
-
177
-
178
-
179
-
180
-
181
-
182
-
183
-
184
-
185
-
186
-
187
-
188
-
189
-
190
-
191
-
192
-
193
-
194
-
195
-
196
-
197
-
198
-
199
-
200
-
201
-
202
-
203
-
204
-
205
-
206
-
207
-
208
-
209
-
210
-
211
-
212
-
213
-
214
-
215
-
216
-
217
-
218
-
219
-
220
-
221
-
222
-
223
-
224
-
225
-
226
-
227
-
228
-
229
-
230
-
231
-
232
-
233
-
234
-
235
-
236
-
237
-
238
-
239
-
240
-
241
-
242
-
243
-
244
-
245
-
246
-
247
-
248
-
249
-
250
-
251
-
252
-
253
-
254
-
255
-
256
-
257
-
258
-
259
-
260
-
261
-
262
-
263
-
264
-
265
-
266
-
267
-
268
-
269
-
270
-
271
-
272
-
273
-
274
-
275
-
276
-
277
-
278
-
279
-
280
-
281
-
282
-
283
-
284
-
285
-
286
-
287
-
288
-
289
-
290
-
291
-
292
-
293
-
294
-
295
-
296
-
297
-
298
-
299
-
300
-
301
-
302
-
303
-
304
-
305
-
306
-
307
-
308
-
309
-
310
-
311
-
312
-
313
-
314
-
315
-
316
-
317
-
318
-
319
-
320
-
321
-
322
-
323
-
324
-
325
-
326
-
327
-
328
-
329
-
330
-
331
-
332
-
333
-
334
-
335
-
336
-
337
-
338
-
339
-
340
-
341
-
342
-
343
-
344
-
345
-
346
-
347
-
348
-
349
-
350
-
351
-
352
-
353
-
354
-
355
-
356
-
357
-
358
-
359
-
360
-
361
-
362
-
363
-
364
-
365
-
366
-
367
-
368
-
369
-
370
 |
 |