HP Designjet Z6200 HP Designjet Z6200 Photo Printer series - User's Guide: Eng - Page 143
Clean the paper-advance sensor window, Lubricate the printhead carriage
 |
View all HP Designjet Z6200 manuals
Add to My Manuals
Save this manual to your list of manuals |
Page 143 highlights
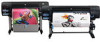
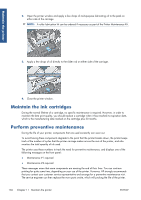
Maintain the printer Clean the paper-advance sensor window The paper advance sensor is the very small rectangular window (less than 1 cm² in size and shown in the following graphic) near the sixth platen roller from the right. You should clean the paper-advance sensor window every six months, and whenever you experience print-quality issues. 1. Unload the paper using the front panel procedure. See Unload a roll from the printer on page 37. 2. Use a clean, absorbent, lint-free cloth, slightly dampened with isopropyl alcohol, to wipe any dust and loosened ink deposits very gently from the sensor window. 3. Under ambient light, a clean sensor window shows a violet-colored reflection that extends uniformly across the entire surface. To see this reflection, look closely at the sensor window and slightly change your viewing angle. 4. Wait 3-4 minutes before reloading the paper to ensure that the alcohol has evaporated completely. Lubricate the printhead carriage The printhead carriage occasionally (about once a year) needs lubrication so that it continues to slide easily along the slider rod. 1. To gain access to the carriage, go to the front panel and select the icon, and then select Replace printheads. The carriage slides to the middle section of the printer. CAUTION: If the carriage remains in the central part of the printer for more than 7 minutes, it attempts to return to its home position on the right. ENWW Clean the paper-advance sensor window 135
-
 1
1 -
2
-
3
-
4
-
5
-
6
-
7
-
8
-
9
-
10
-
11
-
12
-
13
-
14
-
15
-
16
-
17
-
18
-
19
-
20
-
21
-
22
-
23
-
24
-
25
-
26
-
27
-
28
-
29
-
30
-
31
-
32
-
33
-
34
-
35
-
36
-
37
-
38
-
39
-
40
-
41
-
42
-
43
-
44
-
45
-
46
-
47
-
48
-
49
-
50
-
51
-
52
-
53
-
54
-
55
-
56
-
57
-
58
-
59
-
60
-
61
-
62
-
63
-
64
-
65
-
66
-
67
-
68
-
69
-
70
-
71
-
72
-
73
-
74
-
75
-
76
-
77
-
78
-
79
-
80
-
81
-
82
-
83
-
84
-
85
-
86
-
87
-
88
-
89
-
90
-
91
-
92
-
93
-
94
-
95
-
96
-
97
-
98
-
99
-
100
-
101
-
102
-
103
-
104
-
105
-
106
-
107
-
108
-
109
-
110
-
111
-
112
-
113
-
114
-
115
-
116
-
117
-
118
-
119
-
120
-
121
-
122
-
123
-
124
-
125
-
126
-
127
-
128
-
129
-
130
-
131
-
132
-
133
-
134
-
135
-
136
-
137
-
 138
138 -
 139
139 -
 140
140 -
 141
141 -
 142
142 -
 143
143 -
 144
144 -
 145
145 -
 146
146 -
 147
147 -
 148
148 -
149
-
150
-
151
-
152
-
153
-
154
-
155
-
156
-
157
-
158
-
159
-
160
-
161
-
162
-
163
-
164
-
165
-
166
-
167
-
168
-
169
-
170
-
171
-
172
-
173
-
174
-
175
-
176
-
177
-
178
-
179
-
180
-
181
-
182
-
183
-
184
-
185
-
186
-
187
-
188
-
189
-
190
-
191
-
192
-
193
-
194
-
195
-
196
-
197
-
198
-
199
-
200
-
201
-
202
-
203
-
204
-
205
-
206
-
207
-
208
-
209
-
210
-
211
-
212
-
213
-
214
-
215
-
216
-
217
-
218
-
219
-
220
 |
 |
