HP Designjet Z6200 HP Designjet Z6200 Photo Printer series - User's Guide: Eng - Page 53
insert your fingers into the spindle supports during the removal process.
 |
View all HP Designjet Z6200 manuals
Add to My Manuals
Save this manual to your list of manuals |
Page 53 highlights
8. Use the winding button on the take-up reel motor to wind the remainder of the paper around the take-up reel spindle. 9. Press the OK key on the front panel. The amount of printed paper that is on the take-up reel spindle appears on the front panel. 10. Unlock the take-up reel spindle by pushing the spindle lever to its uppermost position. Handle the paper 11. Remove the roll from the printer, pulling out the end on the right side of the printer first. Do not insert your fingers into the spindle supports during the removal process. 12. To remove the roll from the printer after you have unloaded the take-up reel, see Unload a roll from the printer on page 37. ENWW Use the take-up reel 45
-
 1
1 -
2
-
3
-
4
-
5
-
6
-
7
-
8
-
9
-
10
-
11
-
12
-
13
-
14
-
15
-
16
-
17
-
18
-
19
-
20
-
21
-
22
-
23
-
24
-
25
-
26
-
27
-
28
-
29
-
30
-
31
-
32
-
33
-
34
-
35
-
36
-
37
-
38
-
39
-
40
-
41
-
42
-
43
-
44
-
45
-
46
-
47
-
 48
48 -
 49
49 -
 50
50 -
 51
51 -
 52
52 -
 53
53 -
 54
54 -
 55
55 -
 56
56 -
 57
57 -
 58
58 -
59
-
60
-
61
-
62
-
63
-
64
-
65
-
66
-
67
-
68
-
69
-
70
-
71
-
72
-
73
-
74
-
75
-
76
-
77
-
78
-
79
-
80
-
81
-
82
-
83
-
84
-
85
-
86
-
87
-
88
-
89
-
90
-
91
-
92
-
93
-
94
-
95
-
96
-
97
-
98
-
99
-
100
-
101
-
102
-
103
-
104
-
105
-
106
-
107
-
108
-
109
-
110
-
111
-
112
-
113
-
114
-
115
-
116
-
117
-
118
-
119
-
120
-
121
-
122
-
123
-
124
-
125
-
126
-
127
-
128
-
129
-
130
-
131
-
132
-
133
-
134
-
135
-
136
-
137
-
138
-
139
-
140
-
141
-
142
-
143
-
144
-
145
-
146
-
147
-
148
-
149
-
150
-
151
-
152
-
153
-
154
-
155
-
156
-
157
-
158
-
159
-
160
-
161
-
162
-
163
-
164
-
165
-
166
-
167
-
168
-
169
-
170
-
171
-
172
-
173
-
174
-
175
-
176
-
177
-
178
-
179
-
180
-
181
-
182
-
183
-
184
-
185
-
186
-
187
-
188
-
189
-
190
-
191
-
192
-
193
-
194
-
195
-
196
-
197
-
198
-
199
-
200
-
201
-
202
-
203
-
204
-
205
-
206
-
207
-
208
-
209
-
210
-
211
-
212
-
213
-
214
-
215
-
216
-
217
-
218
-
219
-
220
 |
 |

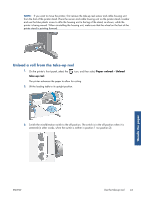
8.
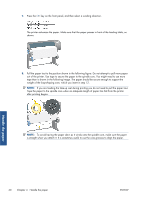
Use the winding button on the take-up reel motor to wind the remainder of the paper around the
take-up reel spindle.
9.
Press the
OK
key on the front panel.
The amount of printed paper that is on the take-up reel spindle appears on the front panel.
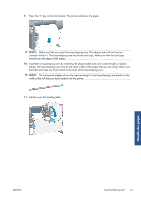
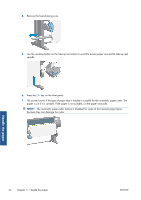
10.
Unlock the take-up reel spindle by pushing the spindle lever to its uppermost position.
11.
Remove the roll from the printer, pulling out the end on the right side of the printer first. Do not
insert your fingers into the spindle supports during the removal process.
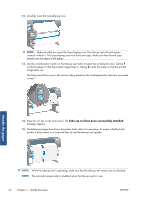
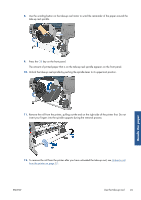
12.
To remove the roll from the printer after you have unloaded the take-up reel, see
Unload a roll
from the printer
on page
37
.
ENWW
Use the take-up reel
45
Handle the paper