HP Designjet Z6200 HP Designjet Z6200 Photo Printer series - User's Guide: Eng - Page 160
Smears or scratches on the front of glossy paper, Ink marks on the back of the paper
 |
View all HP Designjet Z6200 manuals
Add to My Manuals
Save this manual to your list of manuals |
Page 160 highlights
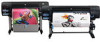
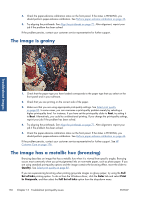
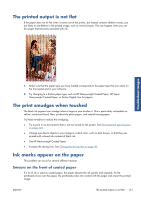
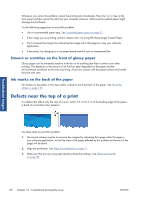
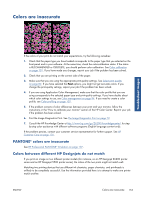
Troubleshoot images Whenever you notice this problem, cancel the printing job immediately. Press the Cancel key on the front panel and also cancel the job from your computer software. Otherwise the soaked paper might damage the printheads. Try the following suggestions to avoid this problem: ● Use a recommended paper type. See Supported paper types on page 31. ● If the image you are printing contains intense color, try using HP Heavyweight Coated Paper. ● Try to increase the margins by relocating the image within the page by using your software application. ● If necessary, try changing to a non-paper-based material such as transparent film. Smears or scratches on the front of glossy paper Glossy paper can be extremely sensitive to the bin or to anything else that it contacts soon after printing. This depends on the amount of ink that has been deposited on the paper and the environmental conditions at the time of printing. Avoid any contact with the paper surface and handle the print with care. Ink marks on the back of the paper Ink residue on the platen or the input rollers is likely to mark the back of the paper. See Clean the platen on page 133. Defects near the top of a print In a defect that affects only the start of a print, within 5.5 cm (2.2 in) of the leading edge of the paper, a band of inconsistent color appears: Use these steps to avoid this problem: 1. The easiest solution may be to increase the margins by relocating the image within the page in your software application, so that the area of the paper affected by the problem (at the start of the page) will be blank. 2. Align the printheads. See Align the printheads on page 71. 3. Make sure that you are using appropriate print-quality settings. See Select print quality on page 82. 152 Chapter 13 Troubleshoot print-quality issues ENWW
-
 1
1 -
2
-
3
-
4
-
5
-
6
-
7
-
8
-
9
-
10
-
11
-
12
-
13
-
14
-
15
-
16
-
17
-
18
-
19
-
20
-
21
-
22
-
23
-
24
-
25
-
26
-
27
-
28
-
29
-
30
-
31
-
32
-
33
-
34
-
35
-
36
-
37
-
38
-
39
-
40
-
41
-
42
-
43
-
44
-
45
-
46
-
47
-
48
-
49
-
50
-
51
-
52
-
53
-
54
-
55
-
56
-
57
-
58
-
59
-
60
-
61
-
62
-
63
-
64
-
65
-
66
-
67
-
68
-
69
-
70
-
71
-
72
-
73
-
74
-
75
-
76
-
77
-
78
-
79
-
80
-
81
-
82
-
83
-
84
-
85
-
86
-
87
-
88
-
89
-
90
-
91
-
92
-
93
-
94
-
95
-
96
-
97
-
98
-
99
-
100
-
101
-
102
-
103
-
104
-
105
-
106
-
107
-
108
-
109
-
110
-
111
-
112
-
113
-
114
-
115
-
116
-
117
-
118
-
119
-
120
-
121
-
122
-
123
-
124
-
125
-
126
-
127
-
128
-
129
-
130
-
131
-
132
-
133
-
134
-
135
-
136
-
137
-
138
-
139
-
140
-
141
-
142
-
143
-
144
-
145
-
146
-
147
-
148
-
149
-
150
-
151
-
152
-
153
-
154
-
 155
155 -
 156
156 -
 157
157 -
 158
158 -
 159
159 -
 160
160 -
 161
161 -
 162
162 -
 163
163 -
 164
164 -
 165
165 -
166
-
167
-
168
-
169
-
170
-
171
-
172
-
173
-
174
-
175
-
176
-
177
-
178
-
179
-
180
-
181
-
182
-
183
-
184
-
185
-
186
-
187
-
188
-
189
-
190
-
191
-
192
-
193
-
194
-
195
-
196
-
197
-
198
-
199
-
200
-
201
-
202
-
203
-
204
-
205
-
206
-
207
-
208
-
209
-
210
-
211
-
212
-
213
-
214
-
215
-
216
-
217
-
218
-
219
-
220
 |
 |
