HP Designjet Z6200 HP Designjet Z6200 Photo Printer series - User's Guide: Eng - Page 84
Insert the maintenance cartridge, installed before it can continue. - supplies for printer
 |
View all HP Designjet Z6200 manuals
Add to My Manuals
Save this manual to your list of manuals |
Page 84 highlights
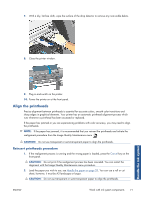
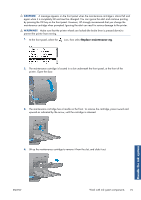
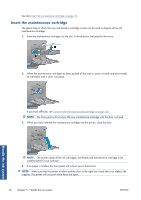
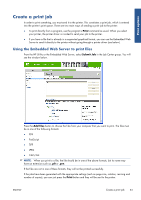
See also Insert the maintenance cartridge on page 76. Insert the maintenance cartridge The plastic bag in which the new maintenance cartridge comes can be used to dispose of the old maintenance cartridge. 1. Insert the maintenance cartridge into the slot, in the direction indicated by the arrow. 2. When the maintenance cartridge has been pushed all the way in, press inwards and downwards as indicated, until it clicks into place. If you have difficulty, see Cannot insert the maintenance cartridge on page 165. NOTE: The front panel will not show the new maintenance cartridge until the door is closed. 3. When you have inserted the maintenance cartridge into the printer, close the door. NOTE: The printer needs all the ink cartridges, printheads and maintenance cartridge to be installed before it can continue. 4. If no paper is loaded, the front panel will instruct you to load some. NOTE: Make sure that the printer window and the door to the right are closed after you replace the supplies. The printer will not print while these are open. 76 Chapter 5 Handle the ink system ENWW Handle the ink system
-
 1
1 -
2
-
3
-
4
-
5
-
6
-
7
-
8
-
9
-
10
-
11
-
12
-
13
-
14
-
15
-
16
-
17
-
18
-
19
-
20
-
21
-
22
-
23
-
24
-
25
-
26
-
27
-
28
-
29
-
30
-
31
-
32
-
33
-
34
-
35
-
36
-
37
-
38
-
39
-
40
-
41
-
42
-
43
-
44
-
45
-
46
-
47
-
48
-
49
-
50
-
51
-
52
-
53
-
54
-
55
-
56
-
57
-
58
-
59
-
60
-
61
-
62
-
63
-
64
-
65
-
66
-
67
-
68
-
69
-
70
-
71
-
72
-
73
-
74
-
75
-
76
-
77
-
78
-
 79
79 -
 80
80 -
 81
81 -
 82
82 -
 83
83 -
 84
84 -
 85
85 -
 86
86 -
 87
87 -
 88
88 -
 89
89 -
90
-
91
-
92
-
93
-
94
-
95
-
96
-
97
-
98
-
99
-
100
-
101
-
102
-
103
-
104
-
105
-
106
-
107
-
108
-
109
-
110
-
111
-
112
-
113
-
114
-
115
-
116
-
117
-
118
-
119
-
120
-
121
-
122
-
123
-
124
-
125
-
126
-
127
-
128
-
129
-
130
-
131
-
132
-
133
-
134
-
135
-
136
-
137
-
138
-
139
-
140
-
141
-
142
-
143
-
144
-
145
-
146
-
147
-
148
-
149
-
150
-
151
-
152
-
153
-
154
-
155
-
156
-
157
-
158
-
159
-
160
-
161
-
162
-
163
-
164
-
165
-
166
-
167
-
168
-
169
-
170
-
171
-
172
-
173
-
174
-
175
-
176
-
177
-
178
-
179
-
180
-
181
-
182
-
183
-
184
-
185
-
186
-
187
-
188
-
189
-
190
-
191
-
192
-
193
-
194
-
195
-
196
-
197
-
198
-
199
-
200
-
201
-
202
-
203
-
204
-
205
-
206
-
207
-
208
-
209
-
210
-
211
-
212
-
213
-
214
-
215
-
216
-
217
-
218
-
219
-
220
 |
 |
