HP Designjet Z6200 HP Designjet Z6200 Photo Printer series - User's Guide: Eng - Page 99
Print in gray shades, Use paper economically
 |
View all HP Designjet Z6200 manuals
Add to My Manuals
Save this manual to your list of manuals |
Page 99 highlights
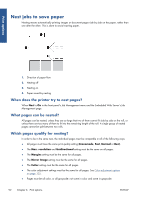
Print options NOTE: The autorotate decision requires known page dimensions. Therefore, the job must have When to Start Printing set to After Processing (see Select when to print a job in the queue on page 114) and cannot have variable dimensions, which happens when Fit to roll or Remove top/bottom blank areas is used. TIP: Once the job is rendered and ready for reprints, autorotation may take a few minutes, depending on job dimensions and resolution. To speed up autorotated reprints, send the job to render when the roll configuration meets your planned scenario, and leave last-minute autorotation only to correct unexpected changes in roll conditions. This applies to TIFF/JPEG/PS/PDF jobs only. Print in gray shades You can convert all colors in your image to shades of gray in the following ways: ● In your application program: many programs provide this option. ● In the Windows driver dialog: go to the Color tab and look at the Color Options section. Select Print in Grayscale. ● In the Mac OS X 10.4 Print dialog: go to the Color Options panel and select Print In Grayscale. ● In the Mac OS X 10.5 or 10.6 Print dialog: go to the Color Options panel and select Grayscale from the Mode drop-down list. ● On the Embedded Web Server's Submit Job page: select Color > Color/Grayscale > Print in grayscale. Use paper economically Here are some recommendations for making economical use of paper: ● If you are printing relatively small images or document pages, you can use nesting to print them side by side instead of one after another. See Nest jobs to save paper on page 92. ● If you are printing multipage documents with relatively small pages, you can print up to 16 of them on one sheet of paper. Use the Pages per sheet option in the Features tab (Windows driver) or the Layout panel (Mac OS driver). ● You may be able to save some roll paper by using the following options: ◦ In the Windows driver dialog: select the Features tab and then Remove Top/ Bottom Blank Areas and/or Rotate by 90 degrees or Autorotate. ◦ In the Mac OS Print dialog: select the Finishing panel, then Remove Top/Bottom Blank Areas and/or Rotate by 90 degrees or Autorotate. ◦ On the Embedded Web Server's Submit Job page: select Advanced settings > Roll options > Remove top/bottom blank areas and/or Rotate. ● If you check the print preview on your computer before printing, you can sometimes avoid wasting paper on prints containing obvious mistakes. See Preview a print on page 87. ENWW Print in gray shades 91
-
 1
1 -
2
-
3
-
4
-
5
-
6
-
7
-
8
-
9
-
10
-
11
-
12
-
13
-
14
-
15
-
16
-
17
-
18
-
19
-
20
-
21
-
22
-
23
-
24
-
25
-
26
-
27
-
28
-
29
-
30
-
31
-
32
-
33
-
34
-
35
-
36
-
37
-
38
-
39
-
40
-
41
-
42
-
43
-
44
-
45
-
46
-
47
-
48
-
49
-
50
-
51
-
52
-
53
-
54
-
55
-
56
-
57
-
58
-
59
-
60
-
61
-
62
-
63
-
64
-
65
-
66
-
67
-
68
-
69
-
70
-
71
-
72
-
73
-
74
-
75
-
76
-
77
-
78
-
79
-
80
-
81
-
82
-
83
-
84
-
85
-
86
-
87
-
88
-
89
-
90
-
91
-
92
-
93
-
 94
94 -
 95
95 -
 96
96 -
 97
97 -
 98
98 -
 99
99 -
 100
100 -
 101
101 -
 102
102 -
 103
103 -
 104
104 -
105
-
106
-
107
-
108
-
109
-
110
-
111
-
112
-
113
-
114
-
115
-
116
-
117
-
118
-
119
-
120
-
121
-
122
-
123
-
124
-
125
-
126
-
127
-
128
-
129
-
130
-
131
-
132
-
133
-
134
-
135
-
136
-
137
-
138
-
139
-
140
-
141
-
142
-
143
-
144
-
145
-
146
-
147
-
148
-
149
-
150
-
151
-
152
-
153
-
154
-
155
-
156
-
157
-
158
-
159
-
160
-
161
-
162
-
163
-
164
-
165
-
166
-
167
-
168
-
169
-
170
-
171
-
172
-
173
-
174
-
175
-
176
-
177
-
178
-
179
-
180
-
181
-
182
-
183
-
184
-
185
-
186
-
187
-
188
-
189
-
190
-
191
-
192
-
193
-
194
-
195
-
196
-
197
-
198
-
199
-
200
-
201
-
202
-
203
-
204
-
205
-
206
-
207
-
208
-
209
-
210
-
211
-
212
-
213
-
214
-
215
-
216
-
217
-
218
-
219
-
220
 |
 |
