HP LaserJet 4 Service Manual - Page 272
Possible Cause, Action, Table 7-20, Table 7-21
 |
View all HP LaserJet 4 manuals
Add to My Manuals
Save this manual to your list of manuals |
Page 272 highlights
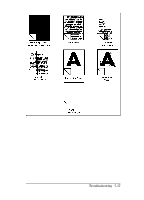
Table 7-20 Smeared Print/Improper Fusing Possible Cause Action Fuser levers not in place. (All LJ4, some LJ4+, N/A on LJ5) The Fuser Assembly has shipping levers that must be lowered during the setup process. See Chapter 3 for instruction on how to lower the fusing levers. Media. The media may not be acceptable for laser printing. Heavy paper stock is a common cause of smeared print and improper fusing. Verify that the media meets specifications as shown in the HP LaserJet Family Paper Specifications Guide. Dirty Fuser Assembly. The print smears if Replace the Fuser Assembly and clean the Fuser Assembly is dirty. the printer. Bent Static Teeth. If the static teeth are defective, the print could smear prior to the paper entering the Fuser Assembly. If the teeth are bent or defective, replace the Static Teeth Assembly. Worn Gears. If the drum and paper are not moving at the same speed the characters may smudge. Replace the Toner Cartridge. Foreign object in paper path. Something Remove any foreign material. Try a new is smearing the unfused toner image on Toner Cartridge. the surface of the paper. Orange Packing Spacers not removed. Remove Orange Packing Spacers. Some HP LaserJet 4 only. Table 7-21 Distorted Print Possible Cause Action Paper Path. If the paper does not move at a uniform speed, the print image will be affected. Characters that are either too tall or too short (in the direction of paper motion), are usually a result of drive mechanism problem. Examine the paper transport rollers along the paper path for wear. Replace if excessive wear exists. Inspect and replace the Toner Cartridge, Drive Gear Assembly, Main Motor, or Fuser Assembly as necessary. Laser/Scanning Assembly. Wavy, irregular-shaped characters, or irregular line margins in the scan direction of printing are usually a result of a defective Laser/Scanning Assembly. Replace the Laser/Scanning Assembly. 7-42 Troubleshooting
-
 1
1 -
2
-
3
-
4
-
5
-
6
-
7
-
8
-
9
-
10
-
11
-
12
-
13
-
14
-
15
-
16
-
17
-
18
-
19
-
20
-
21
-
22
-
23
-
24
-
25
-
26
-
27
-
28
-
29
-
30
-
31
-
32
-
33
-
34
-
35
-
36
-
37
-
38
-
39
-
40
-
41
-
42
-
43
-
44
-
45
-
46
-
47
-
48
-
49
-
50
-
51
-
52
-
53
-
54
-
55
-
56
-
57
-
58
-
59
-
60
-
61
-
62
-
63
-
64
-
65
-
66
-
67
-
68
-
69
-
70
-
71
-
72
-
73
-
74
-
75
-
76
-
77
-
78
-
79
-
80
-
81
-
82
-
83
-
84
-
85
-
86
-
87
-
88
-
89
-
90
-
91
-
92
-
93
-
94
-
95
-
96
-
97
-
98
-
99
-
100
-
101
-
102
-
103
-
104
-
105
-
106
-
107
-
108
-
109
-
110
-
111
-
112
-
113
-
114
-
115
-
116
-
117
-
118
-
119
-
120
-
121
-
122
-
123
-
124
-
125
-
126
-
127
-
128
-
129
-
130
-
131
-
132
-
133
-
134
-
135
-
136
-
137
-
138
-
139
-
140
-
141
-
142
-
143
-
144
-
145
-
146
-
147
-
148
-
149
-
150
-
151
-
152
-
153
-
154
-
155
-
156
-
157
-
158
-
159
-
160
-
161
-
162
-
163
-
164
-
165
-
166
-
167
-
168
-
169
-
170
-
171
-
172
-
173
-
174
-
175
-
176
-
177
-
178
-
179
-
180
-
181
-
182
-
183
-
184
-
185
-
186
-
187
-
188
-
189
-
190
-
191
-
192
-
193
-
194
-
195
-
196
-
197
-
198
-
199
-
200
-
201
-
202
-
203
-
204
-
205
-
206
-
207
-
208
-
209
-
210
-
211
-
212
-
213
-
214
-
215
-
216
-
217
-
218
-
219
-
220
-
221
-
222
-
223
-
224
-
225
-
226
-
227
-
228
-
229
-
230
-
231
-
232
-
233
-
234
-
235
-
236
-
237
-
238
-
239
-
240
-
241
-
242
-
243
-
244
-
245
-
246
-
247
-
248
-
249
-
250
-
251
-
252
-
253
-
254
-
255
-
256
-
257
-
258
-
259
-
260
-
261
-
262
-
263
-
264
-
265
-
266
-
 267
267 -
 268
268 -
 269
269 -
 270
270 -
 271
271 -
 272
272 -
 273
273 -
 274
274 -
 275
275 -
 276
276 -
 277
277 -
278
-
279
-
280
-
281
-
282
-
283
-
284
-
285
-
286
-
287
-
288
-
289
-
290
-
291
-
292
-
293
-
294
-
295
-
296
-
297
-
298
-
299
-
300
-
301
-
302
-
303
-
304
-
305
-
306
-
307
-
308
-
309
-
310
-
311
-
312
-
313
-
314
-
315
-
316
-
317
-
318
-
319
-
320
-
321
-
322
-
323
-
324
-
325
-
326
-
327
-
328
-
329
-
330
-
331
-
332
-
333
-
334
-
335
-
336
-
337
-
338
-
339
-
340
-
341
-
342
-
343
-
344
-
345
-
346
-
347
-
348
-
349
-
350
-
351
-
352
-
353
-
354
-
355
-
356
-
357
-
358
-
359
-
360
-
361
-
362
-
363
-
364
-
365
-
366
-
367
-
368
-
369
-
370
-
371
-
372
-
373
-
374
-
375
-
376
-
377
-
378
-
379
-
380
-
381
-
382
-
383
-
384
-
385
-
386
-
387
-
388
-
389
-
390
-
391
-
392
-
393
-
394
-
395
-
396
-
397
-
398
-
399
-
400
-
401
-
402
-
403
-
404
-
405
-
406
-
407
-
408
-
409
-
410
-
411
-
412
-
413
-
414
-
415
-
416
-
417
-
418
-
419
-
420
-
421
-
422
-
423
-
424
-
425
-
426
-
427
-
428
-
429
-
430
-
431
-
432
-
433
-
434
-
435
-
436
-
437
-
438
-
439
-
440
-
441
-
442
-
443
-
444
-
445
-
446
-
447
-
448
-
449
-
450
-
451
-
452
-
453
 |
 |
