| Section |
Page |
| Product information |
15 |
| Chapter contents |
15 |
| Printer configurations |
16 |
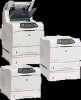
| Base model |
16 |
| n model |
17 |
| tn model |
18 |
| dtn model |
19 |
| dtns model |
20 |
| dtnsl models |
21 |
| Model and serial numbers |
22 |
| Printer overview |
23 |
| Hardware components |
23 |
| Interface ports |
25 |
| Software components |
26 |
| Operating systems and printer components |
26 |
| Printer drivers |
27 |
| Drivers included |
27 |
| Additional drivers |
28 |
| Select the correct printer driver for your needs |
28 |
| Printer driver Help |
28 |
| Using the printer drivers |
29 |
| Software for Macintosh computers |
31 |
| PPDs |
31 |
| HP LaserJet Utility |
31 |
| Specifications |
32 |
| Hardware specifications |
32 |
| Electrical specifications |
34 |
| Acoustic emissions |
36 |
| Print speed specifications |
38 |
| Operating environment |
38 |
| Media specifications |
39 |
| General guidelines |
39 |
| Supported media weights and sizes |
40 |
| Supported-media specifications tables |
40 |
| Paper and print media |
44 |
| Printing and storage environment |
44 |
| Supported types of media |
45 |
| Guidelines for using paper |
46 |
| Envelopes |
48 |
| Envelope construction |
48 |
| Envelopes with double side-seams |
49 |
| Envelopes that have adhesive strips or flaps |
49 |
| Envelope margins |
49 |
| Envelope storage |
49 |
| Labels |
50 |
| Transparencies |
50 |
| Card stock and heavy paper |
51 |
| Card stock construction |
51 |
| Card stock guidelines |
51 |
| Types of media to avoid |
52 |
| Hewlett-Packard limited warranty statement |
53 |
| Print Cartridge Limited Warranty Statement |
55 |
| Service approach |
56 |
| Regulatory information |
57 |
| FCC regulations |
57 |
| Environmental product stewardship program |
58 |
| Protecting the environment |
58 |
| Ozone production |
58 |
| Energy consumption |
58 |
| HP LaserJet printing supplies |
59 |
| Material safety data sheet |
60 |
| For more information |
60 |
| Regulatory statements |
61 |
| Country-/region-specific safety statements |
63 |
| Laser safety statement |
63 |
| Canadian DOC statement |
63 |
| Japanese VCCI statement |
63 |
| Korean EMI statement |
63 |
| Finnish laser statement |
64 |
| Installation |
65 |
| Chapter contents |
65 |
| Operating environment |
66 |
| Site requirements |
67 |
| Software installation |
68 |
| Operation |
69 |
| Chapter contents |
69 |
| Using the control panel |
70 |
| Control-panel layout |
70 |
| Control-panel lights |
71 |
| Control-panel buttons |
72 |
| Using the printer Help system |
72 |
| Settings and defaults |
73 |
| Setting the control-panel display language |
73 |
| Control-panel menus |
74 |
| Printing control-panel menus |
74 |
| To print a control-panel menu map |
74 |
| To change a control-panel setting |
75 |
| Retrieve Job menu |
76 |
| Information menu |
77 |
| Paper-handling menu |
78 |
| Configure-device menu |
82 |
| Printing submenu |
82 |
| Print-quality submenu |
85 |
| System Setup submenu |
88 |
| Stapler/stacker submenu |
91 |
| I/O submenu |
91 |
| Resets submenu (HP LaserJet 4250/4350 only) |
92 |
| Diagnostics menu (HP LaserJet 4250/4350 only) |
94 |
| Maintenance |
95 |
| Chapter contents |
95 |
| Cleaning the printer and accessories |
96 |
| Cleaning the fuser |
97 |
| Running the cleaning page manually |
97 |
| To run the cleaning page manually |
97 |
| Running the cleaning page automatically |
99 |
| To run the cleaning page automatically |
99 |
| Cleaning spilled toner |
99 |
| Performing preventive maintenance |
100 |
| Resetting the maintenance-kit counter (LJ 4200/4300) |
100 |
| Resetting the maintenance-kit counter (LJ 4250/4350) |
101 |
| Maintenance kit part numbers |
101 |
| Expected life of components |
102 |
| Maintaining the stapler unit |
103 |
| To remove and replace the stapler unit |
103 |
| Loading staples |
104 |
| To load staples |
104 |
| Downloading a remote firmware update |
105 |
| Downloading the new firmware to the printer |
105 |
| Remote firmware update through a local Windows port |
106 |
| Windows 95, Windows 98, or Windows Me |
106 |
| Windows NT 4.0, Windows 2000, Windows XP, or Windows Server 2003 |
107 |
| Remote firmware update through a Windows network |
107 |
| Remote firmware update for UNIX systems |
107 |
| Remote firmware update using FTP on a direct network connection |
107 |
| Windows operating systems |
108 |
| Mac operating systems |
109 |
| Remote firmware update using FTP through a browser |
110 |
| Remote firmware update using Fetch (Mac OS 8.6 and OS 9.x only) |
111 |
| Remote firmware update using the HP LaserJet utility (Mac OS 8.6 and OS 9.x only) |
112 |
| Remote firmware update using the LPR command |
113 |
| Using HP Web JetAdmin to download the firmware to the printer |
114 |
| Printer messages during firmware update |
115 |
| Troubleshooting a firmware update |
116 |
| Theory of operation |
117 |
| Chapter contents |
117 |
| Introduction |
118 |
| Basic operation of the printer |
119 |
| Printer operating sequence |
119 |
| Control system overview |
119 |
| Pickup-and-feed system overview |
120 |
| Laser/scanner system overview |
120 |
| Image-formation system overview |
120 |
| General descriptions |
121 |
| Dc controller PCA |
122 |
| Motor and fan control |
123 |
| Power supply |
124 |
| Fuser-control circuit |
124 |
| Fuser over-temperature protection |
125 |
| Overcurrent/overvoltage protection |
125 |
| Laser/scanner assembly |
126 |
| Paper-pickup-and-feed system |
128 |
| Pickup-and-feed block |
130 |
| Printing from tray 1 |
131 |
| Printing from tray 2 |
133 |
| Tray 2, 500-sheet feeder, and 1,500-sheet feeder media-size detection |
133 |
| Lifter-driver operation |
134 |
| Multiple-feed prevention |
135 |
| Media-skew prevention |
135 |
| Fuser/delivery block |
136 |
| Jam detection |
136 |
| Printer pickup delay jam from tray 1 |
137 |
| Printer pickup delay jam from tray 2 |
137 |
| Printer pickup stationary jam |
137 |
| Printer-delivery wrap jam when feeding regular media |
137 |
| Printer delivery wrap-jam when feeding irregular media |
137 |
| Printer delivery-delay jams |
138 |
| Printer door-open jam |
138 |
| Printer residual-media jam |
138 |
| Printing from the 500-sheet feeder |
139 |
| 500-sheet feeder pickup and feeding |
140 |
| Printing from the 1,500-sheet feeder |
142 |
| 1,500-sheet feeder pickup and feeding |
143 |
| 1,500-sheet feeder lifting mechanism |
145 |
| Envelope feeder |
146 |
| Envelope-feeder pickup and feeding |
146 |
| Envelope feeder jam detection |
147 |
| Envelope feeder pickup delay jam |
147 |
| Envelope feeder pickup stationary jam |
147 |
| Duplexer |
148 |
| Reversing and duplexer pickup |
149 |
| Duplexer jam detection |
150 |
| Stacker and stapler/stacker |
151 |
| Stacker |
153 |
| Stacker feed and delivery |
153 |
| Stacker jam detection |
155 |
| Stacker-feed jam |
155 |
| Stacker-feed stationary jam |
155 |
| Stacker residual-media jam |
155 |
| Stapler/stacker |
156 |
| Stapler/stacker feed and delivery |
156 |
| Staple-mode feed and delivery |
158 |
| Stapler unit |
162 |
| Stapler-unit operation |
163 |
| Staple level-detection |
165 |
| Stack-mode feed and delivery |
165 |
| Stapler/stacker jam detection |
166 |
| Stapler/stacker feed jam |
166 |
| Stapler/stacker feed stationary jam |
166 |
| Stapler/stacker delivery jam |
166 |
| Stapler/stacker residual media jam |
166 |
| Image-formation system |
167 |
| Electrostatic latent-image formation |
169 |
| Primary charging |
169 |
| Writing the image |
169 |
| Developing the image |
170 |
| Transferring the image |
171 |
| Fusing the image |
172 |
| Cleaning the transfer charging roller and photosensitive drum |
173 |
| Print-cartridge memory chip |
174 |
| Formatter system |
175 |
| PowerSave (LJ 4200/4200L/4300) or Sleep (LJ 4250/4350) Mode |
175 |
| Resolution Enhancement technology |
176 |
| EconoMode |
176 |
| Input/output |
176 |
| Parallel interface |
176 |
| USB (HP LaserJet 4250/4350 Series printers only) |
176 |
| Embedded ethernet print server (HP LaserJet 4250/4350 Series printers only) |
176 |
| Expanded I/O |
177 |
| Flash (HP LaserJet 4200/4300 Series printers only) |
177 |
| CompactFlash card (HP LaserJet 4250/4350 Series printers only) |
177 |
| Hard-disk accessory |
177 |
| CPU |
177 |
| Printer memory |
177 |
| Read-only memory |
177 |
| Random-access memory |
177 |
| DIMM slots |
178 |
| Firmware DIMM (LJ 4200/4200L/4300 only) |
178 |
| Nonvolatile memory |
178 |
| Memory Enhancement technology |
178 |
| PJL overview |
178 |
| PML |
179 |
| Control panel |
179 |
| Removing and replacing parts |
181 |
| Chapter contents |
181 |
| Removal and replacement strategy |
182 |
| Required tools |
182 |
| Before performing service |
183 |
| After completing service |
183 |
| Screws used in the printer |
184 |
| Parts-removal tree |
185 |
| Printer input tray, and cabinet wheel locks |
186 |
| Dc controller PCA diagram |
187 |
| User-replaceable parts |
189 |
| Print cartridge |
189 |
| Transfer roller |
191 |
| Fuser |
192 |
| Tray 1 pickup roller |
193 |
| Tray 1 separation pad |
195 |
| Tray 2 feed rollers |
196 |
| Covers, tray 1, and the rear output bin |
200 |
| Accessory covers and the tray 2 extension door |
201 |
| Formatter cover |
205 |
| Top cover |
206 |
| Right-side cover |
209 |
| Left-side cover |
211 |
| Front cover |
212 |
| Tray 1 |
214 |
| Rear output bin |
217 |
| Control-panel display |
218 |
| Control-panel overlay |
218 |
| Control-panel assembly |
219 |
| Main assemblies |
223 |
| Firmware DIMM (LJ 4200/4300 only) |
224 |
| Formatter assembly |
225 |
| Reinstallation notes, formatter |
226 |
| Installing a new formatter and a new dc controller (LJ 4250/4350 only) |
227 |
| Output-delivery assembly |
228 |
| Duplexing-pendulum assembly |
231 |
| Laser/scanner assembly |
233 |
| Paper-pickup drive assembly |
236 |
| Tray 2 lifter-drive assembly |
241 |
| Dc controller PCA |
244 |
| Reinstallation tip |
249 |
| Installing a new formatter and a new dc controller (LJ 4250/4350 only) |
249 |
| Power supply |
250 |
| Paper-feed belt assembly |
257 |
| Motors and fans |
259 |
| Main cooling fan (left side) |
260 |
| Cooling fan, right side (HP LaserJet 4250/4300/4350 Series printers only) |
262 |
| Removing the fan without removing the air duct |
262 |
| Removing the fan and the air duct together |
265 |
| Print-cartridge motor (HP LaserJet 4250/4300/4350 series printer only) |
267 |
| Main motor |
269 |
| Pickup and feed assemblies |
271 |
| Tray 1 paper-pickup assembly |
271 |
| Paper-feed assembly |
275 |
| Reinstallation notes for the paper-feed assembly |
276 |
| Main drive assembly |
277 |
| Registration assembly |
280 |
| Sensors and switches |
282 |
| Tray 2/500-sheet feeder media-size sensor (PS101) |
283 |
| Tray 2 media-size sensor (PS101) |
283 |
| 500-sheet feeder media-size sensor |
284 |
| Tray 1 paper sensor (PS105) |
286 |
| Door switch (SW101) |
287 |
| Solenoids and clutches |
288 |
| Tray 2 pickup solenoid (SL101) |
289 |
| Tray 1 pickup solenoid (SL102) |
290 |
| Feed-roller clutch (CL101) |
291 |
| Accessories |
292 |
| 500-sheet feeder assembly |
292 |
| 500-sheet feed rollers |
292 |
| 500-sheet feeder right-side cover |
292 |
| 500-sheet feeder control PCA |
295 |
| 500-sheet feeder lifter-drive assembly |
296 |
| 500-sheet feeder paper-pickup drive assembly |
297 |
| 1,500-sheet feeder assembly |
302 |
| 1,500-sheet feeder feed rollers |
302 |
| 1,500-sheet feeder separation roller |
302 |
| 1,500-sheet feeder door |
304 |
| 1,500-sheet feeder rear cover |
305 |
| 1,500-sheet feeder right-side cover |
306 |
| 1,500-sheet feeder control PCA |
308 |
| 1,500-sheet feeder media-size sensor |
310 |
| 1,500-sheet feeder lifter-drive assembly |
311 |
| 1,500-sheet feeder paper-pickup drive assembly |
314 |
| Troubleshooting |
315 |
| Chapter contents |
315 |
| Introduction |
316 |
| Troubleshooting process |
317 |
| Initial troubleshooting checklist |
317 |
| Troubleshooting flowchart |
319 |
| Power-on checks |
320 |
| Overview |
320 |
| Troubleshooting tools |
323 |
| Information pages |
324 |
| Menu map |
325 |
| Configuration page |
326 |
| Supplies status page |
328 |
| Embedded Web server |
329 |
| Gaining access to the embedded Web server |
329 |
| Information tab |
329 |
| Settings tab |
330 |
| Networking tab |
330 |
| Other links |
331 |
| Printer Status and Alerts software |
331 |
| To select status messages |
332 |
| To view status messages and information |
332 |
| Control-panel menus |
333 |
| Using control-panel menus |
333 |
| Resets submenu |
334 |
| Diagnostics menu |
335 |
| Service menu (service PIN codes) |
337 |
| Service ID |
338 |
| Converting the Service ID to an actual date |
338 |
| Restoring the Service ID |
338 |
| Printer resets and power-on modes |
339 |
| Cold reset |
339 |
| To perform a cold reset |
339 |
| NVRAM initialization |
340 |
| To initialize NVRAM |
340 |
| Hard-disk initialization |
341 |
| To initialize the hard disk |
341 |
| Power-on bypass |
342 |
| Skip disk-load |
342 |
| Self-test |
342 |
| Test pages |
343 |
| Engine-test page |
343 |
| Formatter test page |
344 |
| Interface troubleshooting |
345 |
| Communications checks |
345 |
| Computer direct connect (parallel) test |
345 |
| EIO troubleshooting |
345 |
| Jetdirect page/Embedded Jetdirect page (HP LaserJet 4250/4350 Series printers) |
346 |
| Display-message troubleshooting |
347 |
| Status messages |
347 |
| Warning messages |
347 |
| Error messages |
347 |
| Critical-error messages |
347 |
| Alphabetical printer messages |
347 |
| Alphabetical printer messages |
348 |
| Numerical printer messages |
362 |
| Numerical printer messages |
362 |
| Paper-path troubleshooting |
379 |
| Overview |
379 |
| Jam recovery |
380 |
| To disable the jam recovery |
380 |
| Avoiding jams |
381 |
| Persistent jams |
382 |
| Basic troubleshooting for persistent jams |
382 |
| Data collection |
382 |
| General paper-path troubleshooting |
382 |
| Paper-path checklist |
383 |
| Paper-path test |
383 |
| To perform a paper-path test |
384 |
| Jams in tray 1 |
385 |
| Jams in tray 2 |
386 |
| Jams in tray 3 or tray 4 |
387 |
| Jams in the paper path |
388 |
| Jams in the duplex path |
388 |
| Media transport problems |
389 |
| Multiple pages feed |
389 |
| Media is wrinkled or folded |
389 |
| Media is skewed |
390 |
| Image-formation troubleshooting |
391 |
| Media-related print-quality problems |
391 |
| Overhead transparency defects |
392 |
| Print-quality problems that are related to the environment |
392 |
| Print-quality problems that are related to jams |
392 |
| Image defects |
393 |
| Image quality |
393 |
| Check the print cartridge |
394 |
| EconoMode |
394 |
| Half self-test functional check |
395 |
| Drum-rotation functional check |
395 |
| Image defect tables |
396 |
| Repetitive-defects troubleshooting |
414 |
| Troubleshooting the stacker and the stapler/stacker |
416 |
| Initial checks |
416 |
| Jam errors |
417 |
| Stacker and stapler/stacker paper path |
417 |
| Stacker paper-path test |
418 |
| Stapler/stacker paper-path test |
418 |
| Paper-transport errors |
420 |
| Malfunction errors |
420 |
| Component errors |
421 |
| Printer-component locations |
423 |
| Main printer parts |
423 |
| Printer switches and sensors |
427 |
| Printer motors and fans |
428 |
| Printer PCAs |
429 |
| Accessory component locations |
430 |
| 500-sheet feeder main parts |
430 |
| 500-sheet feeder switches, sensors, solenoids, and PCAs |
431 |
| 1,500-sheet feeder main parts |
432 |
| 1,500-sheet feeder switches, sensors, solenoids, and PCAs |
434 |
| Stapler/stacker stapler assembly |
435 |
| Stacker and stapler/stacker switches and sensors |
436 |
| Stacker and stapler/stacker motors and solenoids |
437 |
| Stacker and stapler/stacker PCAs |
438 |
| Printer and accessory wiring diagrams |
439 |
| HP LaserJet 4200 wiring diagram |
440 |
| HP LaserJet 4250 wiring diagram |
441 |
| HP LaserJet 4300 wiring diagram |
442 |
| HP LaserJet 4350 wiring diagram |
443 |
| 500-sheet feeder wiring diagram |
444 |
| 1,500-sheet feeder wiring diagram |
445 |
| Duplex accessory wiring diagram |
446 |
| Envelope-feeder-accessory wiring diagram |
447 |
| Stacker-accessory wiring diagram |
448 |
| Stapler/stacker-accessory wiring diagram |
449 |
| Dc controller connectors diagram |
450 |
| General timing diagrams |
451 |
| HP LaserJet 4200 general timing diagram |
452 |
| HP LaserJet 4250 general timing diagram |
453 |
| HP LaserJet 4300 general timing diagram |
454 |
| HP LaserJet 4350 general timing diagram |
455 |
| Stapler/stacker timing diagram |
456 |
| Parts and diagrams |
457 |
| Chapter contents |
457 |
| Ordering parts and supplies |
458 |
| Parts |
458 |
| Related documentation and software |
458 |
| HP-authorized resellers and support |
459 |
| HP service agreements |
459 |
| HP Partner Portal |
459 |
| Supplies |
460 |
| Consumables and accessories |
461 |
| Consumables |
461 |
| Accessories |
462 |
| Memory, fonts, and mass storage |
464 |
| Cables and connectivity |
466 |
| Formatters, laser/scanners, power supplies, and fusers |
467 |
| Assembly locations (1 of 3) |
468 |
| Assembly locations (2 of 3) |
469 |
| Assembly locations (3 of 3) |
470 |
| Covers |
472 |
| Internal components |
476 |
| Accessories |
498 |
| Alphabetical parts list |
508 |
| Numerical parts list |
517 |
 1
1 247
247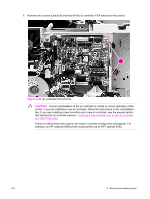 248
248 249
249 250
250 251
251 252
252 253
253 254
254 255
255 256
256 257
257

