HP LaserJet 4250 Service Manual - Page 85
Print-quality submenu, for each setting is the one with an asterisk * next to it.
 |
View all HP LaserJet 4250 manuals
Add to My Manuals
Save this manual to your list of manuals |
Page 85 highlights
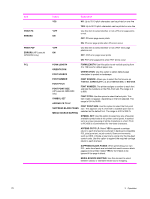
Print-quality submenu Some items on this menu are available in the program or printer driver (if the appropriate driver is installed). Program and printer-driver settings override control-panel settings. In general, it is best to change these settings in the printer driver, if applicable. The section that follows lists the settings and possible values. In the Values column, the default value for each setting is the one with an asterisk (*) next to it. Item SET REGISTRATION Values PRINT TEST PAGE SOURCE ADJUST TRAY [N] Explanation Use this item to shift the margin alignment to center the image on the page from top to bottom, and left to right. You can also align the image that is printed on the front with the image that is printed on the back. PRINT TEST PAGE: Use this option to print a test page that shows the current registration settings. SOURCE: Use this option to select the tray for which you want to print the test page. If installed, optional trays appear as selections, where [N] is the number of the tray. ADJUST TRAY N: Use this option to set the registration for the specified tray, where [N] is the number of the tray. A selection appears for each tray that is installed, and registration must be set for each tray. ■ X1 SHIFT: Registration of the image on the paper from side to side, as the paper lies in the tray. For duplexing, this side is the second side (back) of the paper. ■ X2 SHIFT: Registration of the image on the paper from side to side, as the paper lies in the tray, for the first side (front) of a duplexed page. This item appears only if an optional duplexer is installed and enabled. Set the X1 SHIFT first. ■ Y SHIFT: Registration of the image on the paper from top to bottom as the paper lies in the tray. FUSER MODES PLAIN PREPRINTED LETTERHEAD TRANSPARENCY PREPUNCHED LABELS BOND RECYCLED COLOR LIGHT 60-75 G/M2 CARDSTOCK Use this item to configure the fuser mode associated with each paper type. Change the fuser mode only if you are experiencing problems printing on certain media types. After you select a type of media, you can select a fuser mode that is available for that type. The printer supports the following modes: NORMAL: Used for most types of paper. HIGH 2: Used for textured paper that has a special or rough finish. HIGH 1: Used for rough paper. LOW (LJ 4200/4300) or LOW 1 (LJ 4250/4350): Used for lightweight media. Use this mode if you are having problems with curled paper. LOW 2 (LJ 4250/4350 only): Used for transparencies. Control-panel menus 71
-
 1
1 -
2
-
3
-
4
-
5
-
6
-
7
-
8
-
9
-
10
-
11
-
12
-
13
-
14
-
15
-
16
-
17
-
18
-
19
-
20
-
21
-
22
-
23
-
24
-
25
-
26
-
27
-
28
-
29
-
30
-
31
-
32
-
33
-
34
-
35
-
36
-
37
-
38
-
39
-
40
-
41
-
42
-
43
-
44
-
45
-
46
-
47
-
48
-
49
-
50
-
51
-
52
-
53
-
54
-
55
-
56
-
57
-
58
-
59
-
60
-
61
-
62
-
63
-
64
-
65
-
66
-
67
-
68
-
69
-
70
-
71
-
72
-
73
-
74
-
75
-
76
-
77
-
78
-
79
-
 80
80 -
 81
81 -
 82
82 -
 83
83 -
 84
84 -
 85
85 -
 86
86 -
 87
87 -
 88
88 -
 89
89 -
 90
90 -
91
-
92
-
93
-
94
-
95
-
96
-
97
-
98
-
99
-
100
-
101
-
102
-
103
-
104
-
105
-
106
-
107
-
108
-
109
-
110
-
111
-
112
-
113
-
114
-
115
-
116
-
117
-
118
-
119
-
120
-
121
-
122
-
123
-
124
-
125
-
126
-
127
-
128
-
129
-
130
-
131
-
132
-
133
-
134
-
135
-
136
-
137
-
138
-
139
-
140
-
141
-
142
-
143
-
144
-
145
-
146
-
147
-
148
-
149
-
150
-
151
-
152
-
153
-
154
-
155
-
156
-
157
-
158
-
159
-
160
-
161
-
162
-
163
-
164
-
165
-
166
-
167
-
168
-
169
-
170
-
171
-
172
-
173
-
174
-
175
-
176
-
177
-
178
-
179
-
180
-
181
-
182
-
183
-
184
-
185
-
186
-
187
-
188
-
189
-
190
-
191
-
192
-
193
-
194
-
195
-
196
-
197
-
198
-
199
-
200
-
201
-
202
-
203
-
204
-
205
-
206
-
207
-
208
-
209
-
210
-
211
-
212
-
213
-
214
-
215
-
216
-
217
-
218
-
219
-
220
-
221
-
222
-
223
-
224
-
225
-
226
-
227
-
228
-
229
-
230
-
231
-
232
-
233
-
234
-
235
-
236
-
237
-
238
-
239
-
240
-
241
-
242
-
243
-
244
-
245
-
246
-
247
-
248
-
249
-
250
-
251
-
252
-
253
-
254
-
255
-
256
-
257
-
258
-
259
-
260
-
261
-
262
-
263
-
264
-
265
-
266
-
267
-
268
-
269
-
270
-
271
-
272
-
273
-
274
-
275
-
276
-
277
-
278
-
279
-
280
-
281
-
282
-
283
-
284
-
285
-
286
-
287
-
288
-
289
-
290
-
291
-
292
-
293
-
294
-
295
-
296
-
297
-
298
-
299
-
300
-
301
-
302
-
303
-
304
-
305
-
306
-
307
-
308
-
309
-
310
-
311
-
312
-
313
-
314
-
315
-
316
-
317
-
318
-
319
-
320
-
321
-
322
-
323
-
324
-
325
-
326
-
327
-
328
-
329
-
330
-
331
-
332
-
333
-
334
-
335
-
336
-
337
-
338
-
339
-
340
-
341
-
342
-
343
-
344
-
345
-
346
-
347
-
348
-
349
-
350
-
351
-
352
-
353
-
354
-
355
-
356
-
357
-
358
-
359
-
360
-
361
-
362
-
363
-
364
-
365
-
366
-
367
-
368
-
369
-
370
-
371
-
372
-
373
-
374
-
375
-
376
-
377
-
378
-
379
-
380
-
381
-
382
-
383
-
384
-
385
-
386
-
387
-
388
-
389
-
390
-
391
-
392
-
393
-
394
-
395
-
396
-
397
-
398
-
399
-
400
-
401
-
402
-
403
-
404
-
405
-
406
-
407
-
408
-
409
-
410
-
411
-
412
-
413
-
414
-
415
-
416
-
417
-
418
-
419
-
420
-
421
-
422
-
423
-
424
-
425
-
426
-
427
-
428
-
429
-
430
-
431
-
432
-
433
-
434
-
435
-
436
-
437
-
438
-
439
-
440
-
441
-
442
-
443
-
444
-
445
-
446
-
447
-
448
-
449
-
450
-
451
-
452
-
453
-
454
-
455
-
456
-
457
-
458
-
459
-
460
-
461
-
462
-
463
-
464
-
465
-
466
-
467
-
468
-
469
-
470
-
471
-
472
-
473
-
474
-
475
-
476
-
477
-
478
-
479
-
480
-
481
-
482
-
483
-
484
-
485
-
486
-
487
-
488
-
489
-
490
-
491
-
492
-
493
-
494
-
495
-
496
-
497
-
498
-
499
-
500
-
501
-
502
-
503
-
504
-
505
-
506
-
507
-
508
-
509
-
510
-
511
-
512
-
513
-
514
-
515
-
516
-
517
-
518
-
519
-
520
-
521
-
522
-
523
-
524
-
525
-
526
-
527
-
528
-
529
-
530
-
531
-
532
-
533
-
534
-
535
-
536
-
537
-
538
-
539
-
540
 |
 |
