HP Photosmart C5300 User Guide - Page 256
Solution 1: Install the printhead and then cartridges, Solution, To reinstall the printhead
 |
View all HP Photosmart C5300 manuals
Add to My Manuals
Save this manual to your list of manuals |
Page 256 highlights
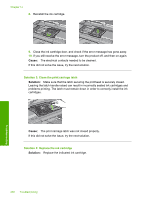
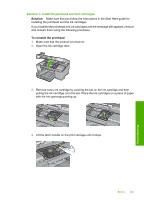
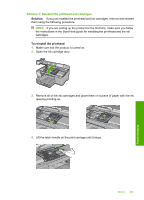
Solution 1: Install the printhead and then cartridges Solution: Make sure that you follow the instructions in the Start Here guide for installing the printhead and the ink cartridges. If you installed the printhead and ink cartridges and the message still appears, remove and reinsert them using the following procedure. To reinstall the printhead 1. Make sure that the product is turned on. 2. Open the ink cartridge door. 3. Remove every ink cartridge by pushing the tab on the ink cartridge and then pulling the ink cartridge out of its slot. Place the ink cartridges on a piece of paper with the ink openings pointing up. 4. Lift the latch handle on the print carriage until it stops. Errors 253 Troubleshooting
-
 1
1 -
2
-
3
-
4
-
5
-
6
-
7
-
8
-
9
-
10
-
11
-
12
-
13
-
14
-
15
-
16
-
17
-
18
-
19
-
20
-
21
-
22
-
23
-
24
-
25
-
26
-
27
-
28
-
29
-
30
-
31
-
32
-
33
-
34
-
35
-
36
-
37
-
38
-
39
-
40
-
41
-
42
-
43
-
44
-
45
-
46
-
47
-
48
-
49
-
50
-
51
-
52
-
53
-
54
-
55
-
56
-
57
-
58
-
59
-
60
-
61
-
62
-
63
-
64
-
65
-
66
-
67
-
68
-
69
-
70
-
71
-
72
-
73
-
74
-
75
-
76
-
77
-
78
-
79
-
80
-
81
-
82
-
83
-
84
-
85
-
86
-
87
-
88
-
89
-
90
-
91
-
92
-
93
-
94
-
95
-
96
-
97
-
98
-
99
-
100
-
101
-
102
-
103
-
104
-
105
-
106
-
107
-
108
-
109
-
110
-
111
-
112
-
113
-
114
-
115
-
116
-
117
-
118
-
119
-
120
-
121
-
122
-
123
-
124
-
125
-
126
-
127
-
128
-
129
-
130
-
131
-
132
-
133
-
134
-
135
-
136
-
137
-
138
-
139
-
140
-
141
-
142
-
143
-
144
-
145
-
146
-
147
-
148
-
149
-
150
-
151
-
152
-
153
-
154
-
155
-
156
-
157
-
158
-
159
-
160
-
161
-
162
-
163
-
164
-
165
-
166
-
167
-
168
-
169
-
170
-
171
-
172
-
173
-
174
-
175
-
176
-
177
-
178
-
179
-
180
-
181
-
182
-
183
-
184
-
185
-
186
-
187
-
188
-
189
-
190
-
191
-
192
-
193
-
194
-
195
-
196
-
197
-
198
-
199
-
200
-
201
-
202
-
203
-
204
-
205
-
206
-
207
-
208
-
209
-
210
-
211
-
212
-
213
-
214
-
215
-
216
-
217
-
218
-
219
-
220
-
221
-
222
-
223
-
224
-
225
-
226
-
227
-
228
-
229
-
230
-
231
-
232
-
233
-
234
-
235
-
236
-
237
-
238
-
239
-
240
-
241
-
242
-
243
-
244
-
245
-
246
-
247
-
248
-
249
-
250
-
 251
251 -
 252
252 -
 253
253 -
 254
254 -
 255
255 -
 256
256 -
 257
257 -
 258
258 -
 259
259 -
 260
260 -
 261
261 -
262
-
263
-
264
-
265
-
266
-
267
-
268
-
269
-
270
-
271
-
272
-
273
-
274
-
275
-
276
-
277
-
278
-
279
-
280
-
281
-
282
-
283
-
284
-
285
-
286
-
287
-
288
-
289
-
290
-
291
-
292
-
293
-
294
-
295
-
296
-
297
-
298
-
299
-
300
-
301
-
302
-
303
-
304
-
305
 |
 |
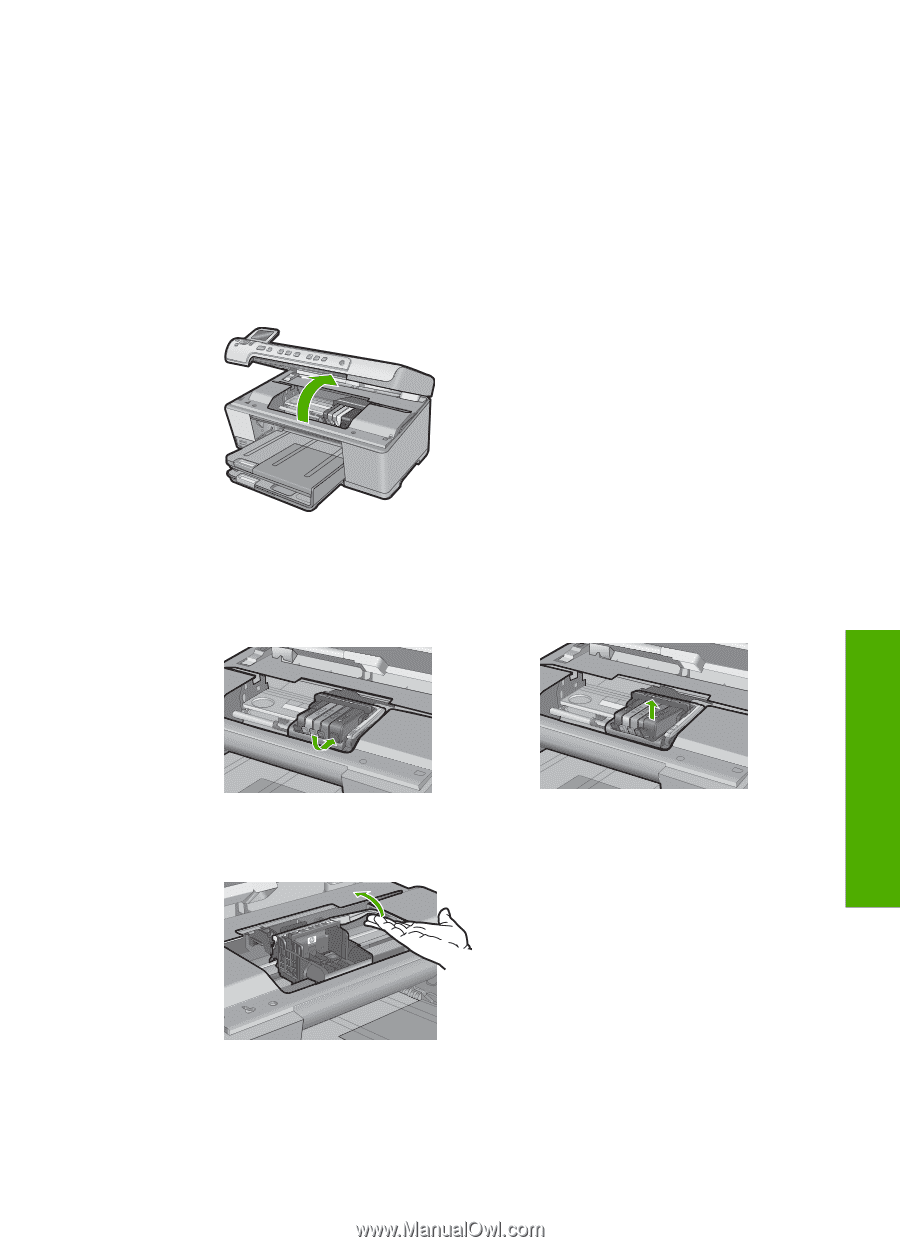
Solution 1: Install the printhead and then cartridges
Solution:
Make sure that you follow the instructions in the Start Here guide for
installing the printhead and the ink cartridges.
If you installed the printhead and ink cartridges and the message still appears, remove
and reinsert them using the following procedure.
To reinstall the printhead
1.
Make sure that the product is turned on.
2.
Open the ink cartridge door.
3.
Remove every ink cartridge by pushing the tab on the ink cartridge and then
pulling the ink cartridge out of its slot. Place the ink cartridges on a piece of paper
with the ink openings pointing up.
4.
Lift the latch handle on the print carriage until it stops.
Errors
253
Troubleshooting