HP ProLiant DL288 HP ProLiant DL288 G6 Server Maintenance and Service Guide - Page 72
To remove the backplane, Pull the backplane up and out to release it from the hard drive cage.
 |
View all HP ProLiant DL288 manuals
Add to My Manuals
Save this manual to your list of manuals |
Page 72 highlights
To remove the backplane: 1. Remove all drives out of the drive bays. Refer to the "Optical disc drive bay" and "Hard drives" sections in this chapter for detailed procedures. 2. Remove the top cover. 3. Remove all cables connected to the backplane. 4. Remove the backplane. a. Remove the three screws that secure the backplane to the hard drive cage. b. Pull the backplane up and out to release it from the hard drive cage. Figure 31 Removing the Backplane To reinstall the backplane: 1. Orient the backplane so that the notches on the backplane align with the hook on the drive cage and then press the backplane down until it clicks into place. 2. Secure the backplane with three screws. Removal and replacement procedures 68
-
 1
1 -
2
-
3
-
4
-
5
-
6
-
7
-
8
-
9
-
10
-
11
-
12
-
13
-
14
-
15
-
16
-
17
-
18
-
19
-
20
-
21
-
22
-
23
-
24
-
25
-
26
-
27
-
28
-
29
-
30
-
31
-
32
-
33
-
34
-
35
-
36
-
37
-
38
-
39
-
40
-
41
-
42
-
43
-
44
-
45
-
46
-
47
-
48
-
49
-
50
-
51
-
52
-
53
-
54
-
55
-
56
-
57
-
58
-
59
-
60
-
61
-
62
-
63
-
64
-
65
-
66
-
 67
67 -
 68
68 -
 69
69 -
 70
70 -
 71
71 -
 72
72 -
 73
73 -
 74
74 -
 75
75 -
 76
76 -
 77
77 -
78
-
79
-
80
-
81
-
82
-
83
-
84
-
85
-
86
-
87
-
88
-
89
-
90
-
91
-
92
-
93
-
94
-
95
-
96
-
97
-
98
-
99
-
100
-
101
-
102
-
103
-
104
-
105
-
106
-
107
-
108
-
109
-
110
-
111
-
112
-
113
-
114
-
115
-
116
-
117
-
118
-
119
-
120
-
121
-
122
-
123
-
124
-
125
-
126
-
127
-
128
-
129
-
130
-
131
-
132
-
133
-
134
-
135
-
136
-
137
-
138
-
139
-
140
-
141
-
142
-
143
-
144
-
145
-
146
-
147
-
148
-
149
-
150
-
151
-
152
-
153
-
154
-
155
-
156
-
157
-
158
-
159
-
160
-
161
-
162
-
163
 |
 |
Removal and replacement procedures
68
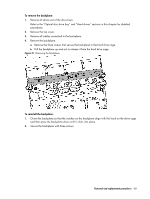
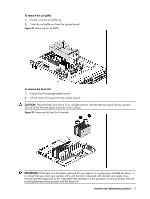
To remove the backplane:
1.
Remove all drives out of the drive bays.
Refer to the “Optical disc drive bay” and “Hard drives” sections in this chapter for detailed
procedures.
2.
Remove the top cover.
3.
Remove all cables connected to the backplane.
4.
Remove the backplane.
a.
Remove the three screws that secure the backplane to the hard drive cage.
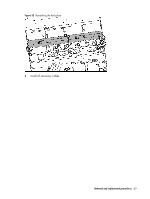
b.
Pull the backplane up and out to release it from the hard drive cage.
Figure 31
Removing the Backplane
To reinstall the backplane:
1.
Orient the backplane so that the notches on the backplane align with the hook on the drive cage
and then press the backplane down until it clicks into place.
2.
Secure the backplane with three screws.