HP StorageWorks 2/32 HP StorageWorks SAN Switch 2/32 V4.2.X Installation Guide - Page 41
Parity: None, Power On, Self-Test
 |
View all HP StorageWorks 2/32 manuals
Add to My Manuals
Save this manual to your list of manuals |
Page 41 highlights
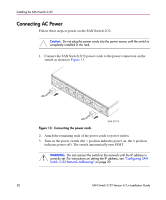
Installing the SAN Switch 2/32 SHR-2572A Figure 14: Connecting the Serial cable 3. Connect the other end of the serial cable to an RS-232 serial port on the workstation. If no RS-232 serial port is available on the workstation, the adapter on the end of the serial cable can be removed to use the RJ-45 connector to create a serial connection. 4. Verify that the switch power is on and POST is completed. See the "Power On Self-Test" section, earlier in this chapter. 5. Power on the workstation and establish a connection to the switch using a terminal emulator application (such as HyperTerminal). Note: These steps show instructions specific to HyperTerminal. If you are using a different application, consult that application's documentation. 6. Using HyperTerminal (or similar application), configure the port settings as follows: ■ Bits per second: 9600 ■ Databits: 8 ■ Parity: None ■ Stop bits: 1 SAN Switch 2/32 Version 4.2.x Installation Guide 41
-
 1
1 -
2
-
3
-
4
-
5
-
6
-
7
-
8
-
9
-
10
-
11
-
12
-
13
-
14
-
15
-
16
-
17
-
18
-
19
-
20
-
21
-
22
-
23
-
24
-
25
-
26
-
27
-
28
-
29
-
30
-
31
-
32
-
33
-
34
-
35
-
 36
36 -
 37
37 -
 38
38 -
 39
39 -
 40
40 -
 41
41 -
 42
42 -
 43
43 -
 44
44 -
 45
45 -
 46
46 -
47
-
48
-
49
-
50
-
51
-
52
-
53
-
54
-
55
-
56
-
57
-
58
-
59
-
60
-
61
-
62
-
63
-
64
-
65
-
66
-
67
-
68
-
69
-
70
-
71
-
72
-
73
-
74
-
75
-
76
-
77
-
78
-
79
-
80
-
81
-
82
-
83
-
84
-
85
-
86
-
87
-
88
-
89
-
90
-
91
-
92
-
93
-
94
-
95
-
96
-
97
-
98
-
99
-
100
 |
 |
