HP StorageWorks 2/32 HP StorageWorks SAN Switch 2/32 V4.2.X Installation Guide - Page 43
Connecting the SAN Switch 2/32 to the LAN, Area Network LAN segment.
 |
View all HP StorageWorks 2/32 manuals
Add to My Manuals
Save this manual to your list of manuals |
Page 43 highlights
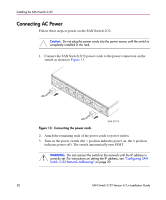
Installing the SAN Switch 2/32 Connecting the SAN Switch 2/32 to the LAN Use the following steps to connect the SAN Switch 2/32 to the Ethernet Local Area Network (LAN) segment. 1. Remove the shipping plug from the SAN Switch 2/32 Ethernet port. 2. Connect one end of an Ethernet cable to the SAN Switch 2/32 Ethernet port as shown in Figure 15. Figure 15: Connecting the Ethernet cable SHR-2573A 3. Connect the other end of the Ethernet cable to the workstation or to an Ethernet network containing the workstation. Note: You can now access the switch remotely (and from multiple connections), using Telnet or the Advanced Web Tools application. Verify that the switch is not accessed from any other connections during the remaining steps. 4. Log in to the switch by Telnet as the admin user. The default admin logon is admin and the default password is password. SAN Switch 2/32 Version 4.2.x Installation Guide 43
-
 1
1 -
2
-
3
-
4
-
5
-
6
-
7
-
8
-
9
-
10
-
11
-
12
-
13
-
14
-
15
-
16
-
17
-
18
-
19
-
20
-
21
-
22
-
23
-
24
-
25
-
26
-
27
-
28
-
29
-
30
-
31
-
32
-
33
-
34
-
35
-
36
-
37
-
 38
38 -
 39
39 -
 40
40 -
 41
41 -
 42
42 -
 43
43 -
 44
44 -
 45
45 -
 46
46 -
 47
47 -
 48
48 -
49
-
50
-
51
-
52
-
53
-
54
-
55
-
56
-
57
-
58
-
59
-
60
-
61
-
62
-
63
-
64
-
65
-
66
-
67
-
68
-
69
-
70
-
71
-
72
-
73
-
74
-
75
-
76
-
77
-
78
-
79
-
80
-
81
-
82
-
83
-
84
-
85
-
86
-
87
-
88
-
89
-
90
-
91
-
92
-
93
-
94
-
95
-
96
-
97
-
98
-
99
-
100
 |
 |
