LG LN240 Turquoise Brochure - Page 62
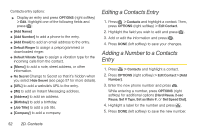
Editing a Contacts Entry, Adding a Number to a Contacts Entry
 |
View all LG LN240 Turquoise manuals
Add to My Manuals
Save this manual to your list of manuals |
Page 62 highlights
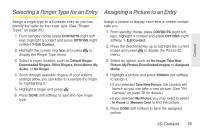
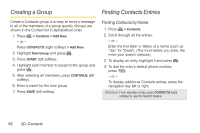
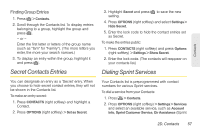
Contacts entry options: ᮣ Display an entry and press OPTIONS (right softkey) > Edit. Highlight one of the following fields and press : ⅷ [Add Name] ⅷ [Add Number] to add a phone to the entry. ⅷ [Add Email] to add an email address to the entry. ⅷ Default Ringer to assign a preprogrammed or downloaded ringer. ⅷ Default Vibrate Type to assign a vibration type for the incoming calls from the contact. ⅷ [Memo] to add a note, street address, or other information. ⅷ No Secret Change to Secret so that it's hidden when you select Hide Secret (see page 57 for more details). ⅷ [URL] to add a website's URL to the entry. ⅷ [IM] to add an Instant Messaging address. ⅷ [Address] to add an address. ⅷ [Birthday] to add a birthday. ⅷ [Job Title] to add a job title. ⅷ [Company] to add a company. Editing a Contacts Entry 1. Press > Contacts and highlight a contact. Then, press OPTIONS (right softkey) > Edit Contact. 2. Highlight the field you wish to edit and press . 3. Add or edit the information and press . 4. Press DONE (left softkey) to save your changes. Adding a Number to a Contacts Entry 1. Press > Contacts and highlight a contact. 2. Press OPTIONS (right softkey) > Edit Contact > [Add Number]. 3. Enter the new phone number and press . While entering a number, press OPTIONS (right softkey) for additional options [Hard Pause, 2-sec Pause, Set # Type, Set as Main #, or Set Speed Dial]. 4. Highlight a label for the number and press . 5. Press DONE (left softkey) to save the new number. 52 2D. Contacts
-
 1
1 -
2
-
3
-
4
-
5
-
6
-
7
-
8
-
9
-
10
-
11
-
12
-
13
-
14
-
15
-
16
-
17
-
18
-
19
-
20
-
21
-
22
-
23
-
24
-
25
-
26
-
27
-
28
-
29
-
30
-
31
-
32
-
33
-
34
-
35
-
36
-
37
-
38
-
39
-
40
-
41
-
42
-
43
-
44
-
45
-
46
-
47
-
48
-
49
-
50
-
51
-
52
-
53
-
54
-
55
-
56
-
 57
57 -
 58
58 -
 59
59 -
 60
60 -
 61
61 -
 62
62 -
 63
63 -
 64
64 -
 65
65 -
 66
66 -
 67
67 -
68
-
69
-
70
-
71
-
72
-
73
-
74
-
75
-
76
-
77
-
78
-
79
-
80
-
81
-
82
-
83
-
84
-
85
-
86
-
87
-
88
-
89
-
90
-
91
-
92
-
93
-
94
-
95
-
96
-
97
-
98
-
99
-
100
-
101
-
102
-
103
-
104
-
105
-
106
-
107
-
108
-
109
-
110
-
111
-
112
-
113
-
114
-
115
-
116
-
117
-
118
-
119
-
120
-
121
-
122
-
123
-
124
-
125
-
126
-
127
-
128
-
129
-
130
-
131
-
132
-
133
-
134
-
135
-
136
-
137
-
138
-
139
-
140
-
141
-
142
-
143
 |
 |
