LG LN240 Turquoise Brochure - Page 65
Selecting a Ringer Type for an Entry, Assigning a Picture to an Entry
 |
View all LG LN240 Turquoise manuals
Add to My Manuals
Save this manual to your list of manuals |
Page 65 highlights
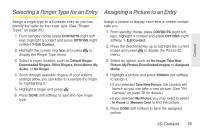
Contacts Selecting a Ringer Type for an Entry Assigning a Picture to an Entry Assign a ringer type to a Contacts entry so you can identify the caller by the ringer type. (See "Ringer Types" on page 30.) 1. From standby mode, press CONTACTS (right soft key), highlight a contact and press OPTIONS (right softkey) > Edit Contact. 2. Highlight the current ring type and press to display the Ringer Type menu. 3. Select a ringer location, such as Default Ringer, Downloaded Ringers, Other Ringers, Voice Memo, My Audio, or No Ringer. 4. Scroll through available ringers. (If your volume settings allow, you can listen to a sample the ringer by highlighting it.) 5. Highlight a ringer and press . 6. Press DONE (left softkey) to save the new ringer type. Assign a picture to display each time a certain contact calls you. 1. From standby mode, press CONTACTS (right soft key), highlight a contact and press OPTIONS (right softkey) > Edit Contact. 2. Press the directional key up to highlight the current image and press to display the Picture ID menu. 3. Select an option, such as No Image, Take New Picture, My Photos, Downloaded Images, or Assigned Media. 4. Highlight a picture and press ASSIGN (left softkey) to assign it. Ⅲ If you selected Take New Picture, the camera will launch so you can take a new picture. (See "2H. Camera" on page 76 for details.) Ⅲ If you selected My Photos, you may need to select In Phone or Memory Card to find the picture. 5. Press DONE (left softkey) to save the assigned picture. 2D. Contacts 55
-
 1
1 -
2
-
3
-
4
-
5
-
6
-
7
-
8
-
9
-
10
-
11
-
12
-
13
-
14
-
15
-
16
-
17
-
18
-
19
-
20
-
21
-
22
-
23
-
24
-
25
-
26
-
27
-
28
-
29
-
30
-
31
-
32
-
33
-
34
-
35
-
36
-
37
-
38
-
39
-
40
-
41
-
42
-
43
-
44
-
45
-
46
-
47
-
48
-
49
-
50
-
51
-
52
-
53
-
54
-
55
-
56
-
57
-
58
-
59
-
 60
60 -
 61
61 -
 62
62 -
 63
63 -
 64
64 -
 65
65 -
 66
66 -
 67
67 -
 68
68 -
 69
69 -
 70
70 -
71
-
72
-
73
-
74
-
75
-
76
-
77
-
78
-
79
-
80
-
81
-
82
-
83
-
84
-
85
-
86
-
87
-
88
-
89
-
90
-
91
-
92
-
93
-
94
-
95
-
96
-
97
-
98
-
99
-
100
-
101
-
102
-
103
-
104
-
105
-
106
-
107
-
108
-
109
-
110
-
111
-
112
-
113
-
114
-
115
-
116
-
117
-
118
-
119
-
120
-
121
-
122
-
123
-
124
-
125
-
126
-
127
-
128
-
129
-
130
-
131
-
132
-
133
-
134
-
135
-
136
-
137
-
138
-
139
-
140
-
141
-
142
-
143
 |
 |