Lexmark C534n User's Guide - Page 79
Modifying confidential print settings, Supporting IPSec, Notes, Configuration, Security
 |
UPC - 734646258524
View all Lexmark C534n manuals
Add to My Manuals
Save this manual to your list of manuals |
Page 79 highlights
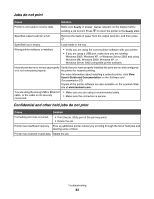
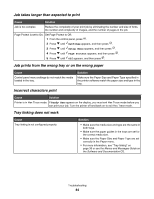
Notes: • A printer hard disk must be installed in the printer and working properly for the printer lockout functionality to be available. • Some data will continue to be processed while the printer is locked. Reports such as user or event logs can be retrieved from a locked printer. To lock control panel menus: 1 Open a Web browser. In the address line, enter the IP address of the printer or print server to be protected using the format: http://ip_address/. 2 Click Configuration. 3 Under Other Settings, click Security. 4 Click Printer Lockout PIN. Modifying confidential print settings You can modify confidential print settings using the Embedded Web Server. You can set a maximum number of PIN entry attempts. When a user exceeds a specific number of PIN entry attempts, all of the jobs for that user are deleted. You can set an expiration time for confidential print jobs. When a user has not printed the jobs within the designated time period, all of the jobs for that user are deleted. Note: This functionality is only available on network printers. To modify the confidential print settings: 1 Open a Web browser. In the address line, enter the IP address of the printer or print server to be protected using the format: http://ip_address/. 2 Click Configuration. 3 Under Other Settings, click Security. 4 Click Confidential Print Setup. Supporting IPSec Internet Protocol Security (IPSec) provides authentication and encryption at the network layer allowing all application and network connections over the IP protocol to be secure. IPSec can be set up between the printer and up to five hosts, using both IPv4 and IPv6. To configure IPSec using the Embedded Web Server: 1 Open a Web browser. In the address line, enter the IP address of the printer or print server to be protected using the format: http://ip_address. 2 Click Configuration. 3 Under Other Settings, click Network/Ports. 4 Click IPSec. Administrative support 79
-
 1
1 -
2
-
3
-
4
-
5
-
6
-
7
-
8
-
9
-
10
-
11
-
12
-
13
-
14
-
15
-
16
-
17
-
18
-
19
-
20
-
21
-
22
-
23
-
24
-
25
-
26
-
27
-
28
-
29
-
30
-
31
-
32
-
33
-
34
-
35
-
36
-
37
-
38
-
39
-
40
-
41
-
42
-
43
-
44
-
45
-
46
-
47
-
48
-
49
-
50
-
51
-
52
-
53
-
54
-
55
-
56
-
57
-
58
-
59
-
60
-
61
-
62
-
63
-
64
-
65
-
66
-
67
-
68
-
69
-
70
-
71
-
72
-
73
-
 74
74 -
 75
75 -
 76
76 -
 77
77 -
 78
78 -
 79
79 -
 80
80 -
 81
81 -
 82
82 -
 83
83 -
 84
84 -
85
-
86
-
87
-
88
-
89
-
90
-
91
-
92
-
93
-
94
-
95
-
96
-
97
-
98
-
99
-
100
-
101
-
102
-
103
-
104
-
105
-
106
-
107
-
108
-
109
-
110
 |
 |
