NEC e232 User Guide - Page 39
Moving the personal data to another directory, Deleting
 |
View all NEC e232 manuals
Add to My Manuals
Save this manual to your list of manuals |
Page 39 highlights
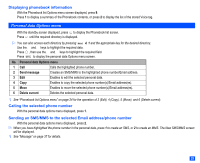
☛ Key in the desired location number or use the ▲ and ▼ keys to highlight the desired destination, then press . 2 When you have chosen the personal data which includes more than one phone number/Email address for a destination that allows only one number to be stored, the Origin number screen will be displayed where you can choose the number to be copied. 2 When copying a personal data from the phonebook(Phone) to other directories, only the items which are supported by the destination directory can be copied. Package copy ☛ With the Phonebook list Options menu screen displayed, press 3 and 2. ☛ Press the appropriate key for the desired package copy. 2 In the case of phonebook (Phone), you have to select the number to be copied. ☛ Key in the desired location numbers, then press . 2 When you have chosen the personal data which includes more than one phone number/Email address for a destination that allows only one number stored, a new personal data for each number is created in the destination directory to store the number(s). 2 When copying a personal data from the phonebook(Phone) to other directories, only the items which are supported by the destination directory can be copied. Moving the personal data to another directory ☛ With the Phonebook list Options menu screen displayed, press 4. ☛ Press the appropriate key for the desired destination to which you wish to move the selected personal data. ☛ Key in the desired location number or use the ▲ and ▼ keys to highlight the desired destination, then press . 2 When you have chosen the personal data which includes more than one phone number/Email address for a destination that allows only one number to be stored, the Origin number screen will be displayed where you can choose the number to be copied. Deleting Delete current ☛ With the Phonebook list Options menu screen displayed, press 5 and 1. ☛ Press Softkey 1 to complete the operation. Delete all ☛ With the Phonebook list Options menu screen displayed, press 5 and 2. ☛ Press Softkey 1 to complete the operation. 2 This option operates only when the phonebook(Phone) is displayed before entering the Options menu screen. 27
-
 1
1 -
2
-
3
-
4
-
5
-
6
-
7
-
8
-
9
-
10
-
11
-
12
-
13
-
14
-
15
-
16
-
17
-
18
-
19
-
20
-
21
-
22
-
23
-
24
-
25
-
26
-
27
-
28
-
29
-
30
-
31
-
32
-
33
-
 34
34 -
 35
35 -
 36
36 -
 37
37 -
 38
38 -
 39
39 -
 40
40 -
 41
41 -
 42
42 -
 43
43 -
 44
44 -
45
-
46
-
47
-
48
-
49
-
50
-
51
-
52
-
53
-
54
-
55
-
56
-
57
-
58
-
59
-
60
-
61
-
62
-
63
-
64
-
65
-
66
-
67
-
68
-
69
-
70
-
71
-
72
-
73
-
74
-
75
-
76
-
77
-
78
-
79
-
80
-
81
-
82
-
83
-
84
-
85
-
86
-
87
-
88
 |
 |
