NEC e232 User Guide - Page 41
Personal data Options menu
 |
View all NEC e232 manuals
Add to My Manuals
Save this manual to your list of manuals |
Page 41 highlights
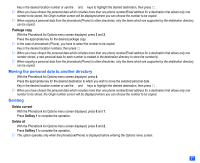
Displaying phonebook information ☛ With the Phonebook list Options menu screen displayed, press 9. ☛ Press 1 to display a summary of the Phonebook contents, or press 2 to display the list of the stored Voice tag. Personal data Options menu ☛ With the standby screen displayed, press to display the Phonebook list screen. ☛ Press until the required directory is displayed. 2 You can also access each directory by pressing 4, 1 and the appropriate key for the desired directory. ☛ Use the ▲ and ▼ keys to highlight the required data. ☛ Press , then use the ▲ and ▼ keys to highlight the required field. ☛ Press to display the personal data Options menu screen. No. Personal data Options menu 1 Call Calls the highlighted phone number. 2 Send message Creates an SMS/MMS to the highlighted phone number/Email address. 3 Edit Enables to edit the selected personal data. 4 Copy Enables to copy the selected phone number(s)/Email address(es). 5 Move Enables to move the selected phone number(s)/Email address(es). 6 Delete current Deletes the selected personal data. / See "Phonebook list Options menu" on page 24 for the operation of 3 (Edit), 4 (Copy), 5 (Move), and 6 (Delete current). Calling the selected phone number ☛ With the personal data options menu displayed, press 1. Sending an SMS/MMS to the selected Email address/phone number ☛ With the personal data options menu displayed, press 2. 2 When you have highlighted the phone number in the personal data, press 1 to create an SMS, or 2 to create an MMS. The New SMS/MMS screen will be displayed. / See "Message" on page 37 for details. 29
-
 1
1 -
2
-
3
-
4
-
5
-
6
-
7
-
8
-
9
-
10
-
11
-
12
-
13
-
14
-
15
-
16
-
17
-
18
-
19
-
20
-
21
-
22
-
23
-
24
-
25
-
26
-
27
-
28
-
29
-
30
-
31
-
32
-
33
-
34
-
35
-
 36
36 -
 37
37 -
 38
38 -
 39
39 -
 40
40 -
 41
41 -
 42
42 -
 43
43 -
 44
44 -
 45
45 -
 46
46 -
47
-
48
-
49
-
50
-
51
-
52
-
53
-
54
-
55
-
56
-
57
-
58
-
59
-
60
-
61
-
62
-
63
-
64
-
65
-
66
-
67
-
68
-
69
-
70
-
71
-
72
-
73
-
74
-
75
-
76
-
77
-
78
-
79
-
80
-
81
-
82
-
83
-
84
-
85
-
86
-
87
-
88
 |
 |
