Panasonic AG-AC160A Operating Instructions Advanced - Page 11
Shooting in Auto mode - hd camera
 |
View all Panasonic AG-AC160A manuals
Add to My Manuals
Save this manual to your list of manuals |
Page 11 highlights
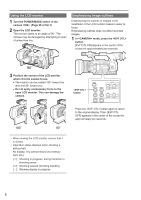
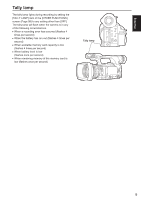
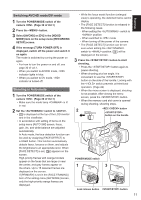
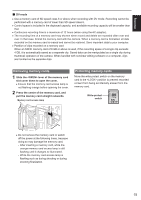
O Switching AVCHD mode/DV mode 1 Turn the POWER/MODE switch of the camera . (Page 30 of Vol.1) 2 Press the button. 3 Select [AVCHD] or [DV] in the [HD/SD MODE] item on the setup menu [RECORDING SETUP] screen. 4 If the message [TURN POWER OFF] is displayed, switch off the power and switch it on again. The mode is switched by turning the power on again. • For how to turn the power on and off, see page 30 of vol.1. • When you switch to AVCHD mode, indicator lights in blue. • When you switch to DV mode, indicator is turned off. Shooting in Auto mode 1 Turn the POWER/MODE switch of the camera . (Page 30 of Vol.1) • Make sure the mode lamp is lit in red. 2 Set the switch to . • [ ] is displayed at the top of the LCD monitor and in the viewfinder. • In accordance with setting of items on the setup menu [AUTO SW] screen, focus, gain, iris, and white balance are adjusted automatically. In Auto mode, the face detection function can be used by assigning [FACE DETECT] to a USER button. This function automatically detects faces, focuses on them, and adjusts the brightness to an appropriate level. When [FACE DETECT] is set, [ ] appears on the screen. High-priority frames with orange borders appear on the faces that are large or near the center, and gray frames appear on the others. Up to 15 detected frames are displayed on the screen. If [PRIMARY] is set in the [FACE FRAMING] item of the setting menu [SW MODE] screen, only the high-priority orange frames are displayed. Shooting • While the focus assist function (eϩnοlaΫrgղedআϘλϯ view) is operating, the detected frame cannot display. • The [FACE DETECT] function is released in the following cases. - When setting the switch to position - When switched to mode - When turning off the power of the camera • The [FACE DETECT] function can be set even when setting the switch to position. [ ] will be displayed on the screen. 3 Press the button to start shooting. • Press the button again to pause shooting. • When shooting at a low angle, it is convenient to use the button on the side of the handle. Locking with the switch prevents unintentional operation. (Page 24) • When the menu screen is displayed, shooting is not possible. After closing the menu screen, press the button. • When the memory card slot cover is opened during shooting, shooting stops. 2 AUTO MANU button button on the handle POWER/MODE switch 1 3 Lock release button button 11
-
 1
1 -
2
-
3
-
4
-
5
-
 6
6 -
 7
7 -
 8
8 -
 9
9 -
 10
10 -
 11
11 -
 12
12 -
 13
13 -
 14
14 -
 15
15 -
 16
16 -
17
-
18
-
19
-
20
-
21
-
22
-
23
-
24
-
25
-
26
-
27
-
28
-
29
-
30
-
31
-
32
-
33
-
34
-
35
-
36
-
37
-
38
-
39
-
40
-
41
-
42
-
43
-
44
-
45
-
46
-
47
-
48
-
49
-
50
-
51
-
52
-
53
-
54
-
55
-
56
-
57
-
58
-
59
-
60
-
61
-
62
-
63
-
64
-
65
-
66
-
67
-
68
-
69
-
70
-
71
-
72
-
73
-
74
-
75
-
76
-
77
-
78
-
79
-
80
-
81
-
82
-
83
-
84
-
85
-
86
-
87
-
88
-
89
-
90
-
91
-
92
-
93
-
94
-
95
-
96
-
97
-
98
-
99
-
100
-
101
-
102
-
103
-
104
-
105
-
106
-
107
-
108
-
109
-
110
 |
 |
