Panasonic AG-AC160A Operating Instructions Advanced - Page 44
Using shooting settings (scene files), Changing scene file settings
 |
View all Panasonic AG-AC160A manuals
Add to My Manuals
Save this manual to your list of manuals |
Page 44 highlights
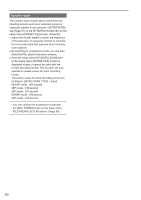
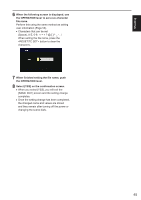
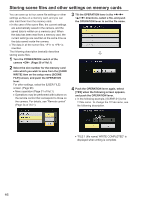
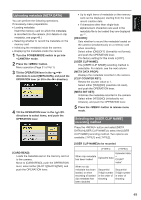
Using shooting settings (scene files) Settings according to a variety of shooting conditions are stored in the positions on the dial ( to ). When shooting, you can use the dial to immediately read out required files. ••The following files are stored as factory settings. : [SCENE] File suitable for normal shooting. : [SCENE FLUO.] File suitable for shooting under fluorescent lights (indoor shooting). : [SCENE SPARK] File suitable for shooting with fuller variations of resolution, coloring, and contrast. : [SCENE B-STR] File suitable for broadening the contrast of dark areas (such as shooting sunsets). : [SCENE CINE V] File suitable for shooting movie-like scenes where contrast is emphasized. (Even when the scene file is changed, the recording format is unchanged. It must be set with the [REC FORMAT] item on the [RECORDING SETUP] screen. See page 89.) : [SCENE CINE D] File suitable for shooting movie-like scenes where dynamic range is emphasized. (Even when the scene file is changed, the recording format is unchanged. It must be set with the [REC FORMAT] item on the [RECORDING SETUP] screen. See page 89.) Changing scene file settings The setting value of a scene file can be changed. Also, changed scene files can be stored at each position of the dial ( to ). Example: Change the name of the scene file 1 Turn the POWER/MODE switch of the camera . (Page 30 of Vol.1) 2 Turn the dial to select a scene file to change. 3 Select the setup menu [SCENE FILE] screen. ••Menu operation (Page 31 of Vol.1) ••Operations can be performed with buttons on the remote control that correspond to those on the camera. For details, see "Remote control" (Page 24 of Vol.1). 4 Tilt the OPERATION lever in the < >< > directions to select the [NAME EDIT] item. 5 Push the OPERATION lever (or tilt in the < > direction) and tilt in the < > direction to select [YES], then push the OPERATION lever again. 44
-
 1
1 -
2
-
3
-
4
-
5
-
6
-
7
-
8
-
9
-
10
-
11
-
12
-
13
-
14
-
15
-
16
-
17
-
18
-
19
-
20
-
21
-
22
-
23
-
24
-
25
-
26
-
27
-
28
-
29
-
30
-
31
-
32
-
33
-
34
-
35
-
36
-
37
-
38
-
 39
39 -
 40
40 -
 41
41 -
 42
42 -
 43
43 -
 44
44 -
 45
45 -
 46
46 -
 47
47 -
 48
48 -
 49
49 -
50
-
51
-
52
-
53
-
54
-
55
-
56
-
57
-
58
-
59
-
60
-
61
-
62
-
63
-
64
-
65
-
66
-
67
-
68
-
69
-
70
-
71
-
72
-
73
-
74
-
75
-
76
-
77
-
78
-
79
-
80
-
81
-
82
-
83
-
84
-
85
-
86
-
87
-
88
-
89
-
90
-
91
-
92
-
93
-
94
-
95
-
96
-
97
-
98
-
99
-
100
-
101
-
102
-
103
-
104
-
105
-
106
-
107
-
108
-
109
-
110
 |
 |